Quantcast
Channel: DrivingLine: RSS Feed
Viewing all 5096 articles
Browse latest View live

Top Swaps: Popular Japanese Engine Swap Basics

$
0
0

You won’t find an easier, more reliable way toward a better power-to-weight ratio than with an engine swap. This is exactly why shoehorning bigger, more powerful engines into smaller cars has been going on almost as long as bigger, more powerful engines and smaller cars have existed. For the Japanese car lover, the whole practice isn’t quite as matured but has been around long enough to solidify the definitive short list of the best donor engines you could ask for. 

Honda B-Series VTEC
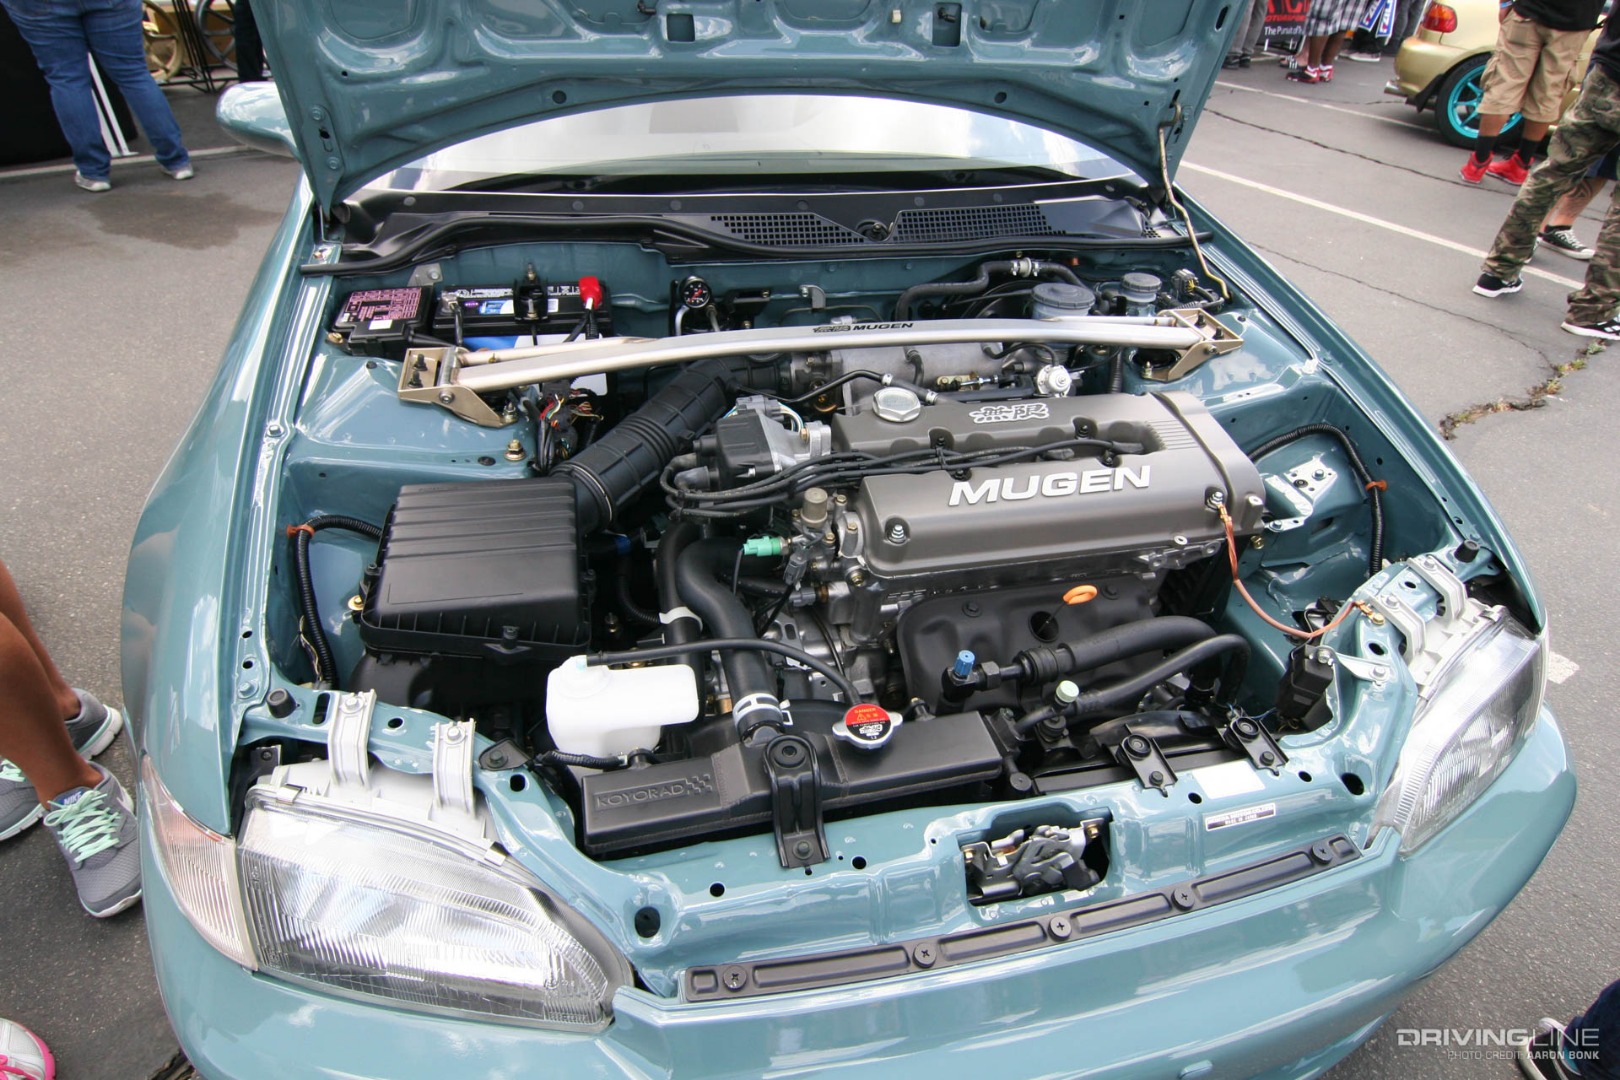
Honda B-series VTEC 

THE PROSHonda’s B-series—particularly its VTEC models—remains one of the most swapped engines of all time. That’s because few engines have the sort of aftermarket support and potential that the B-series does. Even some 17 years after Honda’s stopped making them, it remains the engine of choice for some of the most powerful Hondas in history, capable of well over 1,000hp.
THE CONSYours won’t make 1,000hp. Getting past the 400hp mark is easy enough, but it’ll cost you. The cylinders, rotating assembly, fuel system, engine management and drivetrain all need to be rethought if you care about any of it holding together.
WHERE TO GET YOURSIn the U.S., B16A2 and B16A3 engines were offered in the 1999-2000 Civic Si and 1994-1997 del Sol VTEC, respectively. Only the 1992-1993 Integra GS-R featured the B17A1. The B18C1 can be found in any 1994-2001 Integra GS-R, and its more powerful relative, the B18C5, was available in all 1997-2001 (excluding 1999) Integra Type Rs. B16A engines are native to most 1987-2000 Japanese-spec Si, Si-II, SiR and SiR-II-badged Civic and CRX chassis. Similar 1.6L engines can be found in Japanese-only 1989-1993 Integra RSi and XSi models. Only the Japanese market 1997-2001 Civic came with the unique B16B engine. Japanese-only B18C engines can be found in 1993-2001 Integra Si VTEC, SiR-G and Type R chassis, however, the Type R’s engine is a different, more powerful version.
WHAT TO PUT IT INYou can use any 1984-2000 Civic, CRX or del Sol, or any 1986-2001 Integra.
THE NUMBERSThere are four different B-series VTEC engines you should know about: the 1.6L version, the 1.6L B16B anomaly that’s hiding inside of a taller-deck block, the B17A1 that’s nearly identical to the B16A except for its longer stroke, and the 1.8L. Horsepower varies a lot, with early B16A models measuring in at only 160hp and some of the final JDM-spec, 1.8L Type R versions reaching almost 200hp. Don’t be a bonehead when cross-pollenating, though; dropping a 160hp B16A into an ITR will never be your finest moment.
THE DOLLARSA swap with everything you need, like the engine, transmission, ECU and aftermarket engine mounts and axles can set you back as little as $1,500 for an early model B16A or as much as $7,000 for something more powerful, like the CTR’s B16B.

Honda K-Series

Honda K-series

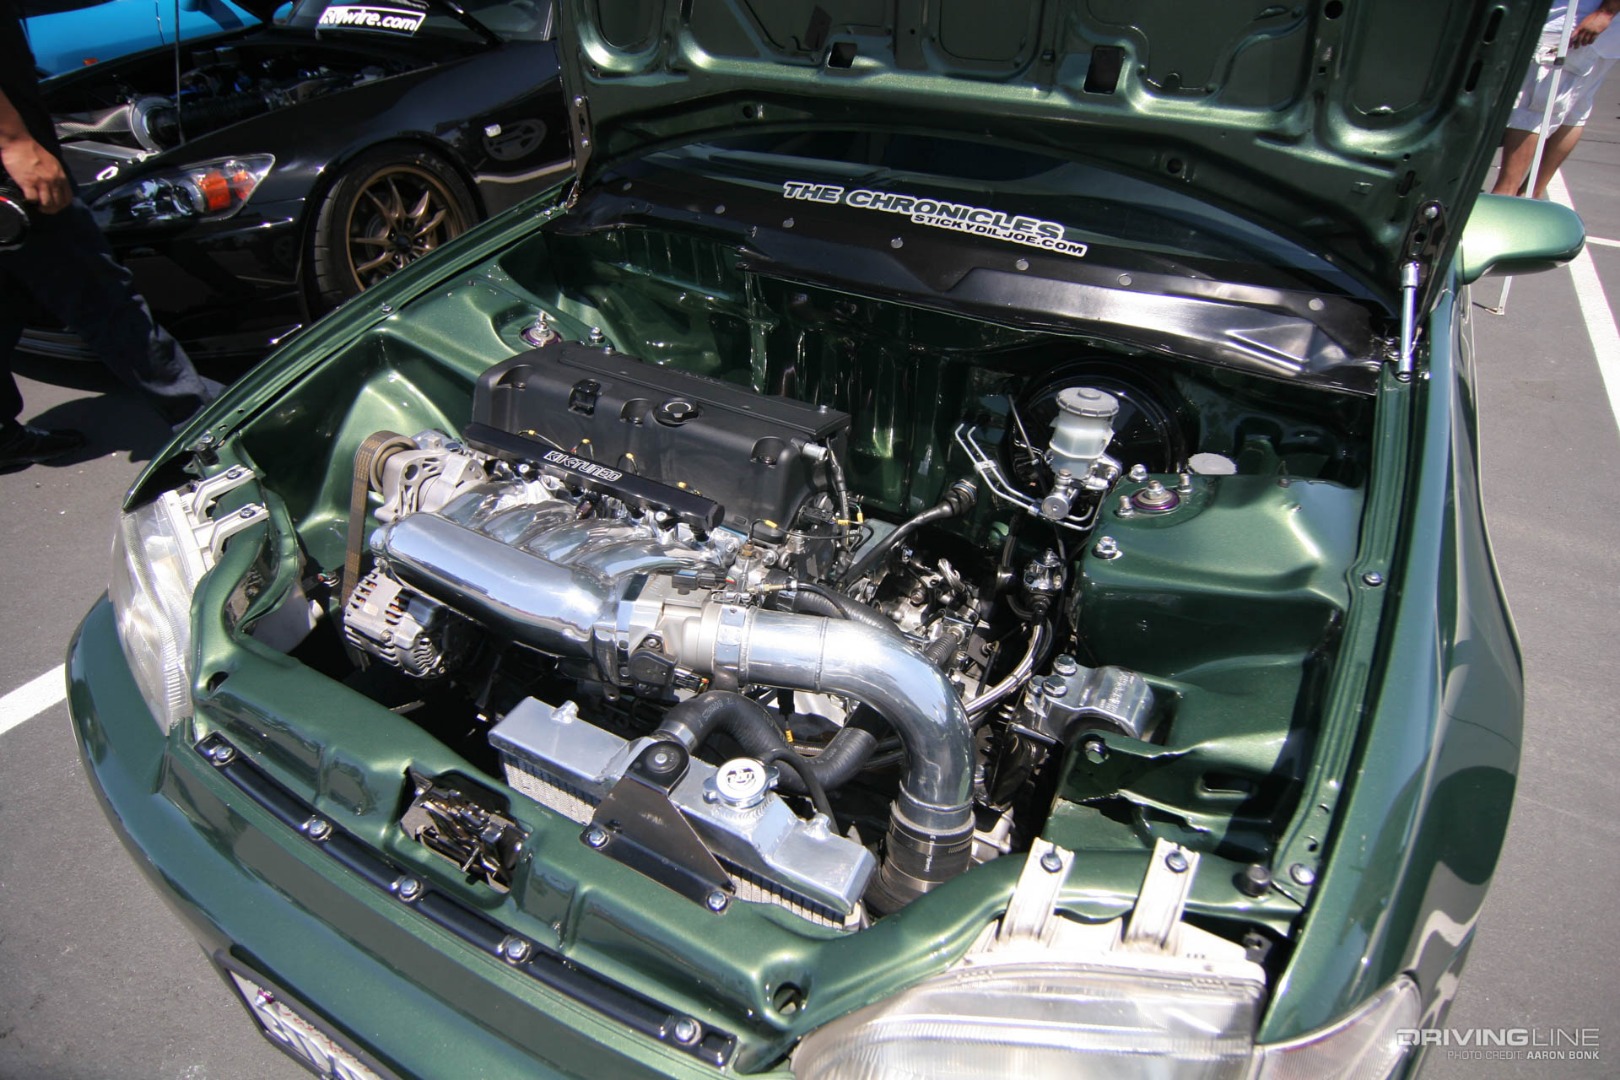
THE PROSIn terms of factory horsepower, there’s no other four-cylinder Honda engine swap that’ll compare. Only the B-series rivals the K-series in terms of aftermarket support, but we’ll probably be eating those words in just a few years.
THE CONSHorsepower isn’t cheap. Because of the engines’ orientation and shifter layout, all sorts of aftermarket components are required to complete any K-series swap. The engines and transmissions themselves aren’t inexpensive either.
WHERE TO GET YOURSYou first saw the K20A2 in the North American-spec 2002-2004 RSX Type-S and then later as the K20Z1 for 2005-2006 models. The similar K20Z3 can be sourced from any 2006-2011 Civic Si. In Japan, the K20A came in dozens of vehicles, however, look for more powerful versions exclusive to 2001-2011 Civic Type R, Type R Euro, Integra Type R and Accord Euro R models. Back in the U.S., the 2004-2008 TSX came with the larger-displacement K24A2, with Japanese variants available in 2004-2008 Accord 24S, 24T, 24TL and Type S chassis.
WHAT TO PUT IT INAny 1988-2005 Civic, CRX or del Sol, or any 1990-2001 Integra works well. Or go buck wild and stick one in a 1990-1997 Accord, a 1992-1996 Prelude or any CR-Z or Fit.
THE NUMBERSAvailable in 2.0L and 2.4L configurations (2.3L turbocharged RDX engines are entirely different and won’t fit), Honda’s K-series is its most sophisticated four-cylinder to date. The ones you care about come with variable valve lift at all 16 valves and electronically controlled camshaft phasing on the intake side. Power starts at 197hp on cheaper 2.0L engines and is rated as high as 222hp on select, naturally aspirated Type R versions.
THE DOLLARSK-series engines, like any of these that have VTEC on both camshafts, are expensive. They are, however, the most powerful. Pricing starts around $6,000 for a complete K20A2 swap and can jump past the $10,000 mark once you start uttering anything “Type R.” 

Honda F-Series (DOHC)

Honda F-series

THE PROSIt remains Honda’s most powerful, naturally aspirated four-cylinder engine to date and for years boasted a specific output rivaled only by the Ferrari 458 Italia and Porsche 911 GT3 RS 4.0.
THE CONSYou can barely afford it, and converting a non-Honda chassis to work with it requires custom engine mounts, a revised engine management system and all sorts of complicated wiring.
WHERE TO GET YOURSLook to the 1999-2005 Japanese-spec S2000 for the smaller-displacement F20C and late-2005-2009 models for the bigger F22C. In North America, the F20C1 was available from 2000-2003 until it was replaced with the F22C1 for model years 2004-2009. Special JDM-only Type V and U.S.-only CR models were sold with the same 2.0L and 2.2L engines, depending on their year.
WHAT TO PUT IT INAlthough not a direct, bolt-in transplant, the F-series regularly makes its way into Miata chassis as well as classic RWD Toyota platforms like older Corollas, Starlets and Celicas. The F-series also serves as the basis for at least a few RWD-converted Hondas like the 1992-2000 Civic or 1994-2001 Integra.
THE NUMBERSHonda’s DOHC F-series is the unofficial K-series predecessor. Honda implemented things like a timing chain-driven valvetrain, roller rocker cam followers, a clockwise-rotating assembly and one of the best-performing cylinder heads of any mass-produced, four-cylinder production engine. Both 2.0L and 2.4L engines make 240hp—the larger of the two laying down a whopping 162 lb-ft of torque.
THE DOLLARSS2000 production numbers pale in comparison to B-series or K-series chassis. As such, an F-series powertrain will cost you dearly. Depending on the chassis and the number of aftermarket components needed to complete the conversion, plan on spending upward of $6,000 and in most cases more since custom mounts, brackets and fab work will almost always be required.

Honda J-Series

Honda J-series

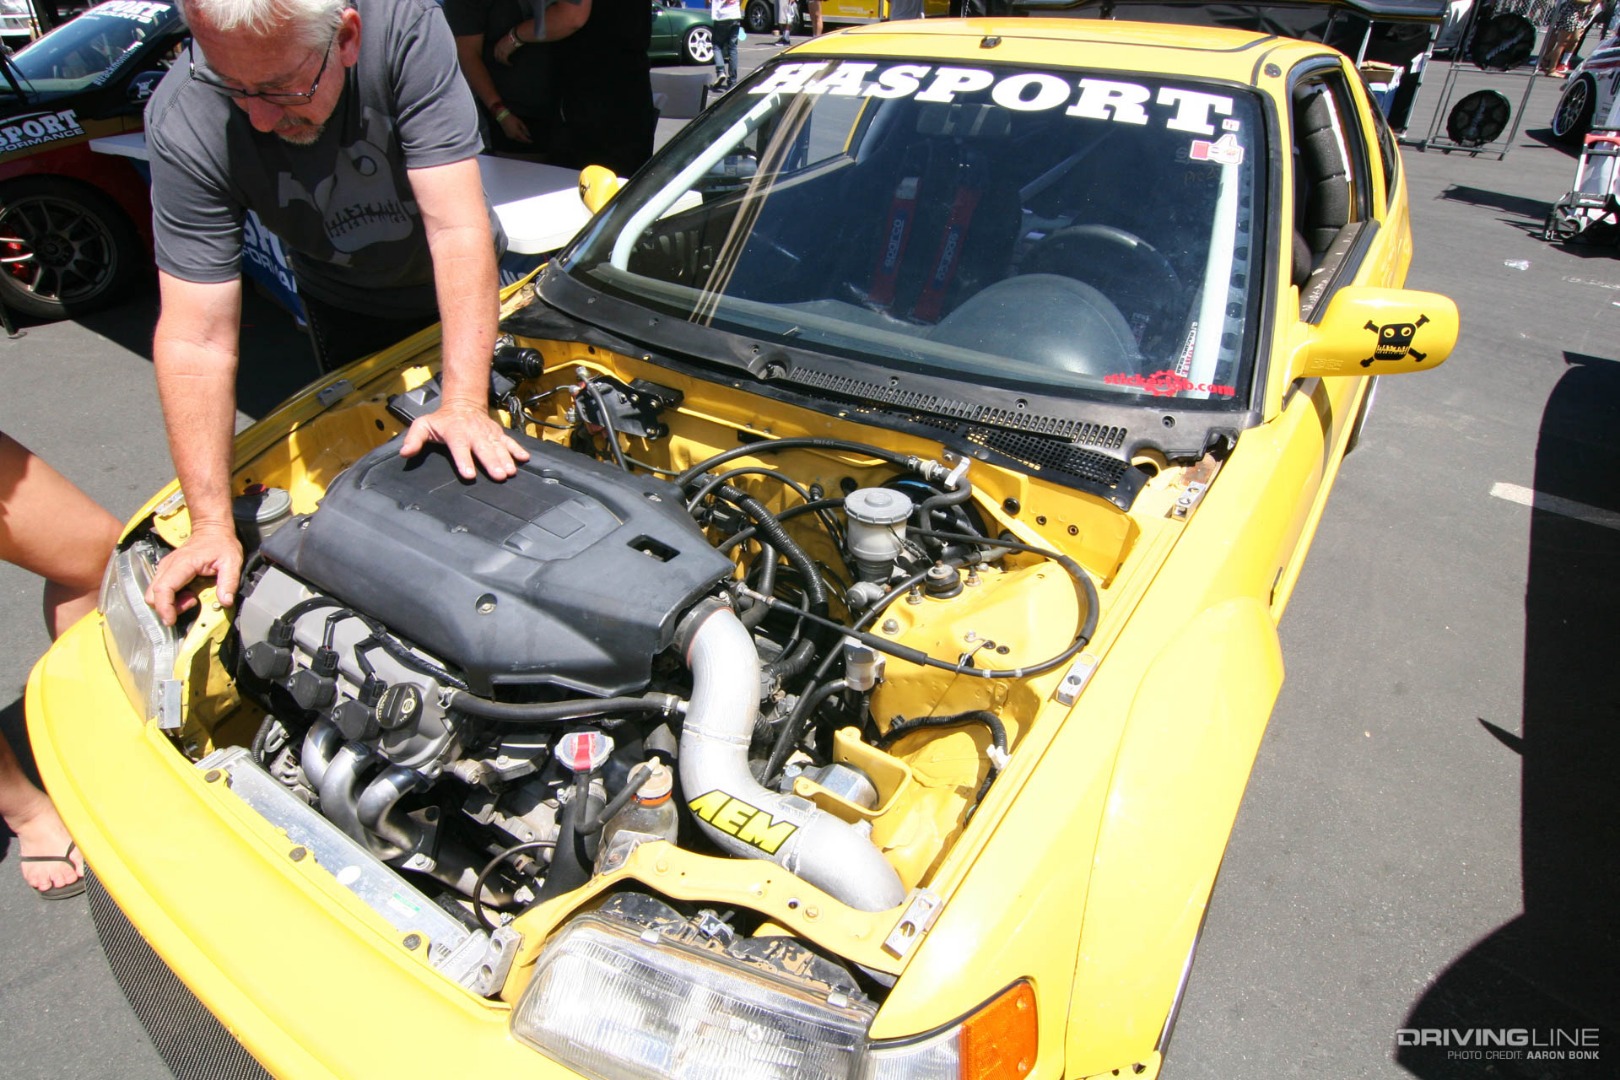
THE PROSAs far as horsepower per dollar goes, there is no better bargain than Honda’s 60-degree V6 engine family. You won’t find 240hp for such little money anyplace else.
THE CONSCompared to other Honda engines, you’ll have a harder time finding upgrades for it, and at 550 lbs, it’s just about the heaviest thing you could stick in that bay of yours.
WHERE TO GET YOURSHonda introduced its J-series platform for the 1997 model year, and it’s since been offered in all sorts of configurations and displacements. Nab one from any of these: Odyssey, Ridgeline, Pilot and Accord, as well as the CL, TL, RL, TSX, TLX, RLX, RDX, MDX and ZDX. J-series engines were sold in such abundance here in the U.S. that sourcing a Japanese-version will hardly be necessary. Keep your swap simple by looking to the more powerful coil-on-plug engines, and avoid those with drive-by-wire throttle bodies.
WHAT TO PUT IT INAny 1988-2000 Civic, CRX or del Sol, as well as any 1994-2001 Integra, works well. Breathe new life back into any 1990-1997 Accord with one, too.
THE NUMBERSHonda’s single-cam, 60-degree J-series is the successor to its larger 90-degree V6 platform of years past. Power varies quite a bit between platforms—as low as 240hp and as much as 310hp—with a combination of either VTEC or i-VTEC available for every one.
THE DOLLLARSIt's about $4,000 for an entry-level Odyssey minivan engine, the right transmission and whatever engine mounts and electrical mods you’ll need. Newer and more powerful engines mean more money.

Toyota JZ

Toyota JZ

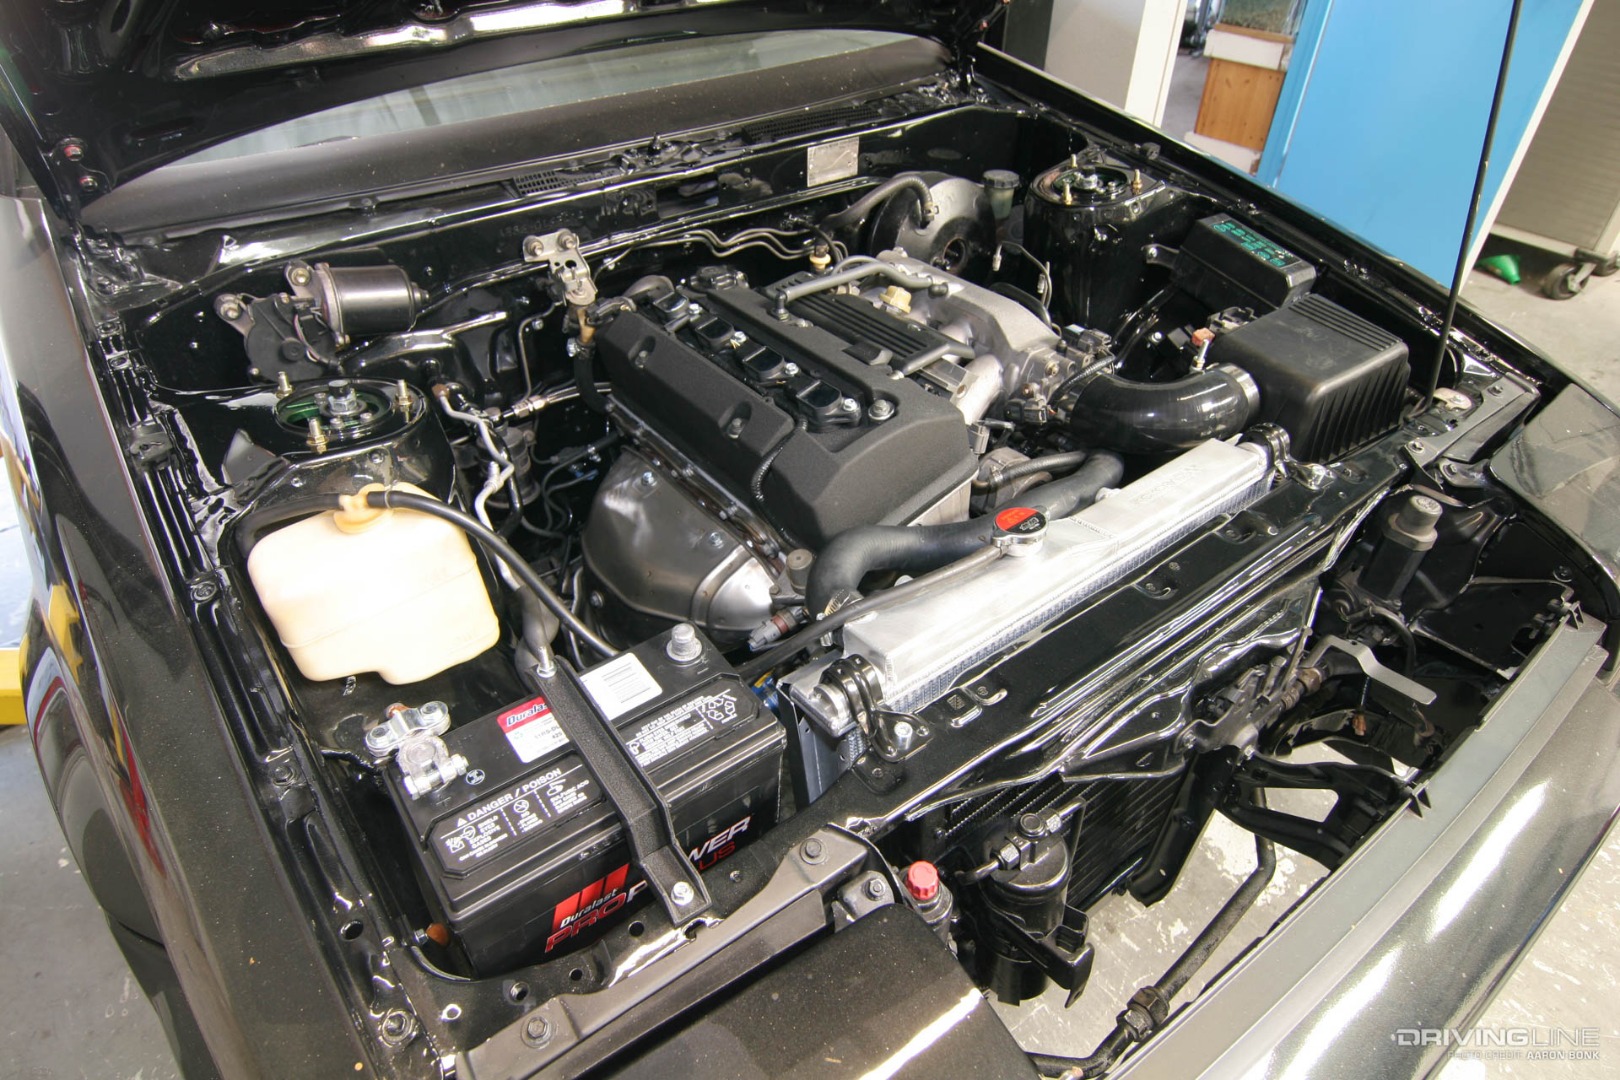
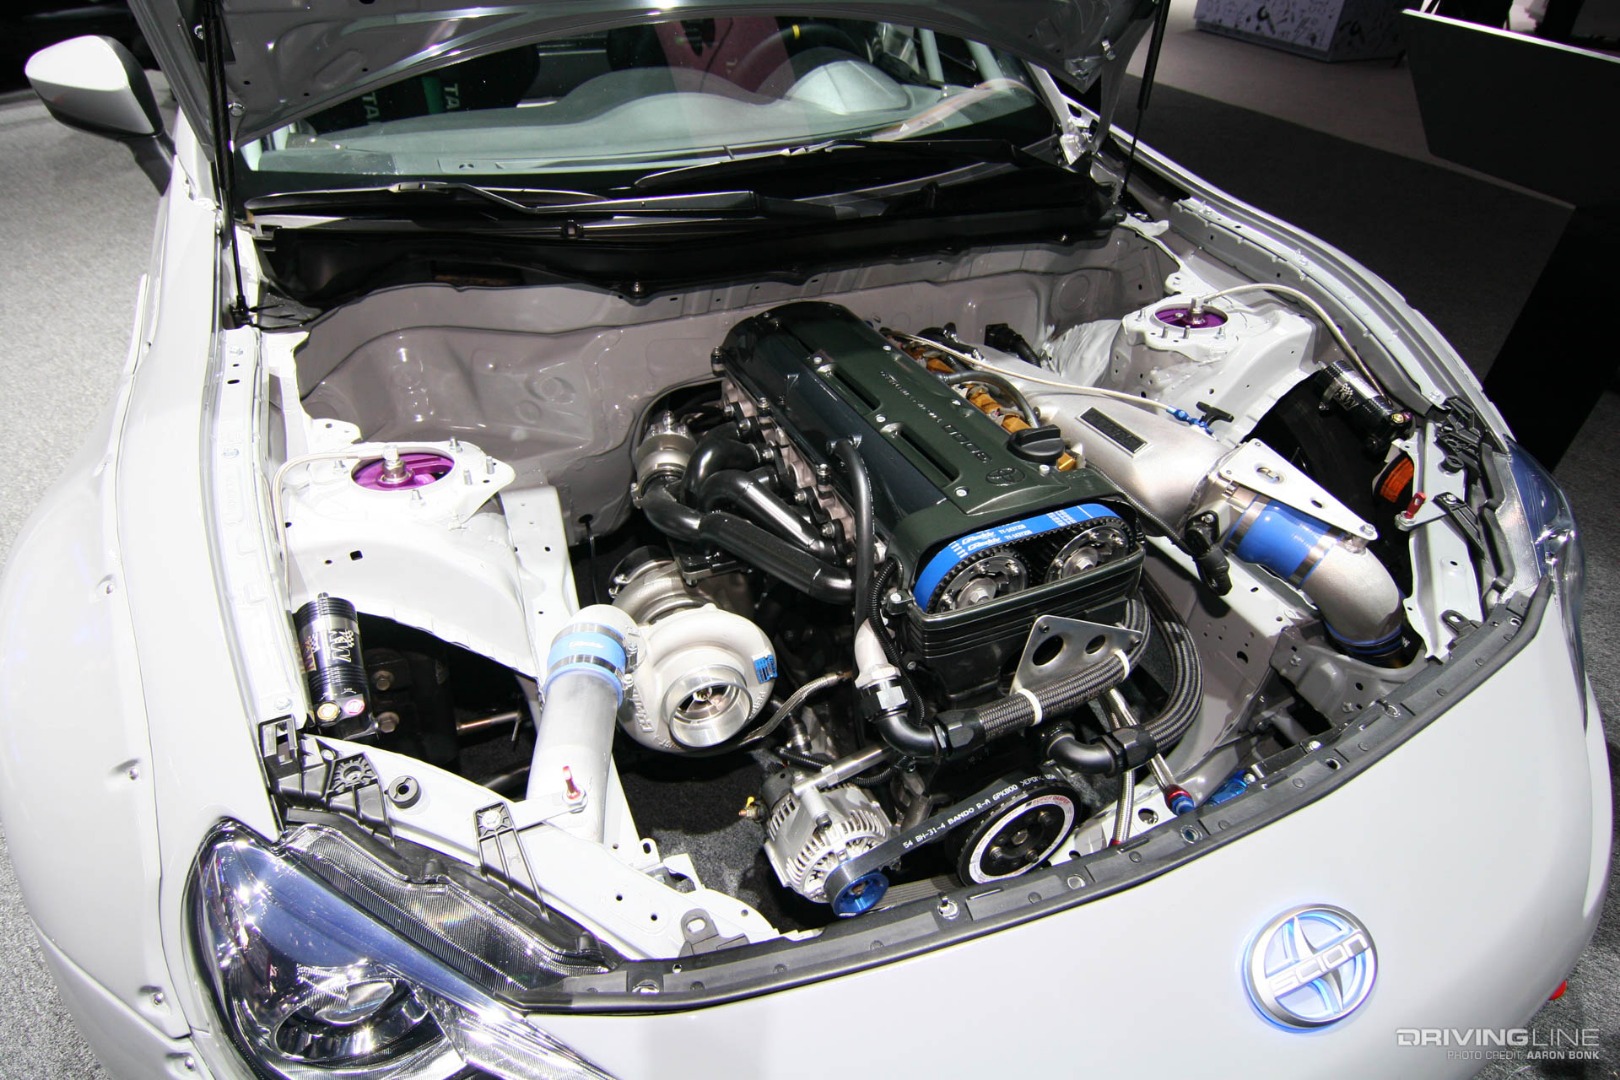
THE PROSWith the exception of Nissan’s RB, Japan’s never produced a stronger, more capable engine.
THE CONSDoing it. Getting any kind of 1JZ or 2JZ into any non-native Toyota chassis can be a demanding job, even for the most seasoned of fabricators and wiring pros.
WHERE TO GET YOURSThere are all sorts of Toyota JZ engines, but the only ones you care about are the factory turbocharged ones. Most obvious is the twin-turbocharged 2JZ-GTE, which can be nabbed from the North-American-spec 1993-1998 Supra Turbo or its 1993-2002 Japanese counterpart. Also native to Japan, select models of Toyota’s first- and second-generation Aristo came with the same twin-turbocharged inline-six. Third-generation 1JZ-GTE engines are similar enough and are most commonly sourced from Japanese-only Toyota sedans, the most common of which is the 1996-2000 Chaser you barely knew existed.
WHAT TO PUT IT INDrop either into any of the following Lexus chassis: 1992-2000 SC 300, 1993-2006 GS 300 or 2001-2005 IS 300. It also fits into any Mark II or Mark III Supra as well as any 1985-1992 Cressida. More complex swaps include those into non-native chassis, like the third-generation RX-7, S2000 or 240SX, to name a few.
THE NUMBERSToyota’s 2JZ-GTE is their most respected engine ever. The 3.0L engine’s cast-iron block is virtually indestructible, allowing its twin-turbocharged power figures to be increased significantly with little strengthening needed. North American versions lay down 320hp and 315 lb-ft of torque—conservative figures if there ever were ones considering the engine’s capabilities. Later versions, including the de-stroked and single-turbocharged 2.5L 1JZ-GTE also benefit from Toyota’s variable valve timing: VVT-i.
THE DOLLARSBudget at least $7,500 for a good-running 3.0L engine, both turbos and the factory-issued GETRAG gearbox. If you’ve got another transmission in mind, lop about $4,000 off that figure. 1JZ-GTE engines are marginally cheaper, regularly selling for around $1,500. Account for another $2,000 worth of electronics and mounts when swapping into any non-Toyota chassis.

Nissan SR20DET

Nissan SR20DET

THE PROSThe SR20DET's compatibility in both transverse and longitudinal form increases the number of chassis it’ll work on. A proven platform, eclipsing the 300hp mark requires little effort.
THE CONSNissan’s SR20DET has been out of production for well over a decade, which means low-mileage specimens might be impossible to come by. Swapping one into any non-native chassis can also be a daunting thing to do.
WHERE TO GET YOURSThe factory-turbocharged SR engine your friends say you ought to care about—the SR20DET—comes all sorts of ways, all of which can be distinguished by turbocharger type and valve cover color, and are native to both FWD and RWD layouts. Red valve cover: 1991-1993 Silvia K’s, 180SX and Bluebird SSS ATTESA LTD; 1990-1994 Pulsar GTi-R and Sunny GTi-R (Euro). Black valve cover: 1994-1999 Silvia K’s, 1999-2002 Silvia Spec-R, 1994-1997 180SX Type R and Type X, 1994-1995 Bluebird SSS ATTESA LTD, and 1993-1999 200SX (Euro). Silver valve cover: 1995-2001 Avenir Salut GT Turbo and GT4, and 1997-2001 R’nessa GT Turbo.
WHAT TO PUT IT INGo easy on yourself and consider any 1989-1998 240SX. Or give yourself a hard time and retrofit one into just about any Miata, RX-7 or classic Toyota or Datsun.
THE NUMBERSUsed in both FWD and RWD applications, Nissan’s 2.0L SR20DET features an 86mm, square architecture turbocharger, either a T25 or T28, depending on the year. Variable cam timing, six-speed transmissions and individual throttle bodies are all features that can be found on various versions, with power nearing the 245hp mark on later engines.
THE DOLLARSSet aside roughly $2,000 for a complete swap. For non-native chassis, set aside even more for engine mounts and electronics.

Nissan RB26DETT

Nissan RB26DETT

THE PROSIt’s the last word on Japanese supercar engines.
THE CONSThe Pep Boys parts counter guy won’t be able to help you with this one. That and the RB26DETT remains one of the most expensive Japanese engines to modify.
WHERE TO GET YOURSNissan’s RB series of engines goes back to the mid-1980s, but it’s the newer engines that suit most swaps. By new we mean the R32, R33 and R34 Skyline GT-R and the almighty RB26DETT.
WHAT TO PUT IT INBecause of the GT-R’s Japanese exclusivity, it makes for a drop-in swap into almost no chassis. Still, popular candidates include the full lineup of Datsun’s Z cars as well as Nissan’s 300ZX and 240SX. Don’t expect to use the GT-R’s AWD gearbox, though.
THE NUMBERSIt has six inline cylinders, individual throttle bodies, two turbos, dual-overhead cams and a severely detuned maximum output of about 280hp. The 2.6L engine’s turbos are arranged uniquely, dedicating each to their own triad of cylinders. Like Toyota’s 2JZ-GTE, the RB26DETT’s cast-iron block lends itself well to increased power, allowing upwards of 600hp to be made with only minimal modifications.
THE DOLLARSThe long-block will set you back about $3,000, but that isn’t the end of it. You’ll also need the RWD transmission normally paired to RB25DET-equipped Skylines. Set aside another $1,000 for this and another grand for any supporting swap components.

If you want to see how one would go about doing an engine swap, check out our breakdown on putting an F-series and K-series engine in a Toyota AE86!


Project Restomod GTO: Breathing New Life Into a Classic Muscle Car

$
0
0

The year was 1994. I was 10 years old and already obsessed with cars, thanks in large part to my dad who had been exposing me to the automotive hobby since birth. That summer my dad bought a 1970 Pontiac GTO from a man in Fresno, California, and in the years that followed, that Pontiac would give me a new-found appreciation of the American muscle car.

Pontiac GTO Headlight

Priced at $4000, this GTO was far from a show car, nor was it a numbers matching survivor. Its original 400ci engine had been replaced by a larger '71 455ci Pontiac V8 that had been bored .30 over to 468 cubes. It had been repainted silver and wore a set of huge for the time 16-inch HRE wheels.

Pontiac GTO Interior Driving

It was a driver through and through, and I can’t remember ever being more excited about a car my dad had bought. The lopey idle made by camshaft was music to the ears, and at the time it was one of  the fastest cars I’d ever ridden in. In the following years, some of my best memories were riding around in the backseat of that GTO on road trips to car shows and car club rallies, just waiting until I was old enough to drive it myself.

Pontiac GTO Radio

Changing Hands

The path to that wasn’t quite so straightforward. With the costs of raising two boys and other expenses, my dad sold the car a couple years later to a guy named Mike who would go on to become a good friend—so the GTO was never far away.

Pontiac GTO Side Street

A few years later he made a deal to buy the car back, and my mom actually even used it as her daily to driver for a short period before the heat of the Central California summers and poor gas mileage made my parents rethink that plan.

Pontiac GTO Interior

The car exchanged ownership between the two of them once more before my dad reacquired the car for good in the early 2000s. By this point I was of driving age and couldn’t wait until the day he’d let me borrow the car to take to high school.

Pontiac GTO Shifter

Upgrading To a Judge

Since then the car has gone through a few changes, including a color change to Orbit Orange, complete with “Judge” decals and stripes (the car is a real GTO but not a Judge). At one point it also had a modern sound system installed in the center console, while the original radio remains in the dash.

Pontiac GTO Radio 2

Most recently my dad had the interior upholstery redone to factory style, replacing aftermarket seat upholstery that was done sometime in the early ‘90s. Mechanically though, not a whole lot has changed over the years.

Pontiac GTO Hood

The car still runs well, but it’s Qudrajet carb can be finicky. It had AC from the factory, but I don't think it's ever worked in the time I've known the car—not ideal for those Summer days in Central California. When it comes to the suspension and brakes, it's all 1970s equipment underneath.

Pontiac GTO Engine

Starting the Restomod

With all this in mind, I convinced my dad to let me take on the GTO as a platform for some upgrades in the coming months as we breathe some new life into this classic muscle car that’s been in the family for years.

Pontiac GTO Front

In a lot of ways the GTO is the perfect candidate for some restomod-style upgrades. While it’s a nice driver that gets a lot of looks at car shows and cruise nights, it’s far from an immaculate show car nor is it a numbers-matching survivor that you’d be scared to alter.

Pontiac GTO Rear

The plan isn’t to transform the car into something dramatically different. It’s not going to become race car or pro touring show stopper—just a fun driver that retains its classic muscle car character but with some tasteful and functional upgrades that take advantage of a large aftermarket for GM A-Bodies.

Pontiac GTO Hood Driving

There are no plans to remove the torquey Pontiac V8 that sits under the hood, but there’s plenty of room left for performance and reliability upgrades. The factory spec suspension and brakes could use some improvements. We’ve also talked about doing some larger wheels and tires that will improve performance without ruining the look.

Pontiac GTO Rear Garage

My dad has no plans to sell the car, and the plan is to keep it in the family forever. In fact it seems my 1-year-old son has already taken an interest in grandpa’s big orange GTO, and I can already tell he’s going to enjoy the car a lot as he gets older.

Pontiac GTO Baby Driving

In the meantime, stay tuned in the coming months for more on our journey to restomod this colorful machine from the peak of the muscle car era.

Like the article? Subscribe to our newsletter to have more sent straight to your inbox!

#Shot4DL: DIRT From Issue 15

$
0
0

One of the most enjoyable things for us to see is the passion that you, our readers, have for cars and car culture. Since so many of you take so many amazing pictures of your automotive adventures, why not feature them? That's just what we're doing. In the upcoming issue of the magazine, we're featuring images that you submitted using the hashtag #Shot4DL

When we sent out the initial call for submissions, we weren't sure what we would get, but we were blown away with what you gave us. Your incredible photography spanned the gamut from the track to the trails, showcasing your favorite niches of the world we inhabit together.

Below, in no particular order, we're featuring our favorite dirt and off-road images that will be in the issue. If you want to be in a future issue, don'f forget to use #Shot4DL, and if you're at LS Fest this year, come by to pick up the latest issue of Driving Line!

@rockitwest

#Shot4DL Dirt Campbell

@imagine.media

#Shot4DL Dirt Wing

@crawler_girl

#Shot4DL Dirt Wagoneer

@imagine.media

#Shot4DL Dirt Pontiac

@lostsubie

#Shot4DL Dirt Subaru

@rockitwest

#Shot4DL Dirt Petersen

@rally_fighter

#Shot4DL Dirt Jump

@rockitwest

#Shot4DL Dirt Vaughn Gittin Jr

@sharkbytephotography

#Shot4DL Dirt Wheelie

Like the article? Subscribe to our newsletter and digital magazine!


#Shot4DL: STREET From Issue 15

$
0
0

Your amazing photos that we received weren't just about getting your car dirty. Many of them showed cars getting sideways, burning out and owning the street. As with the dirt, picking the best street images was a challenge. Your passion for cars and car culture shined through in the obvious effort and care you put into your photography. 

After careful deliberation, we decided on these images, which have been placed in no particular order, and featured them in the upcoming issue of the magazine. We hope you enjoy them as much as we did.

Don't forget. If you want to be featured in a future issue, use the hashtag #Shot4DL. We'd love to see your work! Also, if you're coming out to LS Fest this year, stop by and pick up a copy to see these amazing images in print.

@imagine.media

#Shot4DL BMW Salt

@spencerwilliamhall

#Shot4DL Red Drift

@alexthesprague

#Shot4DL Corvette

@lxiiphotography

#Shot4DL Drift Black and White

@spencerwilliamhall

#Shot4DL Yellow Sparks

@instagranndpa

#Shot4DL Burnout Orange

@imagine.media

#Shot4DL Mad Mike

@dxngvrous

#Shot4DL BMW Engine

@dr1pdr0pcustoms

#Shot4DL Supra Burnout

@livscaffidi

#Shot4DL Mountains

@alvinmiles.jp

#Shot4DL Supra Rear

@instagranndpa

#Shot4DL Drift Water

@dxngvrous

#Shot4DL Drift BMW Red

@alvinmiles.jp

#Shot4DL Six Cars

@t_wrx_2013

#Shot4DL Hod Rod

@mykalfakerich

#Shot4DL Ferrari

@aspiringcarguy

#Shot4DL Track

@alvinmiles.jp

#Shot4DL Mitsubishi

@jwcarphotos

#Shot4DL Lamborghini

@tusky_the_fox

#Shot4DL Grey

@alvinmiles.jp

#Shot4DL Blue Track

Like the article? Subscribe to our newsletter and digital magazine!

Master Class: 5 Classic Truck Building Tips From Randall Robertson

$
0
0

You may have seen Randall Robertson and Rtech Fabrications' work in our Ride of the Week a while back. The Duke is one of the most impressive rides we've featured, and the process of creating it is even more impressive, if that's possible. We sat down with him to find out more about his process, and any advice he has for people trying to build trucks themselves. Here is what he said...

1. Passion or Fashion

First, it's important to understand why you want to build, or have someone build, a custom classic truck. One of the first things that I ask our clients is, what are you planning on doing with the truck? This is where passion or fashion comes into play. Most guys just want to have a trick truck that their friends will think is cool. They may show it a few times, but by and large it ends up being a really cool truck that is driven on the weekends for a while, and then eventually sits way more than it's driven.

The kind of people we build trucks for are more the passionate enthusiasts. They want to have their cake and eat it, too. What I mean by this is that they want a truck that is not only a classic, but also purpose-built. Our motto here at Rtech Fabrications has always been, "We build trucks to do truck things." The majority of the guys who order trucks from us want to be able to use it as a truck but with classic lines and character that have stood the test of time. Very few of the trucks we build leave our shop without a gooseneck hitch. Either way, you need to be fully aware of the high cost of a quality build.

Rtech Fab Team

2. Just Walk on By

After you have decided what your truck will be used for, it’s time to choose a truck. If you don't already have a truck to start with, you will need to find one to purchase for this build.

I have seen so many people go into this with so much excitement for what's about to become their lifelong dream come true that they don't look at the finer details of what they're starting with. In most of the trucks we deal with, rust is the biggest issue. For some people rust can be a real buzzkill. I know that when I'm choosing a vehicle for a client, I'm not necessarily looking for a rust-free truck, but more of a feasible rust repair. There definitely are easy rust repair jobs, but there are also some that I consider catastrophic, costing up to $20,000. In my opinion that's not feasible, but I have seen people spend that kind of money chasing their dream.

Usually the kind of rust I find acceptable would be as follows: rocker rust, inner rocker rust, cab supports or minor floor repairs. Where it starts getting really expensive is when you have rust over the windshield or on the firewall. Places of main structural integrity tend to be the most expensive repairs.

I've seen some trucks appear pretty decent, but once you start looking really close you can see there's some bodywork that has been done. If I see bodywork done in places that are usually rusted, it throws up a huge red flag. I would rather see how bad the rest is than wonder how bad it is under the bondo. In most cases, I'll walk on by a truck that is hiding problems.

Rtech Fab The Duke

Another big problem that I see is bad body fitment. This can be a factory issue, or at some point in the past, the truck might have been wrecked. It is definitely worth looking deeper than just the surface. I have seen people have to abandon a project because it was not feasible in the long run to make these repairs. Unless you're planning on putting a bunch of aftermarket parts on your American classic, you really want to buy a truck that's in pretty decent shape to begin with.

I also look for trucks that don't have a motor or transmission. Usually when an old truck like this loses a motor or transmission, people don't want to put the money back into it. That's when I'm going to get my best deal. Most trucks we build get a different motor and transmission, anyway. I've bought some very nice trucks this way.

3. Hey! Not So Fast

You've finally secured the truck you are going to transform into your dream truck. It's important to not start tearing it apart. Disassemble the truck in a way that you can take inventory of what you will have to replace or repair. In most cases, we spend at least two days completely disassembling a client’s vehicle. Needless to say, the clients do not understand why it takes so long and is so expensive.

We start by having boxes ready for storage and organizing. It will serve you well to buy a couple boxes of one-gallon Ziplock freezer bags and a couple Sharpie pens. I like to take things apart slowly and have a good understanding as to what kind of shape the vehicle is in.

It might seem kind of strange, but this is a part that I really enjoy. I like to try to imagine what kind of life this truck has had, and what kind of people owned it. It's amazing the stories that these trucks can tell just by taking them apart. I like to journal what I see and some of my concerns along the way. It helps to keep your build in order. Keeping track of all your parts will save you time in the long run. In our case, time is money. When we start removing body panels, such as fenders, doors and hoods, we try to estimate what each panel is going to require for repairs. This way, we have an idea of how much it's going to cost. This is about the time that we here, at Rtech Fabrications, start to take the road less traveled.

Rtech Fab Dino

Not only do we restore these trucks, but we modify them into four-door crew cabs. I’d say 99 percent of the builds we do here are crew cab conversions. These conversions, in most cases, more than double the cost of the build. If this is the road that you're going down, be prepared. Instead of two doors, you have four doors. Instead of one bench seat, you have two. Instead of a standard frame, you must stretch the frame. None of this comes easily. If this is the kind of build that you are going to do or have done, it is important to understand that structural integrity is the absolute cornerstone of a successful crew cab build. A lot of people fall short because they are trying to make a cool looking truck and completely miss the structural aspect.

4. OMG! It's Going To Cost How Much To Paint This Thing?

For those of you that have not had a custom paint job done before, there is nothing cheap about it. To begin with, this process starts back a ways. Yes, all the way back to when you were doing the rust repair. Proper metal work is really important to an excellent, long-lasting paint job. In most of the trucks we build, the average cost of a paint job (keep in mind this is for a crew cab) runs about $10,000 to almost $20,000, and believe me, it can go higher than that depending on what kind of paint job you want.

When you're building a classic truck it is still very important to do high-quality body work. Don't be surprised if you have to purchase five gallons of body filler. You will probably sand at least three if not four gallons back off. You're definitely going to sand off a lot of the primer as well. On average we spend approximately 80 to 100 hours blocking a truck. Body fillers, primers and paints are way more expensive than most people realize. Don’t forget about all of the sandpaper and other supporting materials to perform these tasks. This is an area that you need to go into with eyes wide open.

Rtech Fab Ponderosa

5. The Light at the End of the Tunnel

You're finally to the point where you're going to start re-assembling your classic truck. The only advice that I can really give you in this area is to take your time and use the highest quality parts that you can find.

Buyer beware. There are a lot of products on the market that are good for a little over a year before they start to fade or break down. Of course, that's assuming they didn't break during installation. It is so important for you to go out of your way to find the needle in the haystack. This is an area that builders do a lot of research in to ensure they will be able to satisfy their clients for many years to come. You can be sure that most high-end builders have made a lot of mistakes along the way to their success.

One of the things that really gets under my skin is when I use a product, and for reasons completely out of my control, it fails. To the client it will look like it was my fault. To a certain degree it may be that I did not do enough research, or it could be that the market does not supply decent parts. This is a struggle that all builders have to endure daily.

Want more expert insight? Check out the rest of our Master Classes!

From Showroom Stock To ZL1: A History of the Chevrolet Camaro 1LE

$
0
0

The Chevrolet Camaro has always had a strong racing history—and not just in a straight line. Although classic Camaros are more often celebrated for their drag strip cred than their ability to turn a corner, Chevrolet has also let its pony-fighter out to play on road courses, too, starting way back with the first-generation coupe in the Trans-Am series, as well as the International Race of Champions (where the second-gen model was the official car for the series). 

By the time the '80s rolled around, however, a combination of design decisions and EPA regulations had effectively neutered several key aspects of the third-generation F-Body's performance as compared to past iterations of the Camaro. Still, there were a number of things to get excited about, including a lighter design than ever before, the eventual availability of fuel injection and a modern five-speed manual transmission

All these factors helped make the 1982-and-up Camaro a fun street car, but they failed to allow it to hold its own against the more nimble Ford Mustang et al on the race track, as was quickly becoming apparent in SCCA competition. Specifically, the introduction of a Showroom Stock class towards the middle of the decade had attracted significant attention to the Camaro's shortcomings at IMSA, SCCA and Canadian Players Challenge events, not to mention the issues the car was having in Pro Solo.

Camaro 1LE Blue

Can't Stop, Won't Stop

In the Showroom Stock category, teams were only able to swap tires, wheels, shocks and struts, leaving absolutely everything else about the vehicle in factory spec for each full up-to-45-minute door-to-door racing session. Unfortunately for the third-gen Camaro, its brakes were hugely deficient in making the transition from street to track, and since upgrades were banned by the rulebook, the car was effectively non-competitive in its class.

Into this breach stepped a somewhat reluctant General Motors, egged on by Chevy racing teams tired of staring at the taillights of their rivals, instead of claiming podium finishes. Specifically, it was GM Canada that first responded to the pleas of Showroom Stock Camaro pilots desperate for some relief from the limits of their equipment (which makes sense given that the Canadian Players Challenge series had been the first to truly showcase the F-Body's deficiencies).

What started as a "quick fix" to the brake problem—swapping in a set of 12-inch front rotors from the full-size Caprice sedan—quickly lead to a series of cascading improvements to the Camaro's chassis. The engineer who tackled the brake issue, Phil Minch, quickly discovered that not only did the larger rotor require a different caliper (a two-piston aluminum unit snagged from the Corvette), but it also necessitated a change to the Camaro's spindle design. Once installed, testing revealed the need for a new brake proportioning valve to balance out the improved stopping power. At the same time, the quicker haul-downs upset the flow of fuel to the point that a baffled tank had to be installed, with a deeper pickup.

Anyone who's ever found themselves knee-deep in project car hell can easily relate to the rabbit hole that Chevrolet found itself tumbling down into, and by this point both Ray Canale (responsible for the Camaro's drivetrain) and Chuck Hughes (the car's chief engineer) had been looped into the effort, with Bowtie hot shoe John Heinricy also getting involved. Several last "while we've got it all apart anyway" changes were made as a direct result of what had once been a simple braking update: the installation of a more aggressive fifth gear ratio to help the Camaro pass on longer straights (a common complaint from racers who felt defeated by the weak acceleration from the standard overdrive gear), the deletion of power equipment and air conditioning from the coupe to slice a few extra pounds off of the car, an aluminum driveshaft and more aggressive tuning for the car's dampers.

Camaro 1LE White

The end result was the 1LE package, available not just to Showroom Stock racers but anyone out on the street serious enough about performance to forgo the convenience of full climate control and power windows, and savvy enough to understand the arcane lexicon of the GM order guide. Chevrolet didn't advertise the existence of the Camaro 1LE, and in the pre-Internet era you had to be in the know to dig deep enough to find the special RPO required to order the car. It was added automatically once buyers selected the G92 Performance Axle along either the LB9 305 or B2L 350 V8 engine, and then deleted air conditioning.

How secretive was this special edition Camaro? By the time it became available in 1988, less than 10 were built for the remainder of that model year, with 111 following in 1989. In total, fewer than 1,500 third-gen 1LEs left the factory. The handful of cars were recognizable by their deleted T-tops, missing front fog lamps and, of course, by their sweating owners unable to cool down the interior. 

All that perspiration was worth it, however, because it allowed Chevrolet to dominate Showroom Stock as well as take the Endurance Championship title in 1989, further boosting the car's profile and demonstrating that Chevy was once again serious about road course racing.

A Better Camaro, A Better 1LE 

When the Chevrolet Camaro was redesigned for 1993, the 1LE package came right along with it. Given that the new coupe had been radically restyled, and its mechanicals significantly bolstered for the fourth-generation, it's no surprise that what 1LE had to offer was also improved.

Camaro 1LE Black and Green

Now that all versions of the Camaro featured brakes that could withstand repeated abuse at high speeds, GM elected to re-focus the 1LE package on the car's suspension system. For '93, choosing 1LE meant stiffer springs all around, thicker sway bars (32 mm hollow front / 21 mm rear), unique shock valving, a solid transmission mount and beefier bushings for the control arms and panhard bar.

Aside from a few minor details, it wasn't until 1996 that GM would further fiddle with the 1LE formula, moving to a set of Koni double-adjustable shock absorbers as standard equipment. Now known as the "Performance Suspension Package," this was also the year that air conditioning returned to the 1LE fold, and soon enough the options group would be available even on non-stripper Camaros, in stark contrast to its stripped-down origins. 1999 was the last year that 1LE would appear on the order sheet.

The reason for the 1LE's relatively static nature throughout the '90s was primarily due to the constant evolution of the Camaro's performance during that period, with more power, an aluminum driveshaft, enhanced exhaust and bigger brakes all being added to non-1LE vehicles as the decade moved on. Even allowing for the fact that Pontiac added the 1LE option to its Camaro-twinning Firebird model, far fewer fourth-gen buyers took advantage of the package as compared to the previous car, with less than 600 examples sold.

No Half-Measures For Gen-5

After enduring a sad eight-year hiatus between the end of the fourth-generation Camaro and the rebirth of the fifth-gen in 2010, fans of the coupe were eventually able to dip their toes back in the 1LE pool for the 2013 model year. It's safe to say that even the base version of this Camaro was light-years ahead of the model from ten years previous, but Chevrolet was serious about demonstrating just how much potential was locked up inside the all-new platform, what with its independent rear suspension system and hefty 426hp, 6.2L V8 engine.

For starters, adding the 1LE package to the Camaro SS introduced a beefier close-ratio six-speed manual transmission, a TR6060/MM6 rather than an M-10 model (both of which are sourced from Tremec). This sent power back to a 3.91:1 limited slip rear differential and then on to the wheels through hardened axle half-shaft.

Camaro 1LE Yellow

From that point on it was all about the chassis. The SS 1LE was the first to introduce the concept of "one step down" component use, as the car grabbed its fuel pump, wheel bearings, shock mounts out back and toe links all from the supercar-baiting ZL1 edition of the Camaro. The car also gained a 27 mm sway bar up front and a 28 mm bar at the rear and unique rear shocks.

This time the marketing department was fully behind the 1LE initiative, which meant that in addition to the mechanical bits described above, the track-ready Camaro also received a host of styling call-outs to attract attention to its on-track prowess. These included the ZL1-style ultra-wide rims wrapped by all that asphalt-hugging rubber, as well as a flat-black hood, a rear spoiler and suede-style fabric all over the 1LE's flat-bottomed steering wheel and the car's shift knob.

A Full 1LE Line-Up

The fifth-generation 1LE only lasted a couple of years before the sixth-generation Camaro hit the scene. By the time the 1LE reappeared as a 2017 model, it was clear that Chevrolet was willing to invest substantial development dollars to showcase what the car was capable of in a high performance setting. This was initially accomplished by expanding the one-step-down philosophy to include not just the 455hp SS 1LE, but also a 335hp V6 1LE. It's no surprise that the growth of the 1LE's availability was linked to just how popular the option had been on the previous car.

The Camaro SS 1LE grew into a legitimate track day terror thanks to its move to the ZL1's FE4 Magnetic Ride Control suspension and a full differential, transmission and engine cooling package designed to handle the ravages of extended lapping sessions, along with an electronic limited-slip differential, six-piston Brembo brakes latched on to 14.6-inch front rotors and a dual-mode exhaust. GM's data recording video system was installed and similar visual cues inside and out (embellished by Recaro seats) identified the SS 1LE as compared to the regular V8 model.

The V6 1LE was in many ways a standard SS with a different engine, grabbing the mightier car's FE3 suspension, four-piston Brembo brakes, mechanical limited-slip differential and fuel system, while adding the 1LE-specifice track cooling, Eagle F1 tires and interior and exterior styling features.

Camaro 1LE Red

Chevrolet was far from finished when it came to pushing the boundaries of the 1LE's sphere of dominance, however. For 2018, the supercharged 650hp Camaro ZL1 also gained 1LE consideration, adding functional aero front and rear (including a carbon fiber rear wing), forged rims and DSSV spool-valve shock technology produced by the racing professionals at Multimatic. Also along for the ride were adjustable camber plates, springs and rear sway bar, as well as hard mounts for much of the suspension system, all in an effort to create the most cohesive and hardcore package ever devised for the platform.

It's never easy to follow up a car like the ZL1 1LE, but Chevrolet flipped the script for 2019 by adding the 1LE option to the most modest member of the Camaro family, the Turbo. Motivated by a 275hp, 2.0L turbocharged four-cylinder engine, the Turbo 1LE democratizes access to the 1LE's suspension goodies, including the same Brembo brakes, limited-slip diff, tires and FE3 suspension found on the V6 car, along with enhanced cooling and, for the first time, a Competitive drive mode for its electronic stability control system (complete with a launch control feature).

From Humble Beginnings, A Giant-Killer

It's incredible to look back at the history of the Chevrolet Camaro 1LE and realize that today's quadruple track threat can trace its origins to the grumblings of Showroom Stock racers unhappy with their braking performance. Such is the tangled web of vehicle development that the seemingly simple act of swapping larger rotors onto a third-generation Camaro can, nearly 30 years later, result in a world-beating line-up of sports coupes that have truly surpassed their muscle car origins. It's a pleasant reminder that sometimes, the biggest and best automotive ideas can grow from the most modest of beginnings.

To see the latest iteration of the 1LE, see the latest news about the 2019 Camaro!

Shifting Gears: Honda Celebrates the Manual Transmission

$
0
0

It’s no secret that the manual transmission is an endangered species these days. The era of seeing supercars with stick shifts is pretty much over, and manual gearboxes are no longer available in many entry level models.

Honda Shifting Gears Civic

One company that has bucked this trend is Honda, who still offers manual transmissions in all of its passenger car models, and has always been known for delivering some of the best-feeling manual gearboxes in the business. Perhaps that's not surprising given the company's roots in motorsport.

Honda Shifting Gears Racing History

With this in mind, Honda recently started a program called “Shifting Gears” that is designed to teach drivers how to master a manual transmission and just as importantly, show the enjoyment that can come from driving a manual-equipped car. The program is aimed especially at the millennial generation, who has come of driving age in an era where manual transmissions are few and far between.

Honda Shifting Gears Civic Si

To kick things off, Honda recently held a Shifting Gears event in Southern California designed to teach and encourage young people to drive manuals. Along with special training courses, experienced participants were also able to take to the open road in a variety of manual-equipped Hondas.

Honda Shifting Gears Track

The coolest thing is that not only did they bring out current models, but a selection of vintage models as well, including a CVCC, Prelude SH, S2000 CR and an EM1 Civic Si. What better way to experience a manual than in some of these classics from Honda’s own collection?

Honda Shifting Gears Blue

In an industry that has increasingly left the manual transmission behind, we have to tip our hat to Honda who not only keeps the stick shift alive in their current lineup, but celebrates it as something more than just a means of operating a vehicle. Here’s hoping this is just the start of a larger movement not just for Honda, but for other automakers as well.

Images courtesy of Honda Media

Like the article? Subscribe to our newsletter to have more sent straight to your inbox!

Ride of the Week: 1964 Jeep Gladiator J200

$
0
0

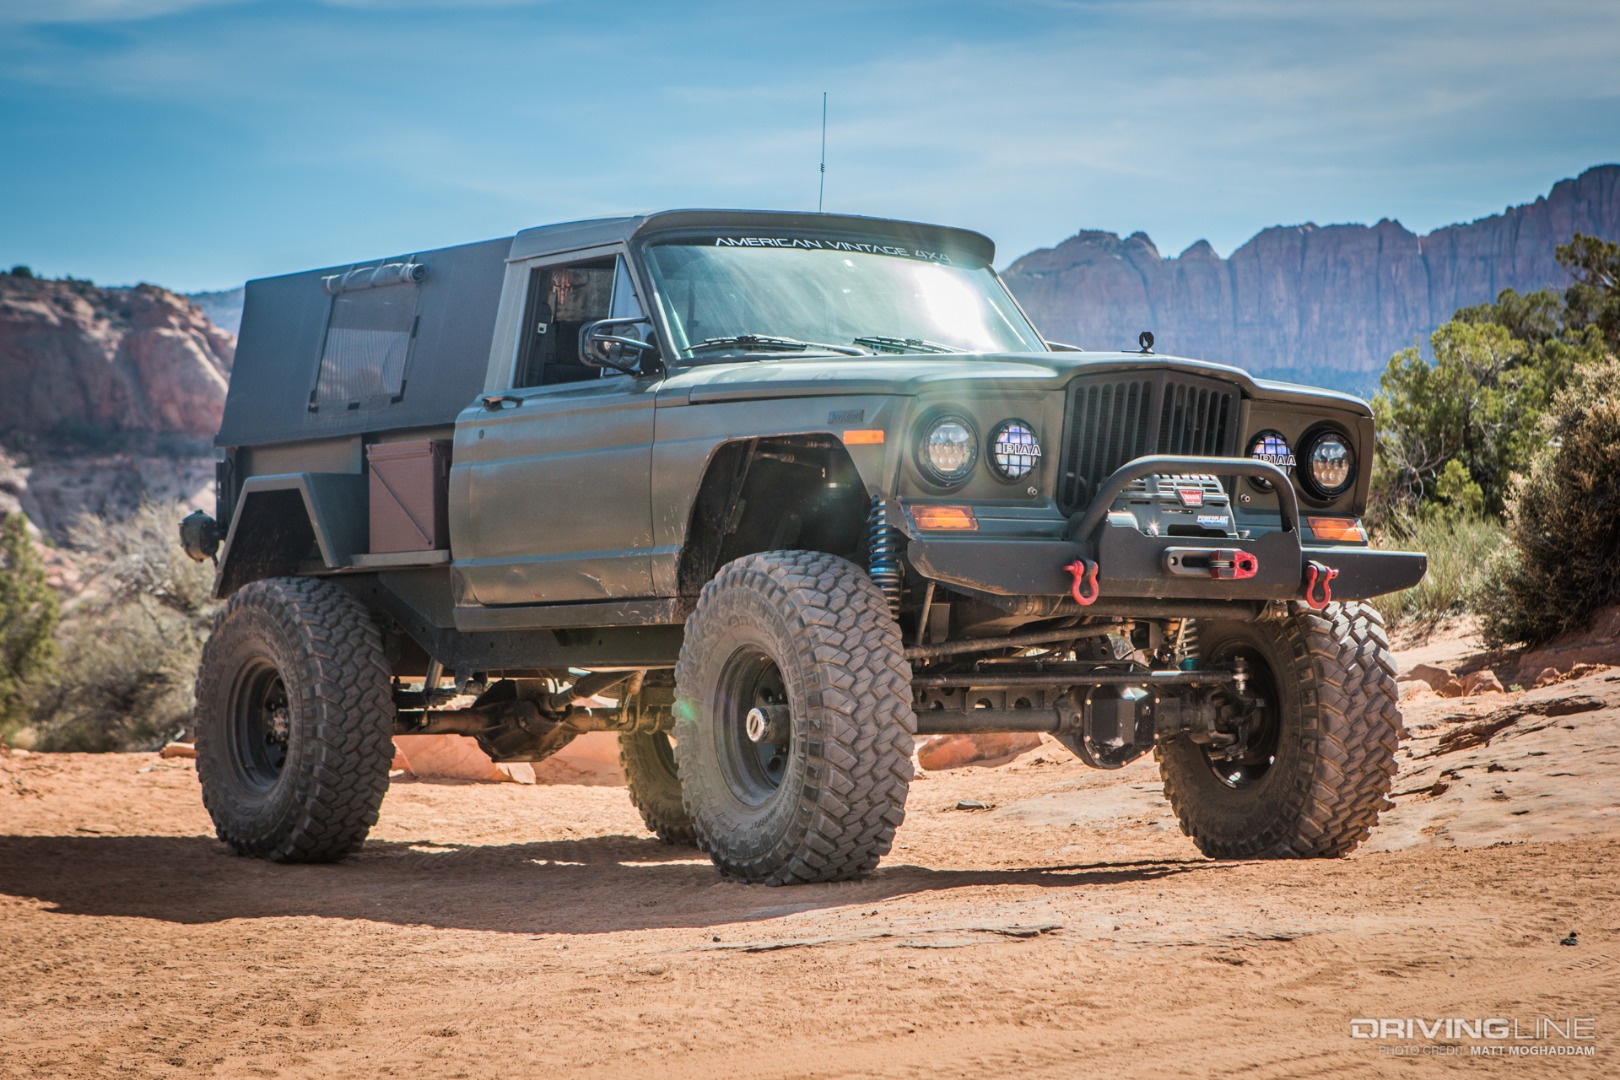
In the early 1960s, Jeep produced a number of pickup trucks, called Gladiators, designed with the goal of providing durability and utility to the American public. Over 50 years later, these iconic 4x4s have become hard to find, but we spotted one in Moab, Utah during Easter Jeep Safari this year that was unlike any we had ever seen. Kevin Mereness has been obsessed with building classic Jeeps and American 4x4s since he was a teenager. So much so that he opened his own shop in Meridian, Idaho, dedicated to breathing new life into classic 4x4s. Kevin’s pride and joy is his 1964 J200, a short wheelbase model of the Gladiator pickup line produced by Jeep in the 1960s. The project, nicknamed “Komodo,” has taken the shape of a performance-oriented crawler with a modern drivetrain, custom suspension, 40-inch Nitto Trail Grapplers and a host of accessories designed to provide a hardcore, durable off-road experience while being mild-mannered enough on the highway to be a daily driver. Check out the video above to get a closer look at what makes Komodo a one-of-a-kind classic 4x4.

Jeep J200

Like this ride? Check out all of our other Rides of the Week!


Enter the Dragon: A Closer Look at American Vintage 4x4's "Komodo" Gladiator

$
0
0

Resto-mod doesn't even begin to describe it. Builds like these take years of passion, dedication and challenges to overcome. Ever since he got his first job in a 4x4 shop at the age of 19, Kevin Mereness has been obsessed with building off-road vehicles. So much so, that he opened his own shop, called American Vintage 4x4 in Meridian, Idaho. “I wanted a company that stepped up to provide personalized project consulting and guidance on what parts are best for each vehicle and lifestyle. A place people could trust to get their 4x4 built right. A company that strengthens the four-wheel community,” Kevin states.

Rear of the Komodo

Over his course of his career, he has been the driving force to bring dozens of classic 4x4s and Jeeps back to life for himself and his customers. One build in particular stands out, and has put Kevin’s abilities to the test. Beginning life as a humble 1964 Jeep Gladiator J200 truck, Kevin’s latest build, nicknamed “Komodo,” has undergone a complete transformation over the better portion of the last decade.

Front of the Komodo

Although the Jeep Gladiator was a rugged, well-built, short-wheelbase truck that was ready for 4x4 use off the showroom floor, Kevin saw the potential for a formidable rock crawler that would turn heads both on and off the trail. But in order to prepare this J200 for off-road abuse, the entire drivetrain and running gear had to be swapped for a beefier and more modern setup. Starting with the engine, Kevin took advantage of the relatively inexpensive GM 6.0L LQ4, which is an LS-based engine found in many GM trucks and SUVs. Kevin kept the engine mostly stock, with the exception of a pair of OBX headers and a Magnaflow exhaust.

LQ4 engine in the Komodo

Bolted to the LQ4 is a 4L65E transmission built by Monster Transmissions, paired with an Atlas 2-speed transfer case, with 4.3:1 ratio. The new gearbox can handle increased torque inputs and will hold up to off-road abuse. Kevin opted for a GM 14-bolt rear axle, a popular choice among those who are swapping to 1-ton axles. The 14-bolt is complete with 4.88 gears, an ARB Air Locker and disc brakes.

Komodo's rear 14-Bolt axle

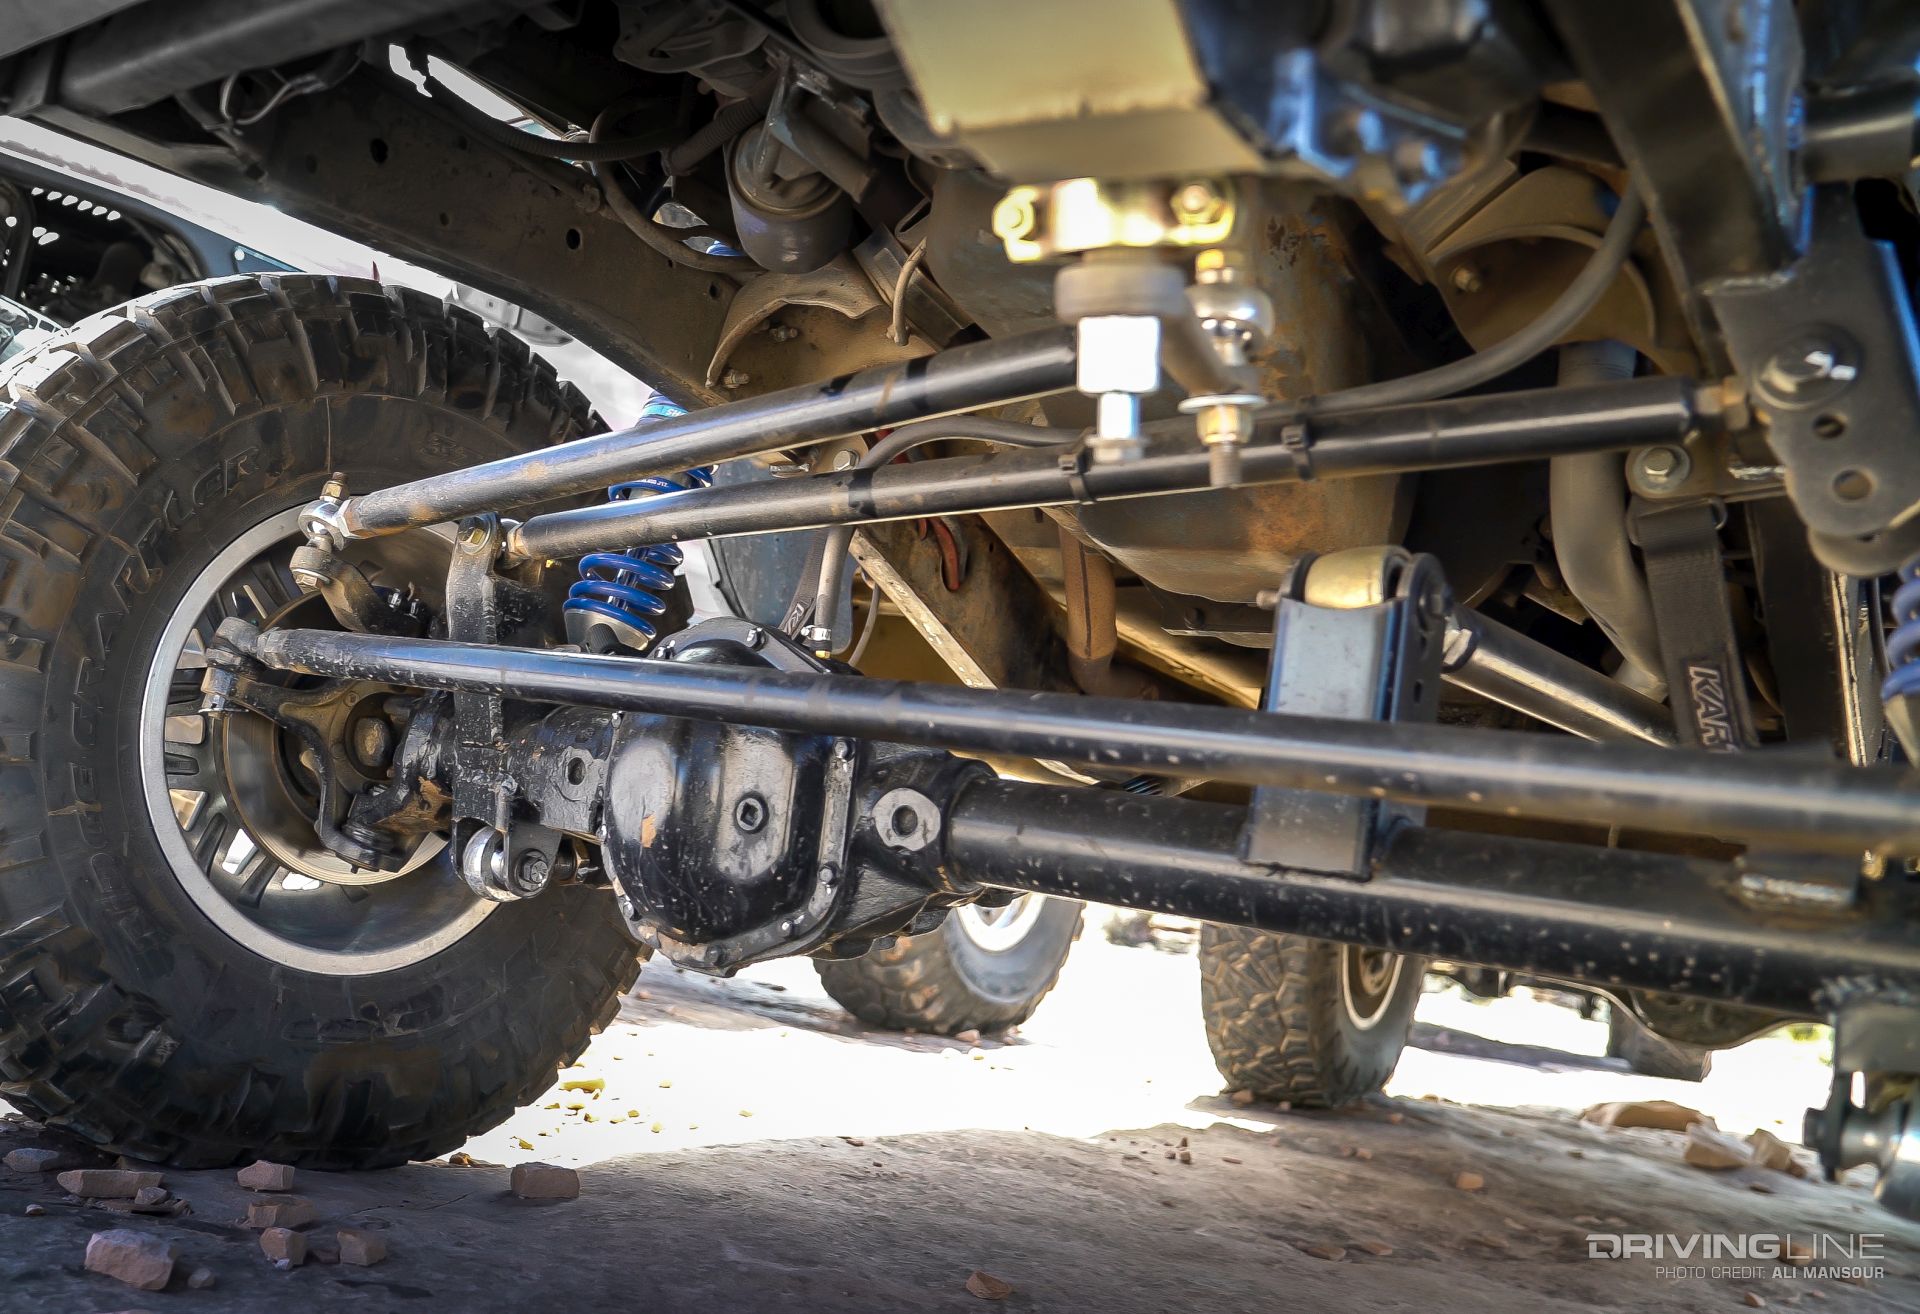
Keeping up with the 1-ton theme, Komodo’s front axle is a high pinion Dana 60 complete with the same gears and Air Locker, but with an added Artec Industries truss and Warn manual locking hubs. The steering components consist of Ballistic Fab high-steer arms, 1.5-inch by .25-inch wall custom tie rod and drag link with RuffStuff Specialties rod ends. Kevin installed a PSC hydraulic assist system to allow for minimum steering effort even when aired down and locked onto a rock.

Front Dana 60 axle

The front suspension is a custom Komodo Gear 4-link system with 14-inch King Coilovers on Artec Industries shock towers. Although the Gladiator has plenty of flex as it sits, Kevin mentioned that he plans to swap out the rear leaf springs for a custom triangulated 4-link system down the line.

Komodo has 14-inch King coilovers

Kevin prides his build on its capability to tackle the roughest trails the American West has to offer, while retaining its comfort and drivability on the highway. Rolling on a set of 40x13.50R17 Nitto Trail Grapplers, Komodo seamlessly transcends all kinds of terrain, both on and off the pavement. Kevin states that he prefers the Trail Grapplers to other mud terrain tires due to their impressive off-road performance and relatively mild highway manners. Komodo is also sporting a set of 17-inch Vision wheels in gloss black.

Komodo is running on 40-inch Nitto Trail Grapplers

Although the upgraded drivetrain and running gear gives Komodo a huge boost in performance from a stock Gladiator, the other components and accessories really set it apart aesthetically. Perhaps the most prominent exterior modification is the custom canvas soft-top Kevin made for the bed. While the purpose of the soft-top is to add extra storage and utility to the rig, it undoubtedly sets the J200 apart from others. Kevin opted for a “Marine Forest Green” paint color to give the Komodo its military look.

Komodo's rear custom soft top

Kevin gave the interior of the Gladiator just as much love as the exterior. Starting with small modifications such as a tilt steering column and Dynamat insulation throughout the cab, Kevin added more creature comforts along the way such as a BJ’s Off-Road carpet kit and a Vintage Air Magnum IV AC and heat system. For safety, Kevin installed a custom interior roll cage as well. The instrumentation has been swapped for a Dakota Digital gauge, common in older vehicles with modern LS-based engine swaps.

Komodo's interior

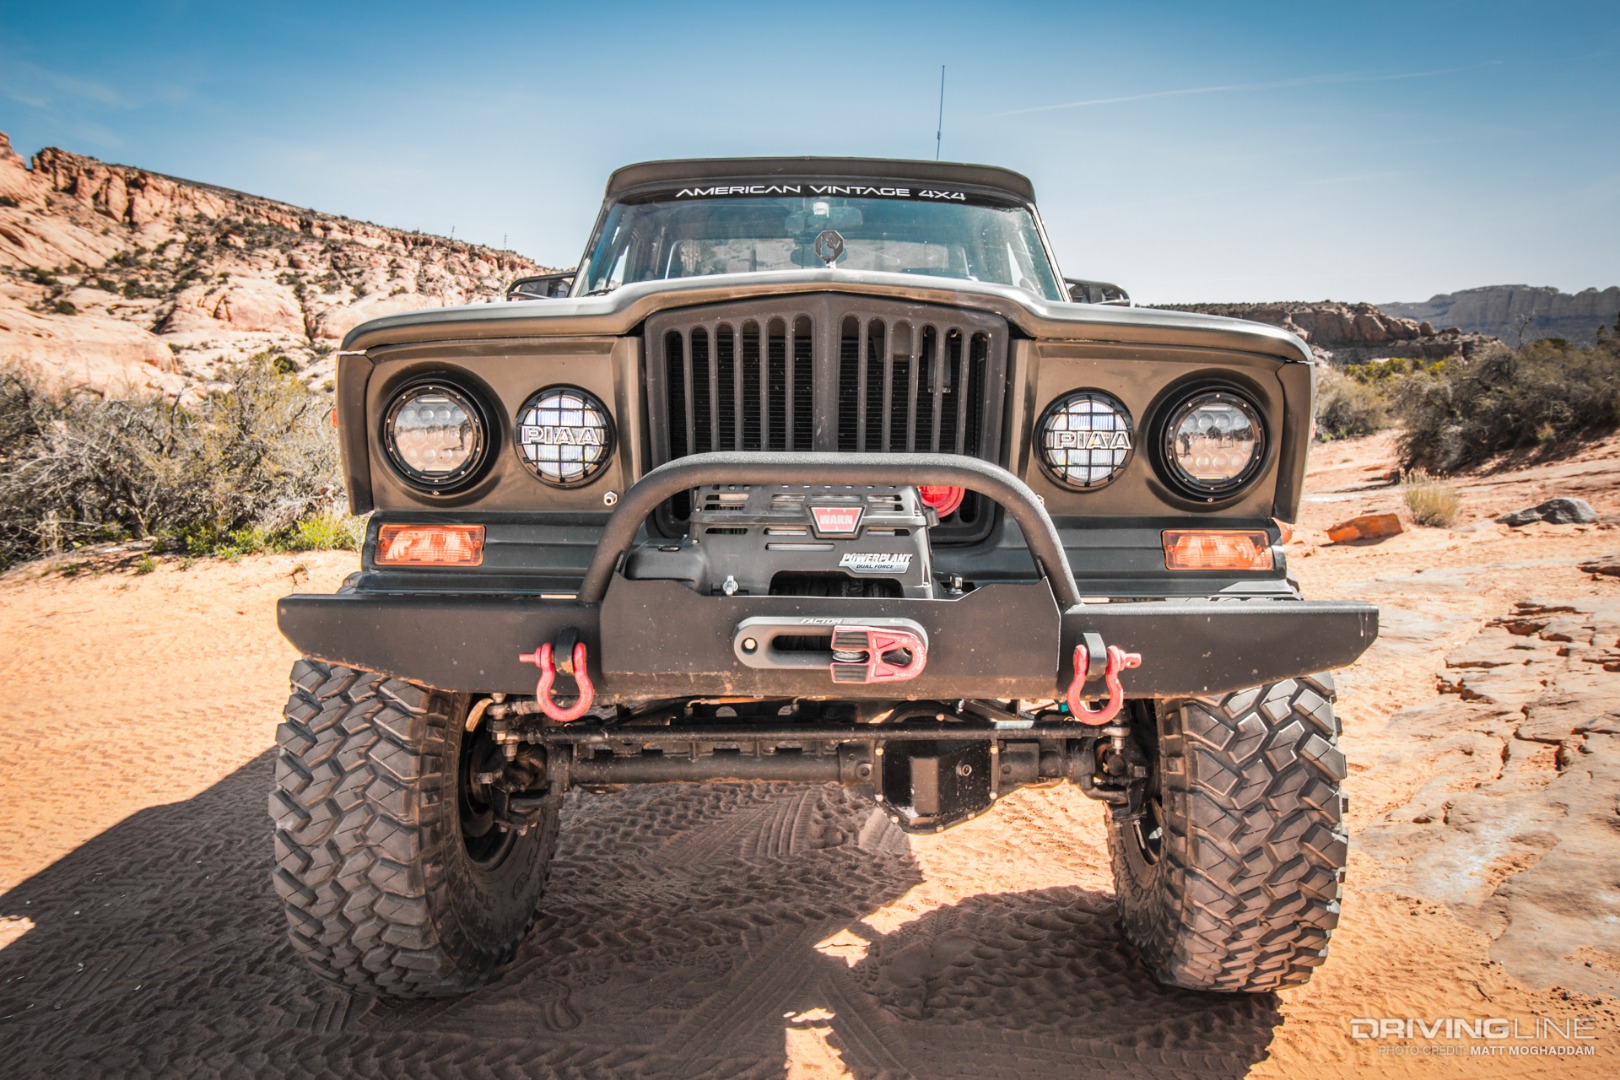
Some of the other accessories Kevin has added to Komodo to finish the build include a Warn PowerPlant winch, an Oasis Manufacturing XD-400 air compressor, XL Series LED headlights, PIAA fog lights, LED rock lights and backup lights and military grade tail lights to give Komodo a more rugged appearance.

the Jeep Gladiator front grill on Komodo

American Vintage 4x4 prides itself on building one-of-a-kind classic Jeeps and 4x4s that not only turn heads, but also outperform many modern off-road vehicles. Kevin’s life-long passion for building these unique vehicles is evident in his work, and Komodo is his masterpiece. It’s been said that anyone can buy a brand new truck and build it, but it takes true passion and skill to bring new life into a truck that would otherwise be long forgotten. Kevin and American Vintage 4x4 are living proof that the older a vehicle is, the more potential it has to become something incredibly unique. 

Komodo flexed out on a rock

Want to see more of this amazing truck? Watch the video for its Ride of the Week!

Extreme Diesel: 2,000HP in a 3,500-Pound Ram

$
0
0

Few other diesel drag racing classes get our blood pumping quite like the Pro Mod field does. It’s a category that’s made up of a wide array of lightweight vehicles (trucks, cars and altereds) duking it out in heads-up races, with some capable of storming the eighth-mile in under five seconds. Familiar faces in the Pro Mod class are the 4-second ’08 F-250 from Rudy’s Performance Parts and Ryan Milliken’s head-turning, Cummins-powered ’66 Nova. While the truck shown here isn’t exactly new to the drag racing scene (it previously spent time running Pro Street), the regular cab ’06 Ram campaigned by Ben Shadday of Done Right Diesel Performance is packing a nasty new powertrain for the 2018 racing season.

With a competition-ready, 6.8L Cummins between the frame rails, enough fuel to support more than 2,000hp, a massive 102mm turbo and a trick, direct-port nitrous system, Shadday’s engine combination will give him a shot at running at the top of the heap this year. Even though 1,600 to 1,700rwhp is all that’s thought to be needed to get his Ram out front, thanks to the abundance of fuel and air on tap, Shadday’s Cummins will have plenty of power in reserve just in case it’s needed. Trust us, if this thing can hook, it’ll book!

Join us for a quick walk around Shadday’s fiberglass bodied, Pro Mod Ram as we highlight the parts and pieces that might just make it the truck to beat in 2018.

Freedom Racing Engines 6.8L Cummins

001-Cummins-2000-Horsepower-Freedom-Racing-Engines

At the heart of Shadday’s Ram lies a dyno-proven version of the 6.7L Cummins. Assembled by Freedom Racing Engines, the engine building arm of Fleece Performance Engineering, the hummin’ half dozen makes use of a Hamilton Cams solid block that was machined for 14mm head and main studs, D&J Precision Machine rods, Diamond Racing pistons, a Wagler Competition Products billet-aluminum cylinder head and a billet-aluminum individual runner intake manifold. Before it was dropped in the truck, the race-ready Cummins produced 2,024hp at 4,600 rpm on Freedom’s engine dyno.

Dual CP3s

002-Cummins-Dual-Cp3-Pumps

A D&J Precision Machine billet front cover accommodates twin Bosch CP3 high-pressure pumps and allows both units to be gear-driven (rather than the factory location pump being gear-driven and the other belt-driven). On top of that, these aren’t your average CP3s. Rather, they’re 12mm stroker pumps from S&S Diesel Motorsport—each one capable of supporting at least 1,000hp on its own. The S&S pumps feed a set of proprietary (code word for “massive”) injectors from Dynomite Diesel Products.

Gear Driven, DSR Fuel Pump

003-Cummins-DSR-Fuel-Pump

A provision on the front side of the D&J Precision Machine front cover allows for a gear-driven fuel pump from Daryl Saucier Racing (DSR) to be run. Frequently found in the upper echelon of truck pulling, these babies move a lot of fuel. This particular pump flows six gallons per minute, and thanks to a Fleece Performance Engineering Cummins regulated return fuel distribution block, a consistent 15 psi is supplied to the CP3s at idle—and 25 psi at full tilt.

The Windmill

004-Garrett-GT55-Turbo

Forced Inductions turbochargers are all the rage these days, especially in the diesel segment. Keeping things simple and also knowing that the engine would live much of its life above 4,500 rpm, Shadday settled on a GT55-based Garret unit with a massive, 102mm compressor wheel (that’s a 4-inch inlet!). The big single charger mounts to a T6 flange competition-style Steed Speed exhaust manifold and pushes 70 psi of boost through an air-to-air intercooler fabricated by Fleece Performance Engineering’s Tony Derhammer.

One Jet Per Cylinder

005-Cummins-Nitrous-Oxide-System

Designed and built by the aforementioned Derhammer (a.k.a. Hammer-Tech), a custom nitrous rail and individual lines feed N2O to each cylinder (there is also a small jet in the intercooler to help get the turbo spooled). The innovative nitrous system has the potential to add several hundred horsepower to the equation if Shadday needs it.

Rossler Turbo 400

006-Rossler-TH400-Automatic-Transmission

Like a lot of drag racers running two-wheel drive trucks these days, Shadday relies on the proven TH-400 design to harness the power he’s making. His Rossler Transmissions-built Turbo 400 sports 300M shafts and is topped off with a 12-inch lockup torque converter from Neal Chance Racing Converters. Shifts are handled by way of a Precision Performance Products air shifter and they occur at an insane (for a diesel) 5,200 rpm. Once on the trans brake, the aforementioned nitrous spool jet is activated and Shadday is able to build 25 psi of boost before the launch.

Back-Halved & Four-Linked

007-Dodge-Ram-Cummins-Back-Half-Tube-Chassis

As you might’ve expected, the truck has been back-halved, but the hind end has also been fitted with a four-link suspension, adjustable AFCO coilovers built by Menscer Motorsports, a Ford 9-inch and received some love from Greg Risk Racecraft. Over the winter, Fleece Performance Engineering reworked the front suspension, adding a set of Chris Alston’s Chassisworks’ VariShock coilovers and bringing the truck’s cage up to the new 25.3 SFI spec.

Stopping Power

008-Pro-Mod-Dodge-Cummins-Parachutes

Two parachutes from Impact Racing Products are tasked with slowing the truck down after each charge down the track. Based on the eighth-mile test passes the truck has made so far this year, the chutes will have to slow the 3,520-pound (with driver) Ram from at least 165 mph if Shadday decides to put the truck through the quarter-mile (although we think that number will likely be more than 180 mph when all is said and done).

Clean Diesel

009-Nitrous-Outlet-Bottle

Along with the obvious goal of getting down track as quickly and as fast as he can, Shadday is determined to meet another target: He wants the truck to be as close to smoke-free as possible. Thanks to Shadday’s extensive knowledge of tuning a Cummins’ ECM, the truck runs very clean as-is. However, with nitrous being the chemical equivalent of adding another turbo, it will always be an option to clean up any leftover fuel—along with providing a considerable bump in horsepower and helping to control in-cylinder heat.

Big Things To Come

010-Done-Right-Diesel-Performance-Dodge-Cummins-Pro-Mod

Right off the trailer, Shadday’s Ram went 5.16 at 131 mph in the eighth without locking the converter (which sapped about 300hp). Not a bad starting point for a highly conservative tune and virtually zero nitrous. As the season progresses, and provided the chassis cooperates like he expects it to, we’re sure the truck will be living in the 4’s, maybe even mid-4’s.

Want more diesel drag performance? Check out Jake White's 10-second terror!

First Drive: 2019 Toyota Avalon

$
0
0

Four-door sedans may not be what we most often talk about here on Driving Line, but the reality is that many of us have one in our garage. When we’re not modifying our fun cars, it’s cars like the 2019 Toyota Avalon that will be the ones that get driven the most. As the Avalon launches its 5th generation, a model that was re-built from the ground up, we thought it was worth a closer look.

2019 Toyota Avalon side profile

We know what a lot of you are thinking, “That doesn’t look like a Toyota?” And you’d be right. The bland, driving-microwave image that some have come to associate with Toyota isn’t true to the company’s roots. Pushing the pendulum back towards dynamism, the 2019 Avalon is the second Toyota being released on the Toyota New Global Architecture (TNGA) platform—following last year’s Camry. The TNGA platform touts a lower center of gravity, slimmer A-pillars, better visibility and sculpted surfaces.

2019 Toyota Avalon Touring - front

Seeing it in person, the designer’s aim of “Technical Beauty” rings true. It looks and feels like a premium sedan, from the exterior to the interior. By the time we buckled into the driver’s seat and adjusted the mirrors, we sensed that this wasn’t our great-aunt’s Toyota.

2019 Toyota Avalon

The interior has been as redesigned as the exterior, with soft-touch materials, a sweeping front console with touchscreen controls and first-ever standard Apple CarPlay interface. Other first-evers for the Avalon are its LED lights and Amazon Alexa-enabled technology. In the Touring edition we drove, the 8-way adjustable heated and ventilated seats were covered in perforated SofTex and Ultrasuede for ultimate comfort.

2019 Toyota Avalon Interior

While sports car clearly isn’t where these car goals are, the new V6 3.5L engine supports the premium sport feel that the looks of this redesigned sedan imbue. Adding 33hp from the previous generation, the 2019 Toyota Avalon hits 301 total horsepower. Combined with a Direct Shift 8-speed Electronically Controlled Automatic Transmission that is meant to combine smooth acceleration with a direct acceleration feel, the pilot can either drive casually or on the sportier side. Perhaps we throttled into this test with low expectations, but the athleticism of the Avalon for a sedan of this type was quite impressive.

2019 Toyota Avalon

The Touring version comes with four driving modes—ECO, NORMAL, SPORT S and SPORT S+. Each mode changes throttle response, steering, suspension and engine sound characteristics. While this difference wasn’t night-and-day to us while testing, it does provide a pivot in the car’s handling characteristics and is another opportunity to strike the right balance between performance and fuel economy. Speaking of which, the V6 comes in at 22/32 mpg (city/hwy)—with a Hybrid variant offering 43/44 mpg, albeit with a more limited 215hp.

2019 Toyota Avalon Driving Modes

What we did find oddly exciting was the car’s brake hold feature which engages once the car has come to a complete stop, enabling the driver to remove their foot from the brake. Testing this on significant inclines and declines, the feature held fast and was seamless in usage—avoiding all the stop-and-go feeling that we’ve felt in other cars with similar features.

2019 Toyota Avalon front grille

Throughout all the details in the new Avalon, clear thought has been put into making a car that is both highly functional as well as enjoyable. Standard features adding both luxury and safety are in abundance, with an estimated $1,700 increase in base model additions with just $250 separating ’18 and ’19 MSRPs. Pricing begins at $35,500 for gas versions with the Touring model we tested coming in at $42,200. Hybrid versions have come down in cost compared to last year’s model, with HV pricing starting at $36,500.

2019 Toyota Avalon tail light

How does this compare to the Camry? Read our driving impressions of the 2018 Toyota Camry here.

Shooting Star: An LS Swapped 240Z That's Burning Brightly

$
0
0

The origin stories of nearly every instantly recognizable build throughout the automotive landscape includes a little luck, some good timing and a whole lot of hard work. The SOS Customz Datsun is no exception.

Datsun 240Z Rear

The Origins

This 240Z began its new life after the first motor gave out, leaving a rolling shell with minimal rust. Here’s where the luck and timing kick in: A friend’s wrecked Corvette had a powerplant looking for a new home, and the Z had just the home it needed. With the motor in and bolted to the 4L60e transmission, more power was added via the prominent On 3 Performance turbocharger paired with an HKS blow-off valve. While the turbo housing requires trimming to the Seibon hood (not pictured), it’s undeniable that the placement and prominence grabs everyone’s attention just as much as the Z’s bright-orange exterior does.

Datsun 240Z Engine

Orange All Around

Now that the shell had a heartbeat, the SOS Customz team moved to the outside of the car and did what it does best. An all-custom, all-metal widebody was formed and fitted to the chassis, allowing for some meaty Nitto tires to fit around Atara Racing wheels on all four corners. CXRacing coilovers and a Brembo big-brake kit help bring the car down to earth and to a halt—both are absolute musts when going from the factory 150hp to the current +600hp figure. 

Datsun 240Z Nitto

Before finishing off the exterior with the signature orange-pearl paint, the custom side-exit exhaust was routed through the passenger front quarter-panel and given a carbon-fiber heat shield to help protect the panel’s finish.

Datsun 240Z Exhaust

Little Custom Touches

From there, attention was moved to the 240Z’s interior, where the orange-on-black colorway continues throughout the cabin. A custom aluminum dash houses a litany of functional AutoMeter gauges and switches, conjuring images of taking off in a fighter jet each time the car is started. Nearly everything else in the cockpit is an SOS Customz custom, from the dash cover and door cards to the reupholstered race bucket seats and rewrapped NRG steering wheel. The finishing touches are the Dragon Ball topping the Hurst shifter and orange FuguZ Hot Wheels car hanging from the rollcage, bringing some additional fun to the build.

Datsun 240Z Shifter

While it may seem like this Z is another show queen with an engine swap, the SOS guys tell us drag racing is in the Datsun’s future; with some luck, good timing and a lot of hard work, we’re sure some drag trophies will take their place alongside the car-show plaques at SOS Customz headquarters.

Datsun 240Z Front

Tuning Menu: SOS Customz 1972 Datsun 240Z

OWNERSaul Rodriguez
HOMETOWNOceanside, CA
ENGINEChevrolet LS1; On 3 Performance Turbocharger; 80-pound fuel injectors; Custom V-mount air-air intercooler, oil cooler, header and exhaust piping; fuel cell; rear-mounted battery; Aeromotive 1000 fuel pump; HKS blow-off valve
SUSPENSION & SAFETYCustom Subframe and Rollcage; CXRacing 32-way adjustable coilovers, control arms, tension rods and camber kit; DardanTuning custom-tuned ECU
WHEELS & TIRESNitto NT01 225/45R15 Front, Nitto NT555R 275/50R15 Rear; Atara Racing wheels, Brembo big-brake kit
INTERIORNRG steering wheel; SOS Customz upholstered racing seats and door cards; custom aluminum dashboard; AutoMeter gauges; Hurst shifter; Dragon Ball Z shift knob
EXTERIORSOS Customz full metal widebody, Pearlescent Orange paint; Custom projector headlights; Skillard rear diffuser; Carbon fiber roof spoiler, door handles, quarter panel exhaust plate

Build-Your-Own Legend: A History of the LS

$
0
0

It's rare for an engine to achieve legendary status in the performance world, but it's even less likely for an automaker to replace one celebrated family of drivetrains almost directly with another. Yet that's exactly what General Motors managed to do when it introduced the LS V8 at the end of the ’90s as the successor to the previous generation of small-block Chevy motors. The architecture behind the LS—largely a clean-sheet design—and the remarkable number of variants that would soon follow quickly displaced the ubiquitous old-tech SBC in the hearts and minds of hot rodders.

There are two main reasons why the LS became the swap of choice for speed-seekers building track-day terrors, reliable daily drivers or restomod cruisers. The first is value. It's very difficult to match the dollar-per-horsepower promise of an LS engine, given that so many were produced across such a wide variety of vehicles as to keep prices affordable and availability strong.

LS Fest Three Cars

Perhaps just as important, however, is the surprising interchangeability of parts between one LS engine and the next. It's tempting to think of these motors as almost the automotive equivalent of Lego; for the most part, you can pop a set of heads off of one LS motor and snap it onto another with very little hassle, and the same is largely true of crankshafts, intakes and a host of other components.

As a result of these defining characteristics, an entire ecosystem has built up around the LS, dedicated to not just improving on what the factory had to offer but also facilitating their transplantation into all sorts of engine bays that were never intended to be powered by pushrods. It's all these things and more that have caught the attention of a major aftermarket player like Holley, a massive company with dozens of venerated brands under its banner, and caused it to get deeply involved in the LS scene and serve as the primary sponsor and founder of LS Fest, now in its ninth year.

LS Fest Engine Side

The Holley name is familiar to anyone who's ever picked up a wrench, but lesser known is the organization's intense focus on the LS over the course of the last 10 years. As motor swaps have become more and more common, the company has worked toward becoming a one-stop shop for anyone looking for plug-and-play LS solutions.

"LS Fest is our chance to create a playground for everyone in the LS community, whether they're drag racers, drift fans, autocrossers or even show-and-shine fans," says Holley's Blane Burnett. "Having this LS engine family as the common thread that links these different groups of gearheads together is unique in the world of automobiles, and it's also a rare chance for us to get directly in touch with the people who are building their cars with our parts."

Destined for Success

After having undergone four years of development during the mid-’90s, the LS1 was primed to introduce a number of important innovations while still staying true to its pushrod roots in an era where chief rival Ford had moved to overhead cams across its entire lineup. Sports car fans were the first to benefit from GM's new small-block strategy when the 5.7L LS1 debuted under the hood of the Chevrolet Corvette in 1997, with the Camaro SS benefiting from the motor the following year.

LS Fest Red Engine

The all-aluminum construction of the LS1 caused a commotion, what with its roughly 107-pound block weight and initial rating of 345hp. So much grunt from a four-bolt main block that weighed just over half of what the SBC tipped the scales at was a revolution, as were other important advancements like the motor's cathedral-port cylinder heads (allowing for more accurate aiming of fuel injectors) and coil-on-plug ignition design (with a new lower-stress firing order). Best of all was its form factor: Without overhead camshafts or turbos hanging off of it, it was small enough to be packaged into a surprisingly wide range of platforms. 

The LS formula would be refined again and again over the course of the next 20 years, with variants such as the LS6 strengthening the block and installing a more aggressive camshaft (matched with higher compression and a deeper-breathing intake manifold), and the LS2 punching displacement out to 6.0L.

LS Fest Two Cars

By the time the LS3 arrived in 2008, almost 100 extra horses were available from the LS architecture (thanks again to more displacement, larger bores and a stronger block casting)—then came variants such as the 7.0L LS7, the supercharged LS9 and LSA and, of course, the primary donor to almost every inexpensive swap, the Vortec line of LS pickup and SUV engines. The latter swapped in iron blocks for aluminum, but still delivered respectable power from anywhere between 4.8L all the way up to 6.2L of displacement.

It's an embarrassment of performance-enhancing riches to choose from if you're someone looking to assemble your ideal LS engine from the above-listed parts bin. All LS crankshafts share the same rear main seal, rod and main journal sizes, and even longer dry-sump designs can be modified to be used on a wet-sump motor. Cylinder-head swaps are simple, as long as you take care to match the intake-port design to the correct intake manifold and remember that early LS1 and LS6 engines feature a small bore that limits you to mixing and matching their respective head designs, plus that of the LS2 (with LS2-and-later blocks capable of accommodating almost every available LS head). Connecting rods and pistons are similarly swappable, allowing for creative and surprisingly inexpensive solutions for creating the perfect blend of power and reliability for your application.

Aftermarket Assist

One would think the parts interchange between LS engines would make them simple enough as swap donors, and you would be right, but this apparent ease of installation has actually pushed builders further and further in terms of finding new platforms where the V8 can be used to generate heaps of horsepower. As that trend has continued, it's opened up a need not just for the near-complete kits that are available for the most popular swap recipients but also the many nuts-and-bolts adapters and other components needed to finish more esoteric builds.

LS Fest Engine Front

"The primary points of concern for anyone installing an LS are being able to fit the engine between the framerails and above the crossmember and steering gear with enough clearance for the oil pan, accessory drive and headers; getting the correct angle for the driveline; and being able to route the exhaust in a way that is simple without restricting flow," Burnett explains. "Then there's the question of being able to fuel and manage the engine itself." 

To that end, Holley has put together a dozen “swap systems” that group together the parts needed to go full-LS in anything from fullsize C10 pickups, to G-bodies, to the ultimate in automotive heresy, the SN95 and Fox-body Ford Mustang. Even the drift crowd is served, with the Nissan 240SX included under the swap system banner.

LS Fest White

"We realize, however, that there are plenty of builders out there who can fabricate their own engine mounts or exhaust systems and maybe only need help with some of the more challenging or time-consuming aspects of their LS swap," Burnett continues. "This is why we made it easy to pick and choose just the missing pieces like our engine swap oil pans, exhaust manifolds, stand-alone plug-and-play EFI systems and, of course, injection-capable fuel pumps for anyone moving from a vehicle that was originally carbureted."

Don't Be Afraid To DIY

Anyone who's ever found themselves knee-deep in project hell can attest to the fact this kind of all-in-one aftermarket support can be the lifeline needed to save a build that's taken up too many hours in the shop. That said, one of the beautiful things about the LS is that there's often a factory-built version of whatever part you need that you can scavenge off of a junkyard motor or trade with another engine owner and get your car or truck running. 

LS Fest Red Engine Left

In fact, it's hard to deny that the DIY ethos is a big part of what has allowed the LS to slowly take over the swap scene, sprawling out across all vehicle makes and models like some type of enormous mechanical blob. Before the LS, the previous-generation small-block Chevy had already been engineered to the edge of its capabilities, and other enthusiast engines were either hurtling toward expensive complexity or required a crash course in forced induction to see meaningful gains.

After just a few years on the streets, however, it became clear that the potential locked up inside the LS V8 was only just beginning to be tapped, and 20 years of nonstop development from both GM and the aftermarket have done nothing but confirm the engine family's status as the MVP of accessible—and inexpensive—horsepower.

Like the article? Subscribe to our newsletter to have more sent straight to your inbox!

The Beater: A ’73 Jeep J2000 Rich with History [VIDEO]

$
0
0

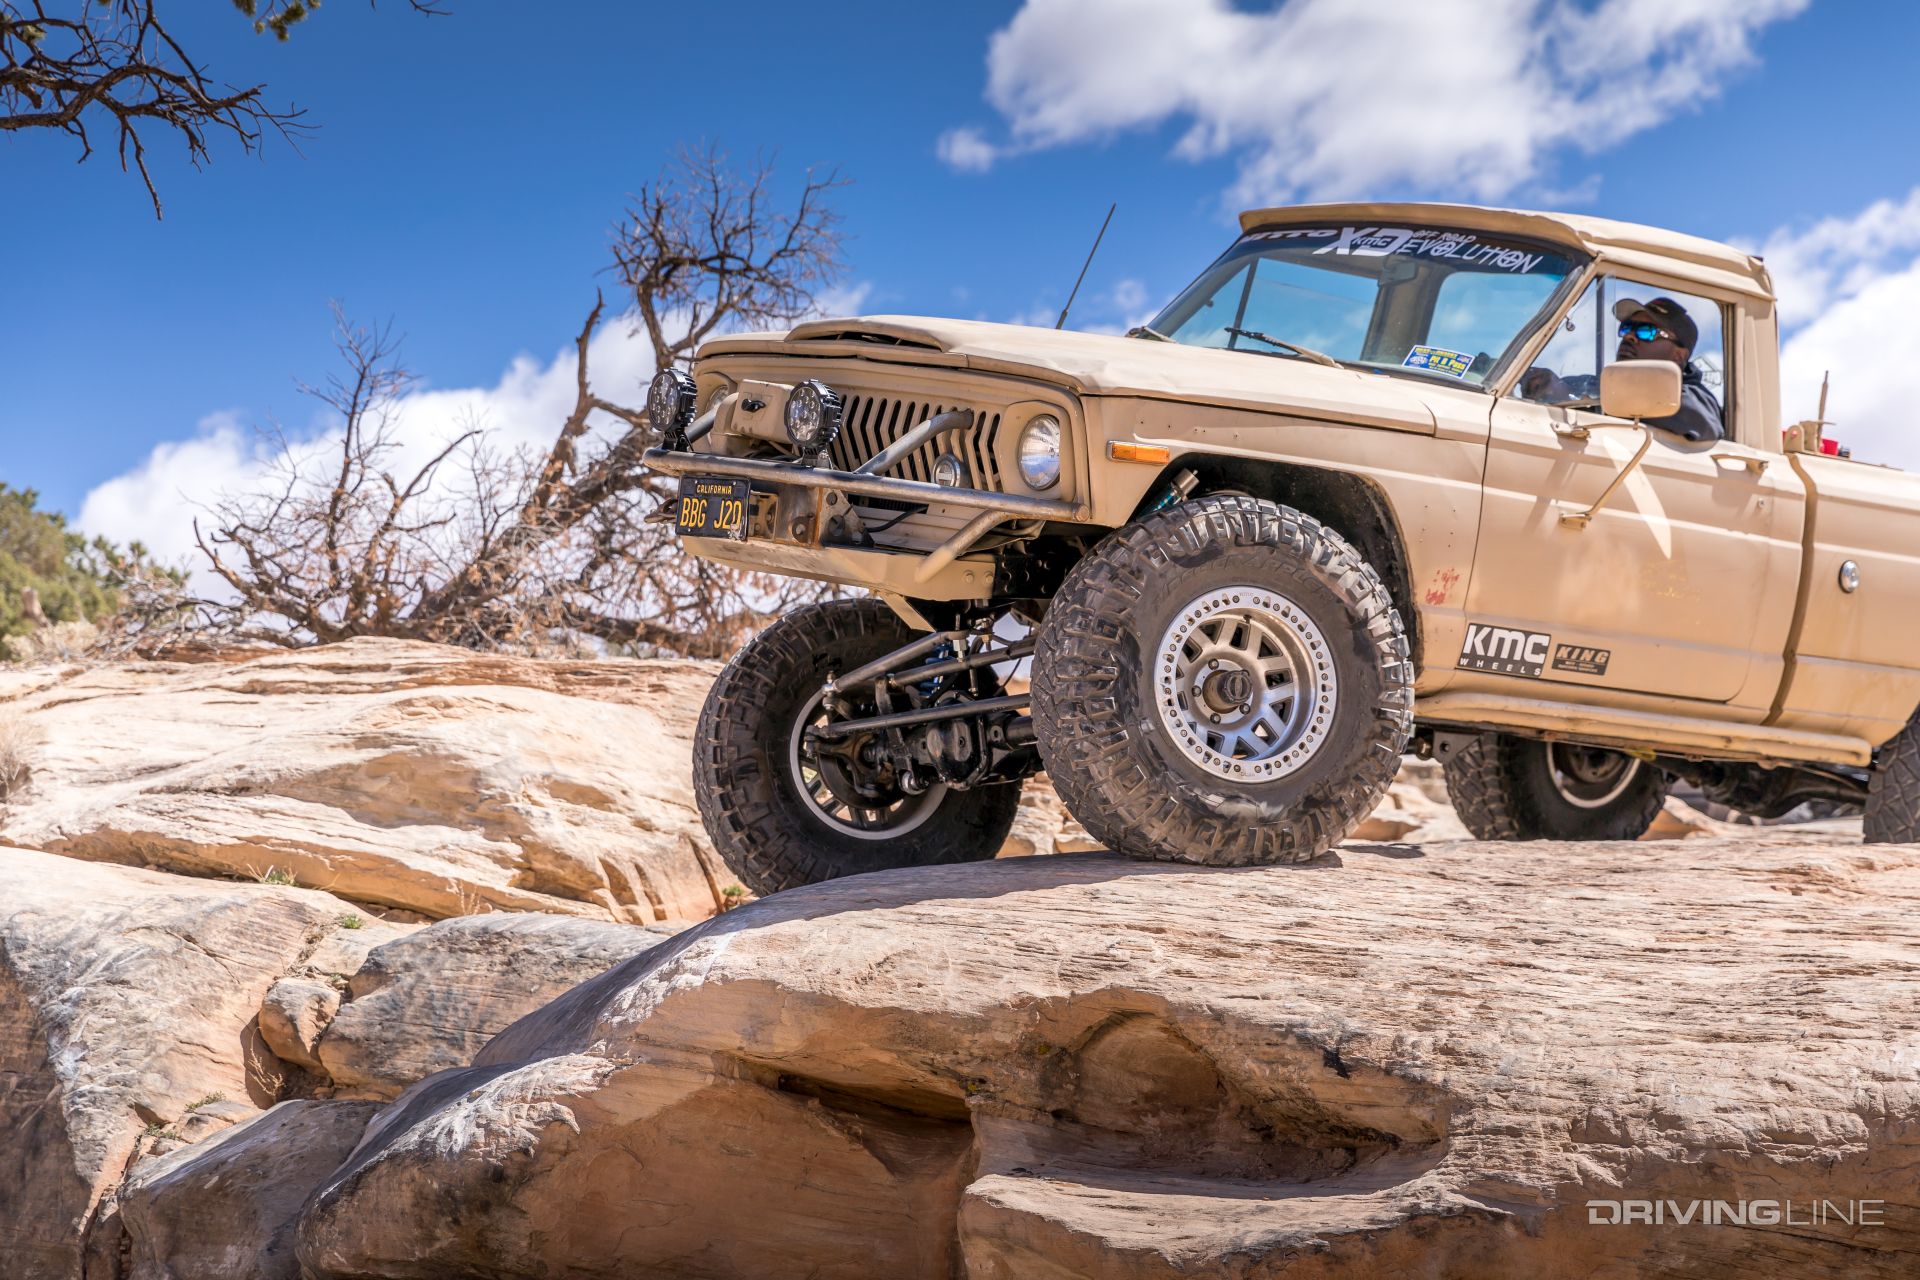
If you’re a ‘wheeling enthusiast, you’ve likely accepted that your 4x4 is going to get damaged off-road. This doesn’t mean it has to look like a crushed can driving down the road, but one has to concede that trail scars are part of the ‘wheeling experience. This is especially true if you like navigating your rig through challenging rock trails. Harris Wells, aka BBG, is a veteran off-roader that understands the collateral damage often associated with hitting the dirt.

Before moving to the J2000 you see here, Harris owned a heavily modified Jeep Wrangler Unlimited Rubicon JK. While the JK had taken him everywhere he wanted to go, it was something that he felt he had to be more cautious with on the trail. Once he sold the JK, he was looking for a rig that could fill the 4x4 void in his life, but also double as a useful work truck around the house. That’s where the 1973 classic Jeep pickup comes into the picture.

Knowing that long-time automotive journalist John Cappa was looking to move on from his old J2000 magazine project, Harris jumped at the opportunity to get the pickup. However, it wasn’t quite in the built condition that you see it here today. In fact, the truck had just been rolled a few months before Harris picked it up. The old and less desirable OE Dana 44 still resided up front, along with 4-inch-lift leaf springs. Rockcrawler it was not, but Harris likes projects and the J2000 seemed like a good fit.

With the help of Godde Welding out of Rosamond, California, Harris was able to breathe new life into a well-used truck. We caught up with Harris as he was enjoying some trail riding in Moab, Utah, during the 52nd annual Easter Jeep Safari. While Harris gives you a breakdown of the truck in his own words in the video above, we’re diving further into the details in the article below.

001-1973-jeep-j2000-nitto-ridge-grapplers

V8 Power

Powering the truck is the original AMC 360ci V8, which has been fit with a Holley Pro-Jection 2D kit. Other engine upgrades include a K&N air filter, DUI distributor and Powermaster alternator. The V8 is backed by the stock T-18 transmission, which thanks to a 6.32:1 first gear, gives it plenty of ‘crawling power. The tower you see arched over the engine is for the coilovers and is tied into the front bumper.

1973-jeep-j2000-nitto-ridge-grapplers

The original Dana 44 axle was replaced with a stronger open-knuckle Dana 44. A custom high steer setup helps make navigating the trails a bit easier, and although the front differential is currently open, it will soon be served with a new traction aid.

1973-jeep-j2000-nitto-ridge-grapplers-dana-44

Modern Touches

To achieve more suspension travel, the leaf-springs were plucked in exchange for a custom 3-link with King 2.0 coilovers. These EVO-spec shocks were dialed in to keep the ride height low, while netting over a foot of suspension travel. Kartek limit straps were added to ensure the 1350 Tom Wood’s driveshaft doesn’t over extend.

1973-jeep-j2000-nitto-ridge-grapplers-king-coilovers

Out back, you’ll find a Ford 9-inch rear axle with a Detroit Locker and 4.10 gears packaged in the low-pinion third member. The stock rear springs still reside over the axle, but the shackles have been flipped to get a few inches of lift. Feeding the rear axle is a Dana 20 transfer case that’s been upgraded with a 32-spline rear output from Advance Adapters. As is the case with the front, a Tom Wood’s rear ‘shaft fit with 1350 U-joints splits off the gear-drive T-case.

1973-jeep-j2000-nitto-ridge-grapplers-ford-9-inch

Comfort Preservation

Inside, the J2000 remains largely stock. The T-18 shifter rests next to an NRG Innovations steering wheel, which knocks down a bit of size compared to the original. The stock seats have been swapped out for some low back PRP Premier Series that add comfort and free up room.

1973-jeep-j2000-nitto-ridge-grapplers-interior-prp-seats

Experienced Grappler

A good experience with a product can be just as memorable as a bad one. With years of trouble-free service from Nitto tires, opting for a set of Ridge Grapplers on the J-truck was a no brainer for Harris. Given the fenders had already been served with a gracious amount of trimming, fitting the 37x12.50R17 hybrid all-terrain tires with a low amount of lift was fairly easy. To ensure the tires stay in place at low air pressures off-road, they were paired with a 17-inch KMC Machete beadlock wheels.

1973-jeep-j2000-nitto-ridge-grapplers

In addition to crafting the custom front suspension, Godde Welding was tasked with building a high-clearance front bumper. Using 1.75-inch, 0.120-wall DOM tubing, the Godde crew were able to build something with proper frontend protection, as well as land a home for the high-speed workhorse that is the Warn M8274-50 winch.

1973-jeep-j2000-nitto-ridge-grapplers-warn-8274

The short-bed truck was also outfitted with a custom DOM tubing rear bumper, which trimmed a bit off the back to increase the departure angle. Inside the bed rest is a tool box that keeps the relocated Optima Battery out of harm’s way. Under the bed, there’s an Air Zenith compressor hooked to a 15-gallon tank to make airing up at the end of the trail a quick affair. In case the gas-hog runs a bit low on fuel, a pair of RotopaX cans are attached to the tool box.

1973-jeep-j2000-nitto-ridge-grapplers

Trail Proven

A low lift height with a sizable tire is always a great combination. With a stable 120-inch wheelbase and 4,200-pound approximate weight, this classic pickup is incredibly capable off-road. While the previous owner may have gotten the truck started off on the right foot with proper rocker guards, fuel injection and a rear-axle upgrade, Harris did a great job of taking the build to the next level.

1973-jeep-j2000-nitto-ridge-grapplers

(Additional photos courtesy of Will Griffin.)

Hard Facts

VEHICLE1973 Jeep J2000 Townside
ENGINEAMC 360 V8
TRANSMISSIONT-18 four-speed manual
TRANSFER CASEDana 20
FRONT AXLE Open-knuckle Dana 44, open, 4.10 gears
REAR AXLEFord 9-inch, Detroit Locker, 4.10 gears
SUSPENSION (F/R)Custom 3-link with track bar front, King 2.0 coilovers/stock leafs, shackle flip, Rancho 7000 shocks
TIRES37x12.50R17 Nitto Ridge Grappler
WHEELS17x9 KMC XD229 Machete Crawl beadlock
MISCTom Wood's driveshafts, Warn M8274-50 winch, custom 1.75-in, 0.120 wall bumpers and sliders (primary tubing), RotopaX

Be sure to check out more shots of the truck in the gallery below! 

Want more rockcrawling action in your life? Check out our coverage of the 52nd Annual Easter Jeep Safari

Did You Spot These Fords at Fabulous Fords Forever?

$
0
0

As the largest gathering of Fords in the West, Fabulous Fords Forever is the show-to-go to see Fords of all types. While it’s great to see rows of Mustangs, one of our favorite things to watch for at this car show are the lesser-known models. This year, as Ford celebrates 115 years of making cars, we scoped out some of our favorites of 2018 Fabulous Fords Forever.

Fabulous Fords Forever 2018

First up, this must be one of the least known of the Fords—the Ford Pinto Pangra wagon. Built by Huntington Ford, the Pangra was a kit car of sorts modified from the best-selling Pinto Wagon. This particular car is Pangra #39 and the last made, the only one made from a 1974 model.

1974 Ford Pinto Pangra Wagon

Much more widely known, but almost as rarely seen is the Mustang II. Filling the ugly years of 1974-1978, out of the 1700+ cars at Fabulous Fords Forever this is the one-and-only Mustang II example we found.

Ford Mustang II - Fabulous Fords Forever

See more of what was on display at 2018 FFF in the gallery above—from more oddballs to modified modern Mustangs.


Reader's Rides: From Dreams to Keys

$
0
0

Building a car that is “just right” to suit our own needs and wants is what being an enthusiast is all about. Whether lifted or slammed, we want to see what fits your lifestyle and why you love it. Hear what these Driving Line readers feel about their vehicles and share your journey with us at #drivingline.

@d_ham96 | '14 Ram 2500 Laramie

Nitto Tires: Ridge Grappler

Dakota's Ram 2500 on Ridge Grapplers

“My daily driver is a ’14 Ram 2500 Laramie Mega Cab with the 6.7L Cummins. Lifted 5 inches on a set of 37-inch Nitto Ridge Grapplers, this truck provides an awesome balance of looks, capability and practicality. The Ridge Grapplers are the best tire I've found yet to do it all. Difficult-to-reach muddy jobs, hunting and snow-covered freeways to the summit—everything is done with confidence. The best part, however, is the fact I can drive 80 mph on the freeway and have a conversation at a normal voice level. So quiet and smooth!”

Check out more pics of this Ram on Dakota's Instagram @d_ham96

@seans54 | ‘04 BMW M3

Nitto Tires: NT01

Sean's BMW M3 

“I previously built a highly modified ’09 BMW 335i (twin-turbo) with full bolt-ons, E85, M3 suspension bits, Wavetrac LSD and so on. But the car would overheat at the track, regardless of the thousands of dollars I dropped into it, so I decided to build this ’04 BMW M3 with a naturally aspirated motor. It has never overheated on me and is an amazing track car. I run Nitto NT01 tires because they offer a tremendous amount of grip, are very consistent and predictable on track and are reasonably priced.”

Follow Sean's adventures on his Instagram @seans54

@kwatson160 | ‘10 Chevy Silverado 1500

Nitto Tires: Ridge Grappler

Koty's Silverado Prerunner on Ridge Grapplers 

“My truck is a ’10 Chevy Silverado 1500 4WD on 37-inch Nitto Ridge Grapplers and Method 101 beadlocks. I had Griffen Fabworks build me a 4WD kit, because I wanted the truck to be multipurpose. I can go fast over whoops, I can climb up hills easily and I can go fast or slow through the dunes and not worry about getting stuck. I have two young daughters who don't want to go fast all the time, so this truck is perfect for me. I can drive fast and aggressive for me or I can just cruise with my family.”

Check out more on Koty's Silverado on his Instagram @kwatson160

@lordposseidon | ’17 Chevy Camaro SS

Nitto Tires: NT555 G2

Gabriel's Camaro on NT555 G2s 

“Ever since I was a kid, I have always loved the Camaro—from the first-gen up to the sixth-gen. When Transformers first came out and Bumblebee was introduced, that piqued my interest even more, and I made it a personal goal of mine to own a Camaro, as Bumblebee was my favorite character from the movie. Now owning the sixth-gen Camaro SS, I couldn’t be happier, and it’s true what they say: If you don’t look back after you’ve parked, you bought the wrong car. A day never goes by without me thinking that I definitely bought the right car.”

Follow Gabriel on Instagram to see his Camaro @lordposseidon

Watch as we match up a reader's Carrera 996 against an R32 GT-R on the track in our Driver Battle series.

Product Spotlight: Mishimoto’s 6.4L Power Stroke Radiator

$
0
0

Virtually every vehicle produced comes with its own unique list of quirks, weak links, or catastrophic failure points. Sometimes even when a “new-and-improved” successor model solves prior issues, it brings with it a new breed of problems. Case in point, while the 6.4L Power Stroke’s revised head bolt and EGR system ruled out a lot of the blown head gasket issues associated with its predecessor, the infamous 6.0L, the compound turbo’d diesel mill in ’08-’10 Super Dutys quickly became notorious for something else: leaking radiators. Be it from chassis flex or poor build quality (there are theories which support both), failed radiators run rampant in these trucks. If you own a 6.4L Power Stroke and haven’t had to replace the radiator, consider yourself lucky. Nearly nine out of every 10 don’t make it past 100,000 miles.

With a reputation for offering products that solve both large scale and pesky, common problems on diesel trucks, Mishimoto Automotive designed an all-aluminum replacement radiator for the 6.4L engine. Not only are the end tanks TIG-welded to the core (instead of plastic units crimped onto an aluminum core), but the rubber-fitted mounting pegs relieve the stress that’s placed on the end tanks themselves. Throw in its added coolant capacity, stronger top and bottom core support plates and OEM-style, quick-disconnect connection points, and you’ve got a direct, drop-in radiator that solves a multitude of issues and provides long-term durability. It’s the cure for one of the 6.4L’s most common problems—and they sell like hot cakes.

We recently installed one of Mishimoto’s aluminum radiators on a ’10 F-250, a process that took roughly three hours. Follow along as we pinpoint the spot where the factory radiators fail and prove why the Mishimoto radiator outperforms and outlasts the factory piece.

Out With the Old

001-2010-Ford-F250-Radiator-Removal

Pulling the radiator on an ’08-’10 6.4L Power Stroke is very straightforward, but it is a bit involved. It calls for the removal of both the intercooler and the upper radiator support, along with disconnecting the transmission cooler bolts, transmission cooler lines and A/C condenser from the radiator. No special tools are required, but rather a small assortment of sockets (8mm, 10mm, 11mm deep well socket and 13mm), a ratchet, ratchet extension, needle nose pliers and a flathead screwdriver. Of course, you’ll want to take care to drain the coolant into a clean pan (if you plan to reuse it) or start over with fresh coolant. We recommend Motorcraft Premium Gold Engine Coolant if you choose the latter.

Bursting at the Seams

002-Ford-Power-Stroke-Radiator-Failure

This is the fate of most factory 6.4L intercoolers: the plastic end tanks separating from the aluminum core they’re crimped onto. If you notice coolant pooling under the front of the truck, it always pays to check to see if the lower radiator hose is the culprit, as they’re prone to leaking almost as often as the radiators themselves. The upper mounting clips (at the top of the end tanks) are reused during the installation of the Mishimoto unit.

Mishimoto 6.4L Radiator, Version 2

003-Mishimoto-Power-Stroke-Radiator

You’re looking at the second version of Mishimoto’s immensely popular 6.4L Power Stroke radiator. The cross flow-design, all-aluminum heat exchanger is capable of dissipating heat much better than the factory unit, and it’s proven vastly more durable than the updated units released by Ford. The radiator’s 2-row core design and increased core size effectively double coolant capacity (2.5 gallons vs. 1.25 gallons, stock), making it considerably more efficient in extreme working environments. The welded tabs on the front of the end tanks serve as mounting points for both the aforementioned transmission cooler and A/C condenser.

TIG-Welded to Perfection

004-Mishimoto-TIG-Welded-Aluminum-Radiator

To eliminate the end tank problem completely, the end tanks on the Mishimoto radiator are all TIG-welded. Constructed from aircraft-grade aluminum, tank wall thickness checks in at 0.098 inches. For version 2.0 of its radiator, Mishimoto increased core support thickness by 33 percent to keep the core from flexing when faced with inputs from the truck’s chassis. 

Quick-Disconnects Retained

005-Mishimoto-Quick-Disconnect-Outlet

A CNC-machined, factory-style quick-disconnect inlet and outlet make for a seamless integration with the factory upper and lower radiator hoses. Also notice the mounting peg along the end tank, which features a co-molded rubber over the top of the aluminum peg. The rubber is new for the second rendition of the company’s radiator and is designed to limit the truck’s torque transfer into the radiator by providing flex where it’s needed.

A Robust Core

006-2008-2010-Ford-Mishimoto-Radiator

Because the top and bottom rows of the Mishimoto radiator’s brazed aluminum core see most of the stress as far as the core is concerned, internally strutted tubes are present in the top and bottom eight rows for superior strength in this area. Dimensionally, the radiator core is massive, measuring 37 x 27.5 inches.

New Hardware

007-Mishimoto-Radiator-Hardware

Although much of the OEM hardware is reused during the install (thanks to its direct, drop-in replacement design), Mishimoto includes just eight M6 x 1.0 x 14mm bolts. However, the company also supplies a slick, magnetic 6061 aluminum drain plug with a Dowty oil seal.

Direct, Drop-in Replacement

008-Mishimoto-Radiator-Install

Essentially a 40-pound, 46 x 29-inch rectangle, the Mishimoto radiator is a bit awkward to install by yourself, so make sure you’ve got a helping hand to squeeze it into place in the truck. As you can see in the photo above, the factory fuel cooler can simply be detached from the radiator and allowed to hang during the radiator swap.

Further Reinforcement

009-Mishimoto-Upper-Radiator-Support

For the ultimate solution to the radiator-damaging chassis flex the ’08-’10 Super Duty’s are known for, Mishimoto also offers a robust replacement for the flimsy OEM upper radiator support bar. Mishimoto’s support bar features an all-steel construction, with welded tubular steel used in the center sections and cast anchor plates for mounting. Additionally, Mishimoto’s upper support bar provides enough clearance for a larger cold side intercooler pipe—an extremely popular bolt-on in the aftermarket.

Like the article? Subscribe to our newsletter to have more sent straight to your inbox!

Times are Changing: Ford is Cutting Car Lineup to Just Two Models

$
0
0

If you’ve been following the auto industry in the US or have just been out on the roads of America lately, you’ve no doubt noticed the ever increasing number of trucks and SUVs on the road.

Ford Red

Whether they are full size models or compact crossovers, American buyers have an insatiable appetite for vehicles that ride higher and have an abundance of cargo space—and sales of traditional sedans and compact cars have fallen off with the shift in consumer tastes.

Ford Blue

Some brands like FCA have already stopped making cars in these segments, and yesterday Ford announced it too will be heavily trimming its lineup of of sedans and compact cars and replacing them with SUVs and crossovers.

Ford Mustang

In fact, Ford will be phasing out several models from the American market, including the Fiesta, most Focus models, the Fusion and the Taurus. In the coming years, the only “cars” in Ford’s U.S. lineup will be the Mustang and the Focus Active (basically a Ford version of the Subaru Crosstrek).

Ford White

It is certainly a drastic step, and will likely come as shock to many who grew up in times when midsize and compact sedans were the defacto vehicles for most Americans. Not surprisingly, this news has generated a lot of negative response—particularly among the enthusiast set that has enjoyed recent Ford offerings like the Fiesta ST, Focus ST and Focus RS.

Ford Hatchback

Time will tell how the move pays off, and it will be interesting to see whether other carmakers follow suit in trimming non-SUV and truck models from their lineups in coming years. In the meantime, if you were thinking about picking up a twin turbo Fusion Sport, a Focus RS or any other of Ford's sedan or hatchback models, now would probably be a good time to do so.

Seeing as we're enthusiasts, we think that Ford should make a sedan version of the Mustang.

JLs On The Trail: 10 Things We’ve Learned 'Wheeling with the All-New Jeep Wrangler

$
0
0

We learned two important things while attending the 2018 Easter Jeep Safari. One: Always put sunscreen on your ears (ouch). Two: The 2018 Jeep Wrangler JL may be the best Wrangler ever produced. That’s a big statement, we know. However, spending a week on the trail with an assortment of them has taught us a good bit in a very short period of time. While there’s never a truly one-size-fits-all build formula when it comes to a Wrangler, we have learned some pretty critical information in regards to the JL.

2018-jeep-wrangler-jl-cliffhanger

1. Turbo Power

2018-jeep-wrangler-jl-20-turbo-four-cylinder-engine

The Jeep Wrangler has traditionally always had a four-cylinder option, and for 2018, a four-popper is back! This time, it’s paired with a factory turbocharger—a first for a Wrangler. We got to spend some time on the trail with the new 2.0L and were impressed with how lively it was with just a little bit of throttle input. There’s a bit of turbo lag, but thanks to the eight-speed transmission, it’s no slouch out of the hole. Considering it’s rated at 270hp and 295 lb-ft of torque, there’s a lot to like on paper about the 2.0L. Would it be our go-to over the V6 or even the 3.0L EcoDiesel option that’s on the way? That depends on what you’re looking to get out of the Jeep. If you don’t mind voiding your warranty, we think the turbo inline-four is going to have some great aftermarket tuning potential (we hope at least). It could also prove to be the fuel-economy boost the Wrangler so desperately needs.

2. Low Lift & Big Rubber

2018-jeep-wrangler-jl-low-lift-big-tires

Maintaining a low lift height with a large tire is one of the reasons why the Jeep Wrangler remains one of the most prominent off-road build platforms. Unless you’re going mud bogging, there’s never a good reason to have an excessive amount of lift. The JL’s large wheelwell openings have proven to be accommodating for 37- and 40-inch tall tires with very little lift. The highline fenders that come standard on the Rubicon seem to be the ticket for those wanting to run as little as 2.5 inches of lift and 37s. Removing the plastic sub fender on the JL has also proven effective to gain more room.

3. Transfer Case Upgrade

2018-jeep-wrangler-jl-transfer-case-synchronizer-removal

For those looking to yank out the factory axles in favor of an aftermarket set, be aware that you’ll need to split apart your transfer case. This is to remove the synchronizer (technically the synchronizer internals). The synchronizer works with the front axle disconnect to allow the four-wheel drive system to smoothly engage. We’ve found that failure to remove the T-case syncro internals can make for a challenging time engaging four-wheel drive (when a non-stock axle set is present). There is a work around, but it’s not the perfect fix. The first JL to report this problem was the Dynatrac Code1 JL build. You can read about the T-case upgrade here.

4. More Sensors = Less Problems?

2018-jeep-wrangler-jl-40-inch-nitto-trail-grapplers

As you probably guessed, the newest Wrangler has more advanced sensors than the outgoing model. However, this isn’t necessarily a bad thing. Unlike the JK, the JL has a transmission sensor that reads the output shaft speed in addition to the wheel speed sensors that are similar to the previous generation Wrangler. The plus side of the additional transmission sensor is that we’re hearing less issues of limp-home mode scenarios, which were more common in the JK when larger tires were present without being re-calibrated. This means you can bolt on a larger set of treads, without having to install a programmer. Although, you still should (more on that below).

5. Calibration Is Here!

If you’re going to change tire size or differential gears, your JL will absolutely work better if you can input those new figures into the computer. As of now, it looks like the first group to give JL owners this option is Dakota Customs. Its new calibrator allows you to adjust tire size, axle ratios, TPMS and more. There’s even a fun lightshow feature which you can check out in the video here.

6. Axle Strength

2018-jeep-wrangler-jl-cliffhanger

In the JL, Jeep engineers addressed two of the major short comings of the JK axles—the housing and brackets. However, Jeep has brought back a feature we haven’t seen on a Wrangler since 1995: a front axle-disconnect. This feature is on all front third Generation Rubicon Dana 44 axles and the new-style front Danas on all other models. Aside from the aforementioned improvements, the new Dana axles are fit with a new style electronic selectable locker in Rubicon applications and a gearset that’s designed to apply more contact between the ring and pinion. So far, we’ve seen the Rubicon JL axles hold up to a 37-inch-tall tire without failure. We’ve even seen some pushing the limits of the Rubi axles with 40s! Not something we would advise. Time will tell how they will hold, but after seeing the Rubicon JLs get punished off-road, we’re pretty impressed out of the gate.

7. The 8-Speed Is Great, Except…

2018-jeep-wrangler-jl-20-turbo-four-cylinder-engine

Mating the ZF eight-speed transmission to the 3.6L is exactly what the Wrangler needed to make the V6 really come to life. Jeep has been pairing this ridiculously stout transmission in the Grand Cherokee for years, and it’s also the same unit found behind the pavement-peeling Dodge Demon. It can hold just about any power you throw at it, but there is one drawback. This is more for Rubicon owners than the other Wrangler models. With a 4.71:1 first gear, some owners are complaining it’s almost too low when paired with the Rubicon’s 4:1 transfer case. Yes. There is such a thing as too low of gearing for off-road. Aside from inching your way across a technical rockcrawling section, there’s not much need for extreme transfer case gearing with that low of an available first gear. Thankfully, there’s a new six-speed manual option for those looking to have more gearing control on the trail.

8. Still a Smoke Show

2018-jeep-wrangler-jl-white-smoke

One thing we had hoped Jeep addressed with the 3.6L engine is the little issue of oil getting sucked in through the PCV valve during extreme climbs. The issue can be seen when you’re climbing a very steep hill or obstacle. As you sit at the extreme climbing angle, oil gets dumped into the intake via the PCV valve causing white smoke to billow out of the exhaust. This can be damaging to the engine if allowed for a prolonged duration. Don’t worry, this isn’t going to happen pulling up a steep driveway, but it is something that you need to be aware of on the trail.

9. Wind Noise

2018-jeep-wrangler-jl-hardtop

Wind noise and leaks are something Jeep battled with on the JK platform. While we haven’t learned of any leaky tops yet, we are hearing one common complaint for JL owners with hardtops—wind noise. In fact, many that are having the issue are upgrading from JKs and stating they find the new JL with the hardtop to be louder! This may be a fitment issue or slight growing pains with a new model, but it’s probably something Jeep was hoping was a thing of the past.

10. More Travel Out of the Box

2018-jeep-wrangler-jl-evo-mfg

The JL’s suspension is similar to the JK in many ways, but the increased bracket sizing and shock placement has opened it more for increased travel potential. So much so that we’re already seeing bolt-on suspension systems capable of netting over 15 inches of travel! More travel equates not only to a better ride, but the ability to keep the tires firmly planted on the ground. Remember, tires on the ground means traction and stability. We recommend doing your research when it comes to suspension systems as this is going to be an area that manufactures may vary wildly from one to the next.

Want to see some JLs in action? Check out a video of extremely modified ones tackling one of Moab’s most iconic trails: Cliffhanger.

Round 2 Rolls Around Nevada: NCRR 2018

$
0
0

Making an even bigger competition this year, John Goodby, the promoter of the Nor Cal Rock Racing series (NCRR), created total of five rounds to complete his show! That’s two more rounds of competitive motorsports for all you crazed Nor Cal fans. As the popularity for the sport continues to grow, so does the crowd and the fans who crave it as they keep coming back for more.

The thriving class of the UTVs will be granted two extra rounds exclusively to themselves, making it a five round race series as opposed to the normal three round series. “I wanted to expand the Side by Side (SXS) racing in the area. All of the other NCRR classes can’t really withstand any more events, but the SXS can because of their costs to operate and maintain,” explains Goodby. So there you have it folks…you now have the Nor Cal Side by Side Championship Series (NCSXS).

Familiar to the NCRR natives, Round 2 took place in Northern Nevada at the Wild West Motorsports Park. Underestimating the warm weather and clear blue skies, we all received our first farmer tans for the year. A true opposite from all the mud experienced in Round 1 last month at the Prairie City SVRA, the Northern Nevada short course offered a few tight turns and rock piles that not only demonstrated both uphill and downhill altercations, but were also stretched far and wide for some extended spectator gratification. There were plenty of rollovers, dicey pass attempts and visions of spinning rubber shadowing in the dust above.

4400 Class

Team Nitto's very own JP Gomez, the baby in the well known Gomez Brothers Racing team brotherhood, won the day…well…all day!

"I get to run this car to its limits, and not rolling it is always a plus,” said JP. Carrying his persistent streak of speed from Round 1 to Round 2, JP had the fastest lap time of 1:39:601, winning both his heats. Not far behind was his brother Raul Gomez with an extremely close lap time of 1:39:786. “It’s always fun racing the Nor Cal series as it’s an adrenaline rush through the whole course. High speed cornering and going through the rocks as fast as you can without losing any tires is always challenging.” The two brothers followed each for a while during the main, until competitor Brendon Thompson snuck in between for a second-place win, sending Gomez brother Raul home with third place.

4400 Race Results

  • 1st Place: JP Gomez
  • 2nd Place: Brendon Thompson
  • 3rd Place: Raul Gomez  

4500 Class

Desperate times call for desperate measures! Due to a family emergency, Dustyn Friesen called upon longtime family friend DSI Dave Schneider to pick up the car and have a whack at the NCRR competition in his place. Dave drove from California up to Canada and picked up the car on Wednesday before the race, a complete 24-hour roundtrip. With only three hours of sleep prior to practice, Dave focused the entire weekend and ended up having a blast! Come race day, the 4500 car finished second in the first heat and won their second heat. Dustyn's step son and co-driver, 17-year-old Woody Rose, willingly sided with Dave and together they won the main. After the race, Dave complemented his co-driver, “The kid was key to winning! He was absolutely on point.” Keep in mind that up until this race, Dave had never before driven Dustyn's car! Nor had he driven competitively for the last 18 months. Now that’s teamwork!

4500 Race Results:

  • 1st Place: Dustyn Friesen
  • 2nd Place: Mike Bedwell
  • 3rd Place: Justin Hall

4600 Class

Patience was a proven virtue for driver Peter Turgeon in the 4600 class. With both the 4600 and 4500 classes running at once, lapped traffic up a nasty uphill rock section turned for the worst in no time. With other competitors breaking or failing to make the pass, Peter decided to wait it out as he watched from the bottom until the mess cleared. Avoiding the carnage kept Peter safely on his wheels. “I just kept my driving smooth and consistent,” Peter claimed. He also admitted to having a front row seat as he watched 4500 competitors Justin Hall and Dave Schneider race their hearts out. “It was a great day of racing. Can’t wait for Round 3.”

4600 Race Results:

  • 1st Place: Peter Turgeon
  • 2nd Place: Josh Bacsi
  • 3rd Place: Anthony Thomas

4800 Class

Two days before the race, Wade Coleman and his crew discovered they had a bent rear housing. He took his 4800 car to Trent Fabrication and completed the repairs just in time. The car held strong for Wade to win his first heat…with the brakes failing on the last lap. After a solid recovery in the pits, Wade would drive conservatively during his second heat to avoid overheating the brakes and finish third. He was the first to drop into the rock section during his main. “After that I never looked back,” he explained. Girlfriend and co-driver Jeanette Chester kept tabs on the other drivers around them. Together, they led all eight laps and brought home the win.

4800 Race Results:

  • 1st Place: Wade Coleman
  • 2nd Place: Jeren Gunter
  • 3rd Place: Justin Day

Pre-RunnerClass

Run what you brung is the Pre-Runner class. Justin Radford, the returning champ from Round 1, felt he battled all weekend with his setup due to changing some stuff on the truck prior to race day. Despite the changes, it seems as though Justin and co-driver Joe Thompson made all the right decisions. “Each heat we were messing with settings trying to make it better, and right before the main we went drastic which seemed to give us more traction, so we had a better drive off the line to get in front of fellow competitor Ian Murray. I knew if I could just get in front of him, he would have a hard time getting around me. So, we did just that and came home with the win!”

Pre-Runner Race Results:

  • 1st Place: Justin Radford
  • 2nd Place: Zack Merrill
  • 3rd Place: Travis McCalla

Class 10

Class 10 Race Results:

  • 1st Place: Max Baggett
  • 2nd Place: Ryan Sargent
  • 3rd Place: Kameron Kallas

UTV 1000

As the shop owner of Auburn Extreme Powersports, Jeff Barbarick discovered an intriguing way to help promote his business: race UTVs. He started in 2014 and quickly learned about his competition, including Beau Judge. “Beau is hard to beat, I’ve taken second to him many times.” Taking advantage of the freshly watered down track, Jeff set off to a good start, which kept him in front of Beau for six laps out of the nine. Then…Jeff blew turn six, allowing Beau and the next driver to pass him. But soon after, Beau and the next driver got tangled up, allowing Jeff to retake first. “I was cruising the last lap, and my spotter said I had a good lead. When I came back to where Beau and car #89 were, the yellow flag was out. I slowed for the yellow flag which allowed the guy behind me to catch up. He tried to sling shot past me and take me on the outside in the last turn. We unfortunately locked tires and luckily, I was able to drive out of it. It broke my axle but I was able to drive it in for the win. Being in front of and maintaining the lead in front of Beau was the highlight of my weekend. That guy is a tough competitor and you have to bring it to beat him.”

UTV 1000 Race Results:

  • 1st Place: Jeff Barbarick
  • 2nd Place: Tim Compton
  • 3rd Place: Mark Olson

UTV Turbo

It was prep work times three for the UTV Turbo winner Beau Judge. With a total of three race cars, he was competing in both the UTV Turbo class and the UTV 1000 class, along with his son Braden competing in the UTV 170. Driving his new car only once before, Beau continued to create the perfect set up. He started out in eighth position for his first heat, and within the first turn on the first lap, he took the lead. Starting out in the front row for his second heat, he had a near perfect repeat, once again taking lead position. Within the first lap of his main, he built up a pretty good gap between himself and the rest of the pack, and only separated himself farther and farther away as the laps progressed. The man is untouchable! Curious, I asked Beau what would be the highlight of his weekend, and he responded, “I guess the highlight of my weekend would be winning in a brand-new car, and only my second time in it.” An outstanding accomplishment by an amazing driver!

UTV Turbo Race Results:

  • 1st Place: Beau Judge
  • 2nd Place: Brian Van Dyke
  • 3rd Place: Darren Nelson

UTV 170

Don’t blink…or you’ll miss him. At only nine years old, our winner of the UTV 170 class made this his fifth race in a row to conquer first place. Braden Judge started in the tenth position in his first heat, only to pass his entire class and take the lead by the time he reached the second turn! “I was excited to see the track was fast and wide,” Braden admitted. Winning his first heat put him in front for his second heat, leading the whole way. In his main, Braden duked it out between himself and second place after a few turns and exchanged a little bit of carnage, which included getting his back bumper torn off. Towards the end, Braden’s closest competitor got a flat tire, which guaranteed Braden the crown. Not only did Braden dominate the weekend, but unlike the rest of his friends, he got to be out of school on Friday!

UTV 170 Race Results:

  • 1st Place: Braden Judge
  • 2nd Place: Shelby Waterbury
  • 3rd Place: Wyatt Blevins

UTV 800

The 13-year-old Hailey McCalla has been riding quads and razors since she was two. For many years, she has loved watching Lucas Oil with her dad. It didn’t take much. When dad got a race truck, Hailey was hooked. The avid dancer and aerial skills artist won both of her heats. With the combined 800 and 1000 classes during her main, Hailey made it her personal goal to stay caught up with some of the cars from the 1000 class that started ahead of her. Battling every corner and straightaway, she ended up passing two of the cars from the 1000 class. With dad’s voice and the rest of the pit crew cheering her on over the radio, Hailey could feel the excitement. “I knew at that point that I had to keep pushing if I wanted to keep my lead on the other cars.” She did just that and held her lead position all the way to the checkered flag. Impressing us all, Hailey was touched when her competitor standing next to her at the podium mentioned how proud he was of her. “It was really great to see that I impressed someone so much that he included me in his speech,” Hailey added.

UTV 800 Race Results:

  • 1st Place: Hailey McCalla
  • 2nd Place: Kory Merrill

UTV 900

UTV 900 Race Results:

  • 1st Place: Anthony Fifer

When you’re the best in the west…it’s up to you to satisfy the rest!

Catch more of the best action around when Round 3 comes to town. Nor Cal Rock Racing next goes to the Prairie City SVRA on June 23, 2018.

Like the article? Subscribe to our newsletter to have more sent straight to your inbox!

Viewing all 5096 articles
Browse latest View live


<script src="https://jsc.adskeeper.com/r/s/rssing.com.1596347.js" async> </script>