Quantcast
Channel: DrivingLine: RSS Feed
Viewing all 5096 articles
Browse latest View live

Budget Diesel Mods: 6.4L Power Stroke

$
0
0

The 6.4L Power Stroke brought a whole new meaning to the words “plug-and-play.” Thanks to being equipped with quick-firing piezoelectric injectors, a high-volume injection pump and compound turbochargers from the factory, the 6.4L has arguably the best out-of-the-box potential of any diesel to ever grace the pickup segment. With custom-tailored tuning, the average ’08-’10 Super Duty can be taken from a measly 280rwhp to a Camaro-killing 580rwhp (along with an earth-rotating 1,200 lb-ft of torque). Granted, at $1,500 the 6.4L is a little more expensive to unlock than its predecessors (the 7.3L and 6.0L), but you get a lot more for the money. Take it from us, it’s pretty cool watching a tune-only, standard cab F-250 run mid-12’s in the quarter-mile.

Beyond the initial $1,500 hit, small tweaks in airflow (intercooler piping, intake elbow) and fueling (ported fuel rails) can help you creep past 600rwhp on the OEM turbochargers and injection system. Not bad, eh? Perhaps the best part is that—in most trucks—the factory 5R110 TorqShift automatic handles the added power quite well. However, and as you’ll find out below, pressing beyond this point requires you to spend some pretty big bucks. If 600hp simply won’t suffice, fear not, as we’ll clue you into what you need to do to keep your 6.4L reliable as you pursue even loftier goals.

6.4L Power Stroke Budget Mods

Stick around to find out what the cutting-edge 6.7L Power Stroke is capable of next!

Things to Keep in Mind:

  1. These horsepower recipes assume the truck you’re working with is in good overall health (injectors, lift pump, turbos, up-pipes, transmission).
  2. Without head studs, blown head gaskets can result with a hot programmer in the mix.
  3. Each budget assumes you’re starting new, with a bone-stock truck.
  4. The labor to have these parts installed has purposely been excluded.
  5. Warning: Things get expensive, fast, once you begin to venture past 600rwhp.

$1,500 Budget (550–580rwhp)

Custom Tuning: $789

001-Power-Stroke-Tuner

Similar to the 7.3L and 6.0L Power Stroke, custom tuning allows you to get the most out of your injectors. In the 6.4L’s case however, an incredible 550 to 580rwhp can be made with custom tuning in the mix. This is because the 6.4L Power Stroke makes use of a common-rail fuel system that employs lightning-quick, piezoelectric injectors and a Siemens K16 high-pressure fuel pump that outflows a comparable Bosch CP3 by 20 percent. On top of that, the engine benefits from compound turbocharging right out of the box. All of the above is a perfect recipe for making big power. (For reference, most ’08-’10 6.4L-powered Super Dutys make 280 to 290rwhp in bone-stock trim).

Race Exhaust: $430

002-Power-Stroke-Diesel-4-Inch-Exhaust

An aluminized, 4-inch diameter, turbo-back exhaust system is the most affordable path to opening up flow on a 6.4L Power Stroke. While aluminized exhaust systems don’t hold up as long as their stainless steel counterparts, those living in the rust belt can still expect to get a solid, 5-6 years out of them.

S&B Cold Air Intake: $299

003-SB-Filters-Power-Stroke-Diesel-Cold-Air-Intake

This is one of the most popular cold air intakes for the 6.4L. For the price alone, you simply can’t beat it. With a gain of 10 to 20hp, you won’t feel it in the driver seat, but this system eases serviceability, matches or exceeds the factory filtration standard and offers an oiled air filter option, which means it’s reusable.

$2,300 Budget (600rwhp)

Cold Side CAC Pipe and Intake Elbow: $439

004-2008-2010-Power-Stroke-Pusher-Intake-Kit

The 6.4L responds extremely well to subtle airflow mods. Pusher Intakes’ intake system for the ’08-’10 Fords replaces the restrictive factory cold-side intercooler pipe (passenger side) with an unobstructed, 3-inch diameter pipe and a smooth-transitioning intake elbow. During testing, Pusher’s components provided a 42 percent increase in airflow over the OEM pieces.

Stage 2 Ported Fuel Rails: $300

005-Elite-Stage-2-Power-Stroke-Fuel-Rails

Once a big horsepower tune is introduced, the 6.4L’s fuel rails are on the verge of being completely drained during prolonged instances of wide-open throttle. For a 25 percent increase in rail capacity, Elite Diesel Engineering offers Stage 2 rails, which adds a few more ponies to the mix and also helps improve responsiveness. When used in conjunction with the freer flowing cold-side intercooler pipe and intake elbow mentioned above, an extra 25 to 30hp and 80 lb-ft of torque can be gained (at the wheels).

  • Custom Tuning (Mentioned Above): $789
  • Competition Exhaust (Mentioned Above): $430
  • S&B Cold Air Intake (Mentioned Above): $299

$3,800 Budget (600rwhp)

Head Studs & New Head Gaskets: $829
006-ARP-Head-Studs-Power-Stroke

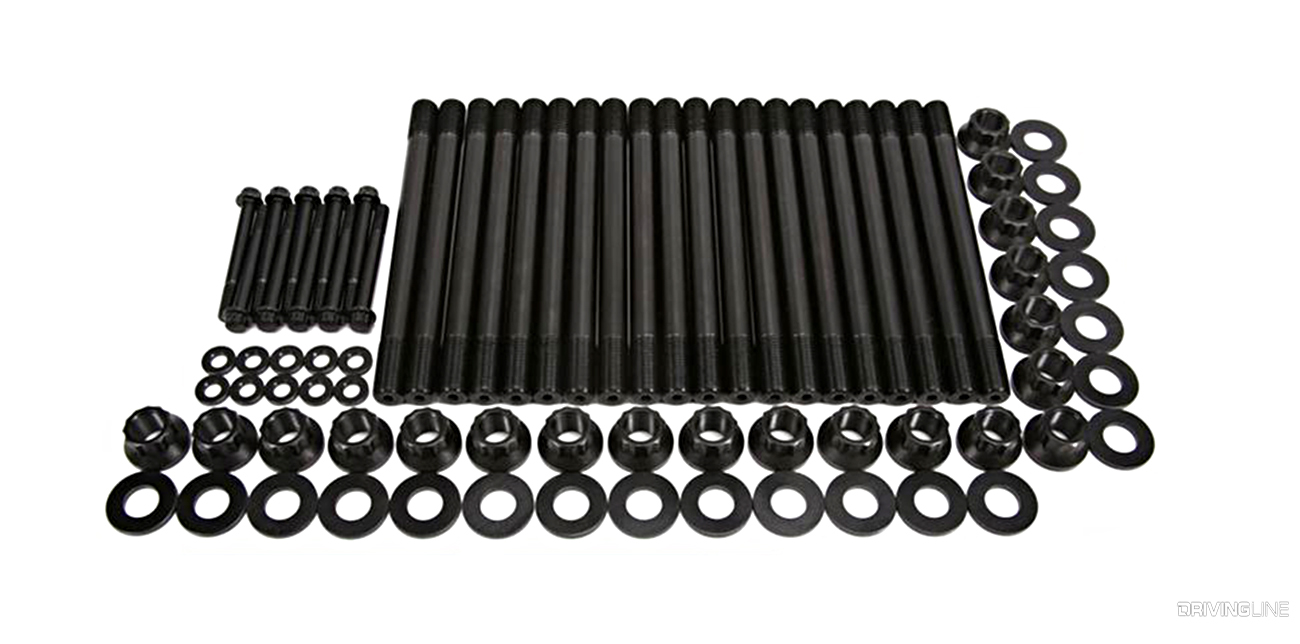
At 600 rwhp, you’ve played with fire long enough… Stud your engine! Just make sure you have the heads inspected and resurfaced by a reputable machine shop during this process—and don’t forget to make sure that your block’s deck surface is still within spec. Sinister Diesel offers one of the more affordable kits on the market, which includes ARP head studs and OEM Ford head gaskets.

Fuel Supply System: $721.05
007-2008-2010-Power-Stroke-Fass-Fuel-System

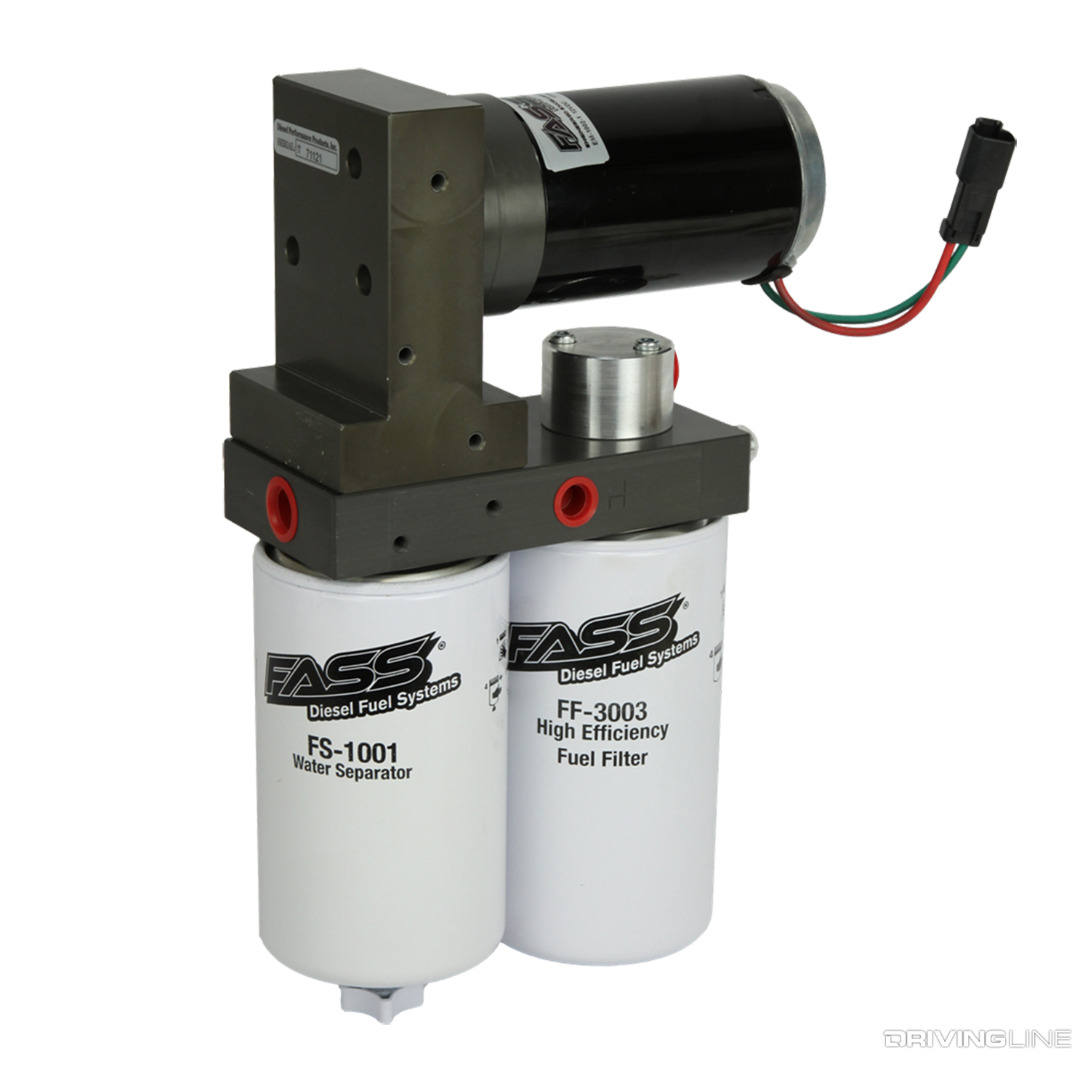
While the factory lift pump can support the high horsepower tunes that allow a 6.4L to clear 600rwhp, there is no denying it’s on the ragged edge when doing it. On some trucks, we’ve seen lift pump supply pressure fall to 0 psi by the end of a run. If left unaddressed, this will eventually kill both the lift pump and the expensive high-pressure fuel pump. Better safe than sorry here. With stock injectors, a 165 gph Titanium series FASS system will have no problem maintaining 10-12 psi of supply pressure under any circumstance.

  • Cold Side CAC Pipe and Intake Elbow (Mentioned Above): $439
  • Stage 2 Ported Fuel Rails (Mentioned Above): $300
  • Custom Tuning (Mentioned Above): $789
  • Competition Exhaust (Mentioned Above): $430
  • S&B Cold Air Intake (Mentioned Above): $299

$13,000+ Budget (650–675rwhp)

Drop-in Atmosphere Turbo Upgrade: $1,249
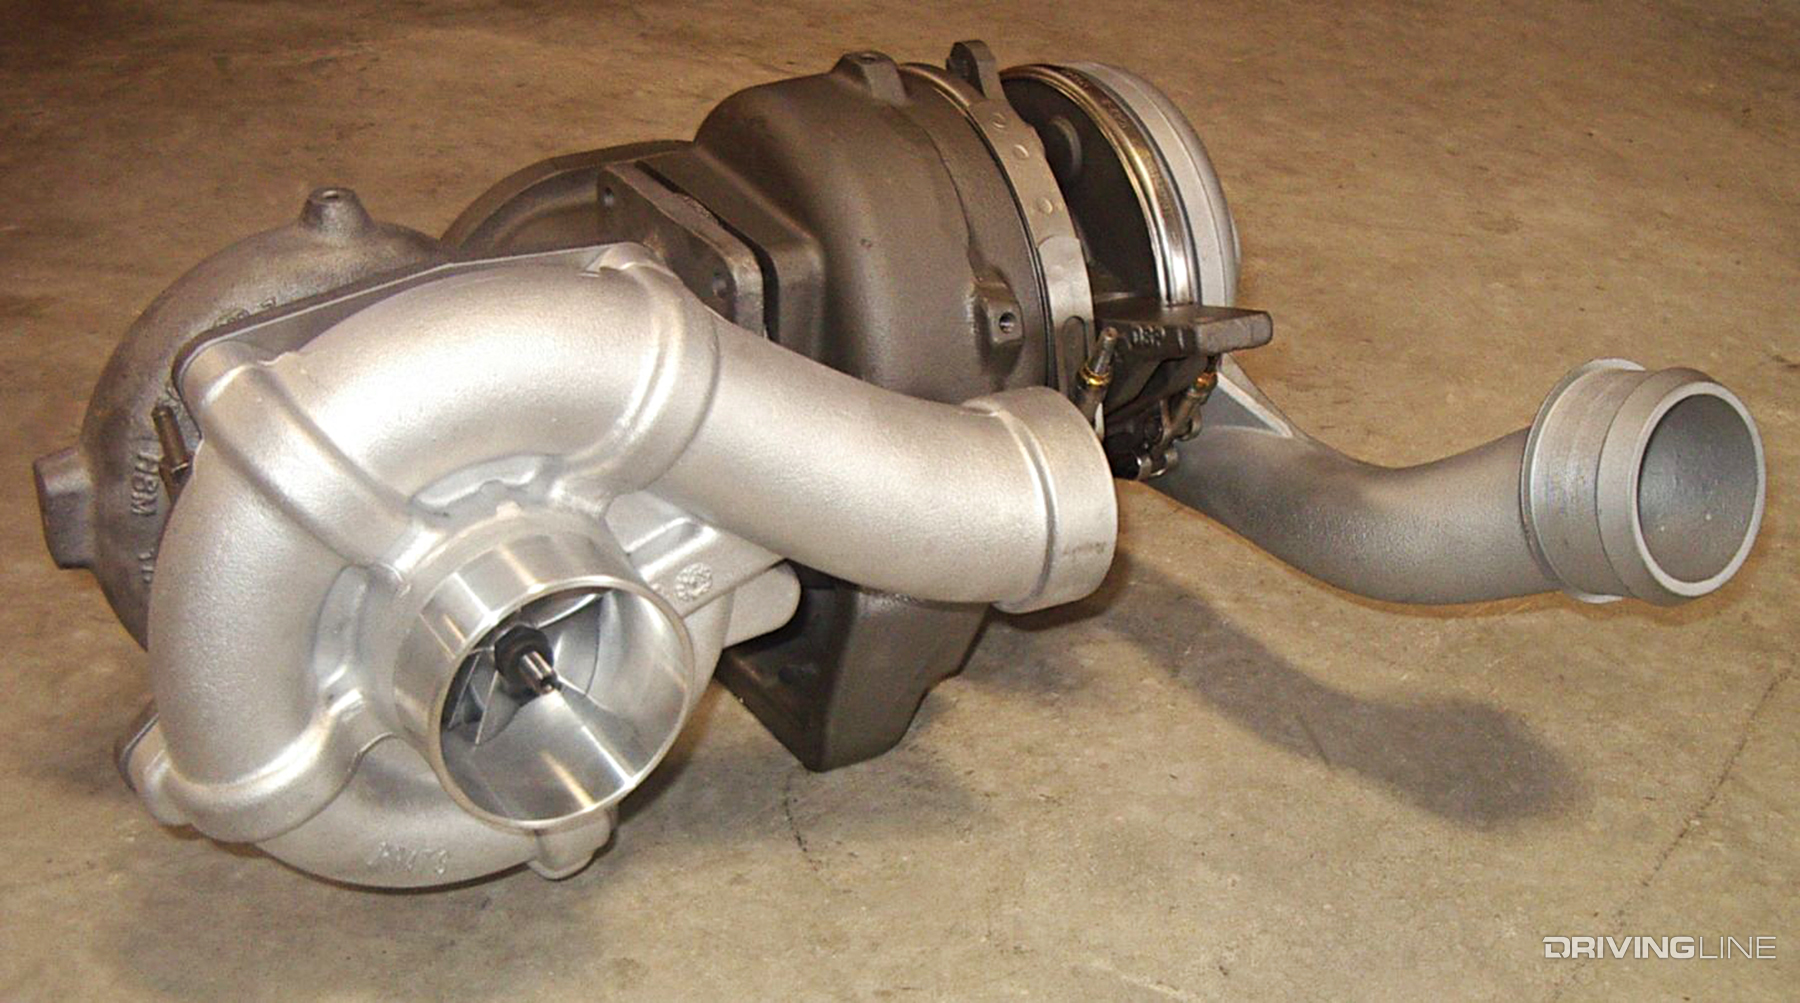
008-2008-2010-Power-Stroke-Sequential-Turbo-System

With the right fueling and tuning, River City Diesel’s 72mm drop-in atmosphere turbo can support more than 700rwhp. Built using the OEM-based, low-pressure BorgWarner charger employed in the 6.4L’s factory setup, it features a billet, 7-blade compressor wheel with a 72mm inducer (vs. 65mm stock). In addition to yielding a considerable power gain, peak operating EGT will be reduced as well.

Drop-in High-Pressure Turbo Upgrade: $1,499
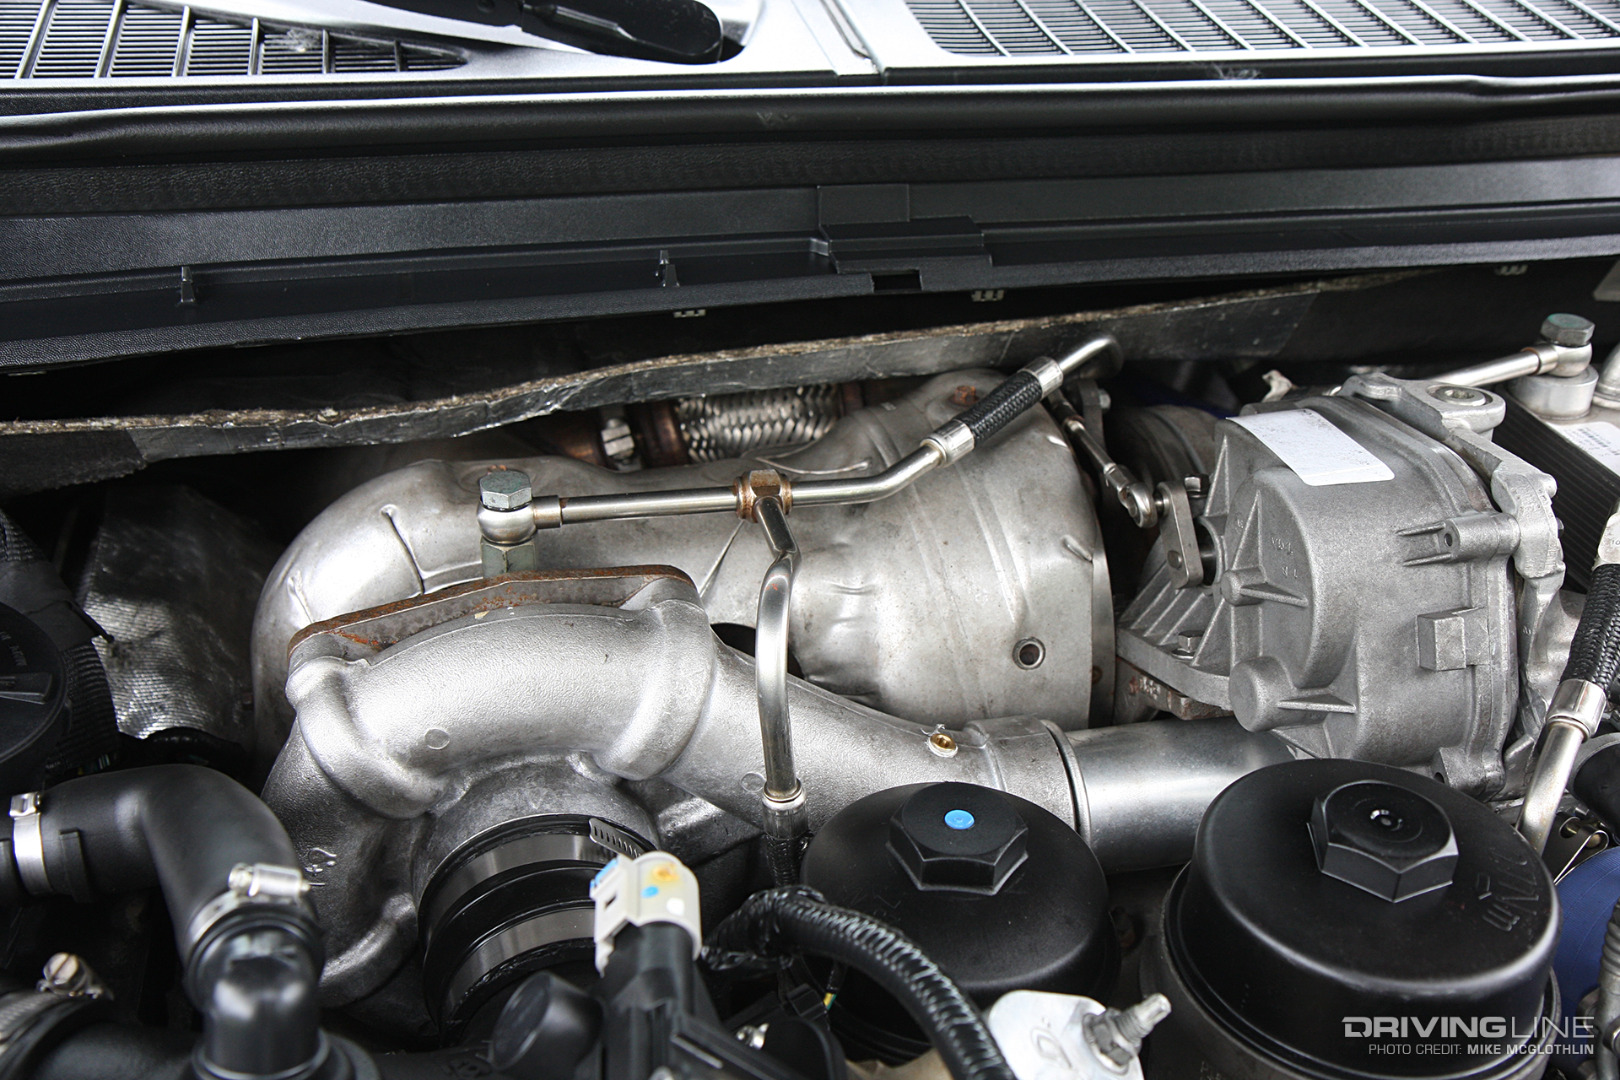
009-Power-Stroke-Sequential-Turbochargers

Like its atmosphere unit, River City Diesel’s high-pressure drop-in turbo replacement is based on the OEM BorgWarner charger and sports a larger compressor wheel. In this case, a billet, 7-blade wheel with a 59mm inducer is used (vs. 52mm stock). Being factory-based, this turbo also retains variable geometry functionality for instant transient response.

Built Transmission: $6,500

010-Elite-Diesel-Engineering-5R110-TorqShift-Transmission

Both Elite Diesel Engineering and Midwest Diesel & Auto offer built versions of the factory 5R110 TorqShift automatic in this price range. Either one will handle 700rwhp and regular tow duties without breaking a sweat.

No Limit Fabrication Cold Air Intake: $400

011-No-Limit-Cold-Air-Intake-Ford-Power-Stroke

With larger drop-in turbo options capable of outflowing most cold air intakes on the market, it pays to upgrade to a cold air intake that’s better suited for supporting higher flowing turbochargers. In testing, No Limit’s intake has proven capable of supporting 30 more hp than competitive aftermarket intakes.

  • Head Studs & New Head Gaskets (Mentioned Above): $829
  • Fuel Supply System (Mentioned Above): $721.05
  • Cold Side CAC Pipe and Intake Elbow (Mentioned Above): $439
  • Stage 2 Ported Fuel Rails (Mentioned Above): $300
  • Custom Tuning (Mentioned Above): $789
  • Competition Exhaust (Mentioned Above): $430

Now that you're powered up, learn about the weak points on the 6.4L. 


Ride of the Week: The Fall Guy Tribute Truck

$
0
0

If you are a child of the 80s, you might remember a popular TV show about a Hollywood stuntman and his high-flying Chevy truck, called "The Fall Guy". When veteran desert racer and Texas local Wyatt Pemberton decided he wanted to build his 2013 Chevy Silverado, he didn't know that the long travel half-ton would take on a reincarnated look of the original truck from the 1980s action show. While suspension technology has vastly changed in the 35 years since the original Fall Guy truck first jumped across your TV set, Wyatt's Silverado just proves that even classic looks are timeless. Watch the video above to get an even closer look at this modern rendition of one of the most loved television vehicles of the 1980s. 

Like the truck? A full feature is coming soon. And subscribe to our newsletter to get more articles like this sent to your inbox!

Grapple & Tow: ICON’s Stage 2 Ram Suspension Review

$
0
0

When Ram transitioned its ¾-ton trucks from a traditional leaf-sprung rear suspension to a 5-link, it was pretty revolutionary for the ¾-ton truck market. The transition to a multilink rear suspension not only gave Ram better control over the rear axle, but allowed them to improve upon the ride quality of the truck tremendously. Paired with a coil sprung front suspension using radius-style control arms, the modern Ram platform became an instant hit with truck enthusiasts and the suspension aftermarket. 

One option that also let the Ram stand out from the pack was rear air bags. This not only offered a smoother ride over the standard steel suspension trucks, but gave truck owners auto-load leveling. This feature alone made it a hot option for those planning on hauling heavy cargo and towing frequently. It was definitely a selling point on our 2014 Ram 2500, which has proven effective over the past four years.

However, as we’ve logged thousands of miles with our Cummins-powered pickup, we’ve found that the suspension in stock form could benefit from a bit more travel. Once we added on our ARB front bumper and Warn winch, it was painfully obvious that our stock suspension needed some help. Given that we use our truck primarily for towing and work, we didn’t want an outlandishly tall lift. We also needed something that would work with our rear air suspension.

Thankfully, we found what we were looking for from ICON Vehicle Dynamics. Well known for its high-end performance suspension systems, ICON’s Stage 2 2.5-inch kit fit the bill perfectly for our Ram. While the video above walks you through the install process, we’re diving more into what makes this kit an ideal solution for the 2014 and newer ¾-ton Ram trucks in the article below.

2014-ram-2500-icon-suspension-lift-nitto-ridge-grapplers

Dual-Rate Coils

To gain 2.5 inches of lift, ICON replaces the stock front coils with a set of dual-rate coils. These not only increase height, but create a smoother ride over the factory springs. Since we opted for the Stage 2 system, these coils are matched to work with the large 2.5 series ICON shocks.

2014-ram-2500-icon-suspension-lift-nitto-ridge-grapplers

2.5 VS Reservoir Shocks

Moving up to ICON’s Stage 2 series kit gets you the company’s 2.5 VS (Vehicle Specific) reservoir shocks. These CAD-plated, 1026 DOM steel shock bodies are ideal for ensuring the shocks stay cool after hours on the road and in the dirt. There’s even a built-in internal bump zone that adds additional dampening force through the final phase of the shock’s compression (upwards travel). This is especially helpful when hitting harsh bumps while supporting the type of front end weight our truck has.

2014-ram-2500-icon-suspension-lift-nitto-ridge-grapplers

CDCV

Speaking of compression, ICON has given you plenty of suspension control thanks to its CDCV technology. Short for Compression Dampening Control Valve, the 10 position adjuster knob allows you to easily tune the ride of your Ram. Ranging from soft (1) to hard (10), we found single click adjustments to be more noticeable as you reached the higher settings. This is ideal for those who use their trucks in a variety of on and off-road situations. While you can rebuild and revalve ICON’s VS series shocks, the CDCV setup makes for a much easier (and faster) way to dial in your truck’s suspension.

2014-ram-2500-icon-suspension-lift-nitto-ridge-grapplers

Securing the Reservoir

To give the fluid reservoir a secure place to attach up front, you’ll need to drill two holes into the top of the coil tower. Next, you’ll install the provided bracket and secure the reservoir in place via a set of hose clamps.

2014-ram-2500-icon-suspension-lift-nitto-ridge-grapplers

Air-Level Extension Rods

If your Ram is equipped with the factory air-ride option such as ours, ICON sells these air-level extension rods. They trick your truck’s level sensors, causing the bags to inflate more. ICON states these will provide an inch of lift, but we found they set the rear up closer to two inches.

2014-ram-2500-icon-suspension-lift-nitto-ridge-grapplers

Tires and Wheels

For tires and wheels, we laced on a set of 35x12.50R17 Nitto Ridge Grapplers and mounted them on 17x9 XD131 RG1 KMC wheels. Living in the southeast, and towing in a variety of conditions, we’ve found the Ridge Grappler to be an ideal fit for the truck. Being more aggressive than a standard all-terrain tire, its siped pattern and deep tread blocks give us traction in the dirt more commonly reserved for mud terrains.  

2014-ram-2500-icon-suspension-lift-nitto-ridge-grapplers

The Results

Once we wrapped up our lift and alignment at Low Range 4x4, we immediately put the truck to work. On road, we found the ride quality noticeably smoother. Hitting pot holes and speed bumps was no longer a seat quenching experience as the added lift gave the truck the much needed travel it was lacking. In the dirt, we found that setting the rear suspension to the lower alternate ride height setting prevented the air bags from topping out as quickly, thus creating a smoother ride overall.

2014-ram-2500-icon-suspension-lift-nitto-ridge-grapplers

We had two simple wants when we lifted the truck. First, we wanted to bring the nose of the truck up to level it out. Second, we desperately wanted more up travel to increase the ride quality. We hit both of those goals and then some. Sure, the steering on these trucks is already a little heavy from the factory, and adding a lift and meatier tires didn’t help that. But, the ride quality gains were well worth the minor tradeoffs.

2014-ram-2500-icon-suspension-lift-nitto-ridge-grapplers

We’ll have more adventures and upgrades for our Cummins coming soon. So, be sure to subscribe to our newsletter to stay up to date on all of our latest projects.

2014-ram-2500-icon-suspension-lift-nitto-ridge-grapplers

Looking to build your perfect Cummins powered tow rig? Take a look at this buyer's guide first!

Performance Driving Clinic: The Best $200 an Enthusiast Will Ever Spend

$
0
0

Last month when I took my daily driver Golf GTI to the local autocross, my idea was that it would be a last hurrah for the car in bone stock form before it started going under the knife for some long-awaited performance and aesthetic upgrades.

Performance Driving Clinic Golf Back

I didn’t have any plans to take the car to the track in its current form, but we all know how plans can change. This month my brother decided to bring his C5 Corvette Z06 to the Performance Driving Clinic hosted by Buttonwillow Raceway and he wanted to me to tag along to help him out.

Performance Driving Clinic Golf and Corvette Side

Initially my plan was just to go along with him and do what I could while taking some photos of the day’s activity, but the more I thought about it the more I realized I should just take my GTI and participate as well. If I was going to be spending an entire day at the race track, I may as well be driving right?

Performance Driving Clinic Interior

So a few days beforehand I registered, paid the $195 registration fee (which also included lunch and a $15 credit at the track’s gift shop) and got ready for a day on the track. Unlike a typical track day, which will have several groups of drivers ranging from beginners to experts, the Performance Driving Clinic is aimed specifically at drivers with little or no track driving experience.

Performance Driving Clinic Golf Side

While I’ve photographed more track events and races than I can count, I’ve only participated in track driving myself a handful of times—so I thought this type of HPDE experience would be perfect for a rookie like me.

Performance Driving Clinic Lineup

Inspection and Training

Saturday morning I woke up early and left my house at 6 a.m. in order to get to Buttonwillow in time for tech inspections and the drivers meeting. Seeing as how the GTI is a bone-stock car that's less than a year old, tech inspection was as quick as you would imagine.

Performance Driving Clinic Golf and Corvette Hoods

From there we headed to the drivers meeting where we met the organizers and had a short classroom session going over the basics of track day etiquette and safety, with a few helpful driving tips thrown in for good measure.

Performance Driving Clinic Meeting

From there we split into groups and it was time to get ready for some driving. Each participant was assigned a veteran racing instructor along with just one or two other students, so there was plenty of time for one-on-one training.

Performance Driving Clinic Group

While I was expecting to run one of the popular clockwise layouts at Buttonwillow, for this event we’d be running a more unusual counterclockwise layout. It turns out the Performance Driving Clinic runs different layouts each time, which keep things challenging and exciting for students.

Performance Driving Clinic Track

For the first two laps, the instructors took the wheel of our cars while we rode shotgun. We lapped the track at roughly half speed while my instructor Scott showed the ideal line, how much of the curbs to use, which corners were especially tricky and other inside tips.

Performance Driving Clinic Golf Racing

After that it was time for the real fun to begin as we hopped into the driver's seat for our first session. From this point on, if participants desired, instructors could ride with them or they could run alone while asking for advice in between sessions. Or, for more learning the instructor would drive your car or you could go for a ride in their car.

Performance Driving Clinic Golf Windsheild

Going Solo

After seeing the ideal line on my ride along, I decided to go solo and see how it went. It took some time to acquaint myself with the unusual course layout, but once I did I was able to gradually get more confident and drive faster.

Performance Driving Clinic Golf Front

After lunch there was another short drivers meeting where we could ask questions or get feedback after the morning sessions. From there we were free to drive the rest of the afternoon.

Performance Driving Clinic Wheel

The flyer for the Performance Driving Clinic promised lots of track time and the event didn’t disappoint. With only two or three run groups, there was just enough time to let the cars cool down and relax a bit before it was time to go back out and drive.

Performance Driving Clinic Civic

How the Golf GTI Handled the Track

Speaking of letting the car cool down, I was really interested to see how the Mk7 handled punishment and how it’d perform in showroom spec. The answer is "quite well" on both accounts. While I wasn’t pushing the car to the absolute limit, I never overheated the factory Performance Package brakes despite their OEM pads. And the VAQ diff did a great job helping me power out of the corners.

Performance Driving Clinic Turn

As I found when I went autocrossing last month, the biggest limiting factors were the GTI’s low-grip, all-season tires that were always the first thing to give up when it came to accelerating, braking or turning through a corner. They just don't quite stand up to the rest of the car's capabilities.

Performance Driving Clinic Straight

And while the GTI will ultimately understeer at the limit, as most FF cars are apt to do, that seemed to be a bigger issue on the super tight autocross course than on the more varied race track. However, I can definitely still see how a damper and sway bar upgrade will pay dividends when it comes to chassis balance.

Performance Driving Clinic Turn 2

Fun for Everyone

But if anything, my experience at the Performance Driving Clinic only made me realize the small importance your car actually has during entry level HPDE situations. There was a wide variety of cars taking part in this particular event, and while some were certainly going faster than others, your car actually had little to do with how much fun you had or how much you learned.

Performance Driving Clinic Parked Rear

For example, my brother's Corvette is for all intents and purposes a much more serious performance car than my GTI, but we agreed that we both ended up having an equal amount of fun.

Performance Driving Clinic Corvette Racing

In fact one driver was out there in a completely unmodified Chevy Caprice PPV ex-cop car—if this guy could have an enjoyable and educational track experience, then you can truly do so in any vehicle. There are really no excuses when it comes to your equipment.

Performance Driving Clinic Cop Car

All was said and done, both my brother and I ended up getting so much track time that we packed up 30-minutes early and headed home.

Performance Driving Clinic Drive Home

Driving home I felt both tired and incredibly satisfied with my decision to join in the fun. Now I can’t wait to go back and do it again, especially after the suspension upgrades I'll be doing to the car this month.

Performance Driving Clinic Gas Station

Whether or not you have visions of a becoming a track day junkie, I'm now convinced that spending a couple hundred bucks on an experience like the Performance Driving Clinic might just be the best money a car enthusiast will ever spend.

Curious about getting into motorsports? Learn all about the Golf GTI going autocrossing for the first time!

Additional Track Photos by Cali Photography

Racer Recaps: First-Hand Accounts of the 2018 King of the Hammers Race

$
0
0

Battle-worn and bruised, the top ten finishers of the 2018 King of the Hammers rolled off the stage and into the crowds for hand shakes and photo ops. We caught up with Josh Blyler, Shannon Campbell, and Loren Healy to get a quick recap of how each of their races went. From headaches to heartaches to unexpected finishes, these drivers go through a roller coaster of emotions on race day. But as any Ultra4 racer knows, the hunger to win King of the Hammers never subsides. 

Josh Blyler - 4th Place Finish:

Shannon Campbell - 6th Place Finish:

Loren Healy - 7th Place Finish: 7th Place Finish:

To catch all our coverage of the 2018 King of the Hammers, check out our KOH headquarters page

Where the JDM Classics Meet in Japan: JCCA New Year Meeting

$
0
0

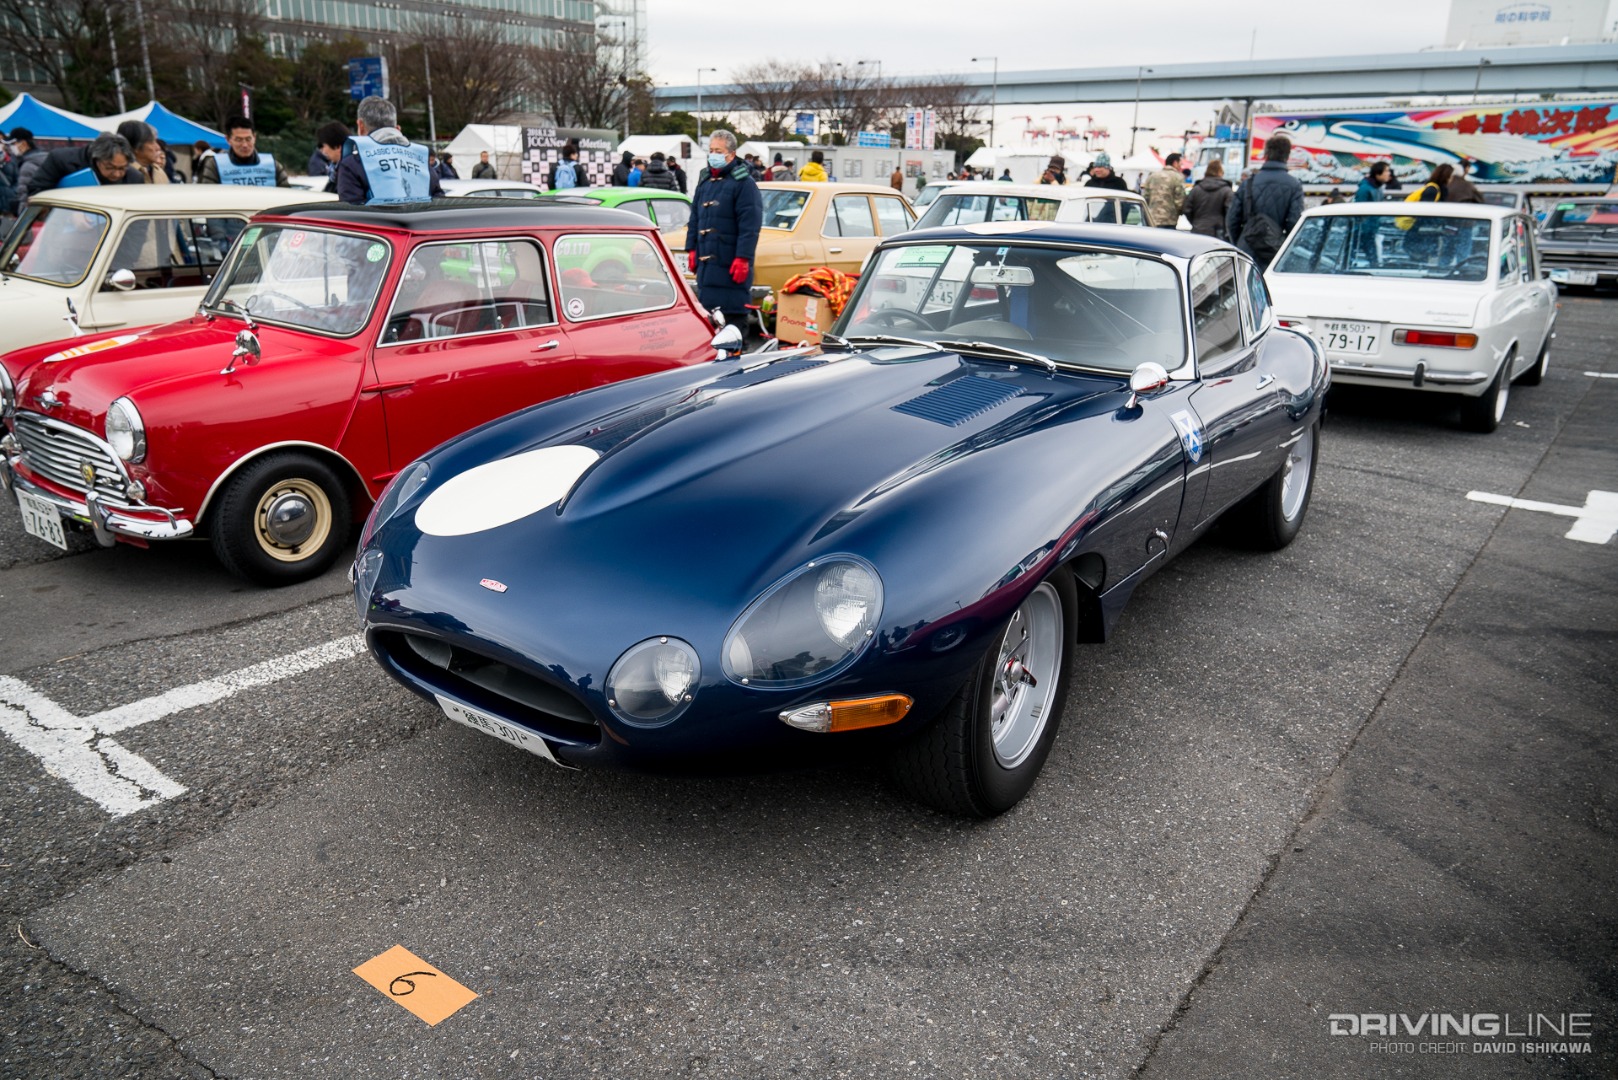
The Japanese Classic Car Association gatherings are the place to see fully restored versions of vintage vehicles in Japan. Each year kicks off with the JCCA New Year Meeting, which, despite the unusually cold weather this year, saw a healthy turnout of classics and attendees. As you'd expect, the majority of cars on display were Japanese, a few European classics made their presence known as well.

Japanese Classic Car Association 2018 New Year Meeting

While we enjoy seeing custom classics too, like the Nostalgic2Days event, one can't help but be impressed by taking a step back in automotive history with these beautiful examples. 

Browse through the JCCA show in the gallery above or read on for our cream of the crop picks.

Levin or Trueno

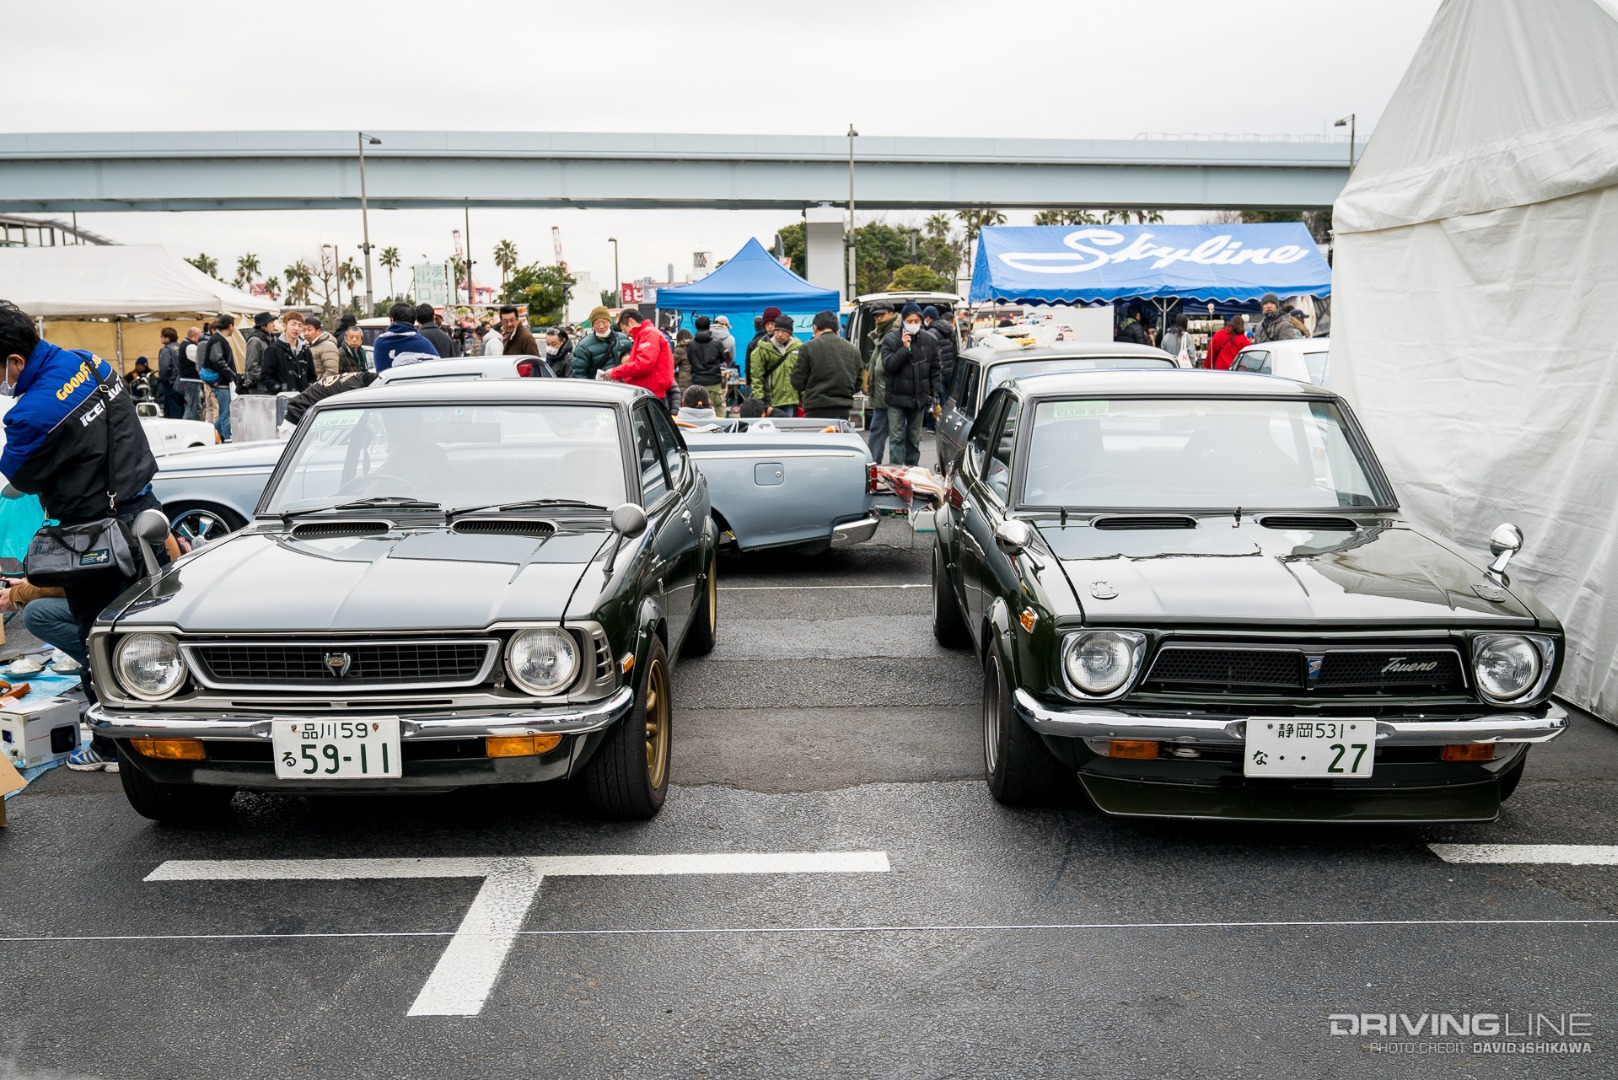
"Levin or Trueno?" It's an age old question that started long before Initial D and the battle to see who could outrun the tofu delivery guy. A perfect example of this early battle was on display with this pair, which, just like their more contemporary siblings, are more about styling differences than anything else. With variations in both front and rear lights, these later versions of the second-generation Levin and Trueno are a perfect example of why there is no clear favorite.

Japanese Classic Car Association 2018 New Year Meeting Levin Trueno

Datsun B110

There were plenty of Datsuns on hand, including the legendary Fairlady and the 510. However, we were feeling the Datsun B110s, and this one really caught our attention. This B110 just happens to be a Nissan Sunny B110, and unlike a lot of the other restored B110s or race-prepped versions, this one still has the appearance of being daily driven with a comfortable interior and mild fender flares with a set of classic Speed Star Racing FLII wheels.

Japanese Classic Car Association 2018 New Year Meeting B110

The Bubble Car

While not Japanese in origin, these FMR Tg500s seem very well suited for Japan's small streets. With a history in aeronautics, the influence can be seen in the Tg500. With only 320 produced, we consider it a privilege to get to see not just one, but two up close and personal.

Japanese Classic Car Association 2018 New Year Meeting Tg500

Mazda Cosmo

You can't talk about Mazda history without mentioning the Wankel engine. One of the first cars to be produced with the Wankel engine, the Cosmo is the predecessor to the beloved RX-7 and even the RX-8. Recent sales put these cars in the $100,000 to $200,000 price range—so if you want your own, it may empty your bank account but is still accessible... unlike our next cars.

Japanese Classic Car Association 2018 New Year Meeting Mazda

Million Dollar Babies

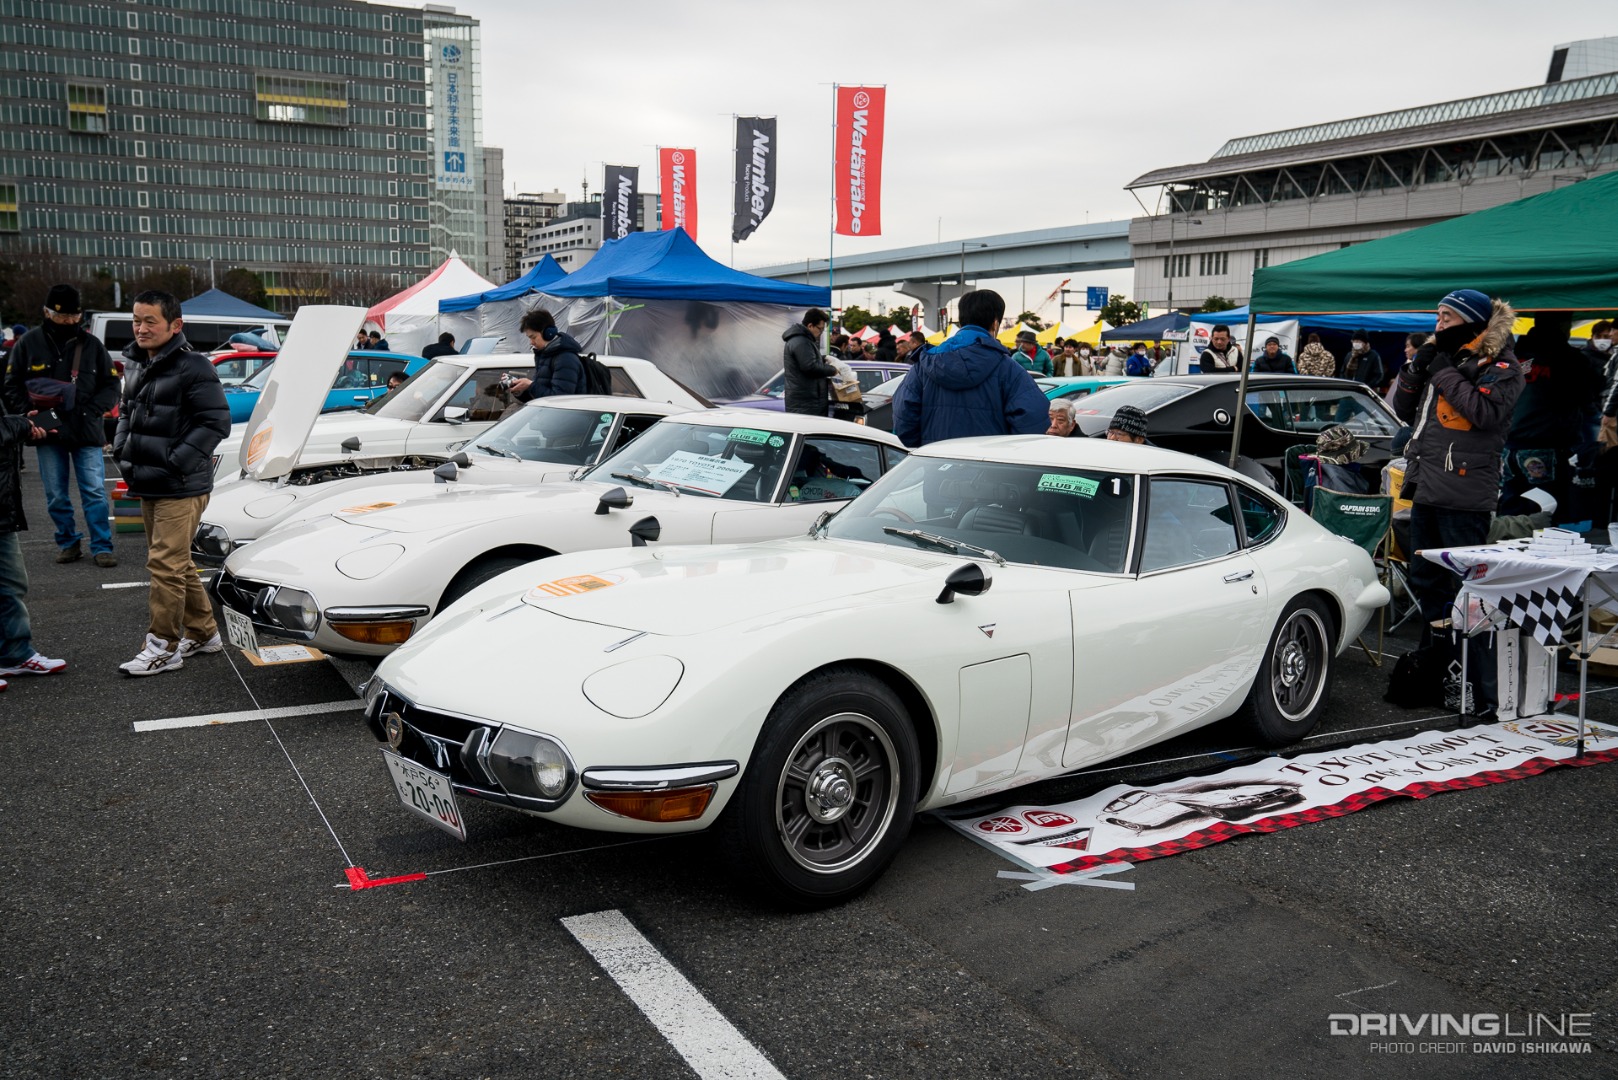
Many of us have never seen a million dollars, except for in movies—so, when we came across three million dollars, our jaws dropped. Although there were a couple of replicas at JCCA, there were in fact three pristine Toyota 2000GTs, each potentially valued at one million dollars each. What makes these cars special? With only 351 hand-made 2000GTs ever produced, combined with their movie-worthy sleek design (featured in the James Bond movie, "You Only Live Twice") these cars are highly prized. Even rarer are the left-hand drive versions—just 62 were built for the U.S. and their value increased immediately, with more recent sales breaking the one million dollar mark.

Japanese Classic Car Association 2018 New Year Meeting 2000GT

How About Some Outlaws?

In the nearby parking lot, one can also experience a slightly different style of Japanese classic cars. Calling them "outlaws" might be a bit of an extreme classification, but back in the late '70s and early '80s these cars and their owners were definitely the bad-boys (and girls) on the street. The exposed oil coolers, extended body work and crazy exhaust pipes are just a few signature characteristics of these cars, but we were impressed with the quality and upkeep that many of the builds showed off.

Japanese Classic Car Association 2018 New Year Meeting outlaws

Make sure to check out the gallery above to see more from the JCCA show and lot.

Budget Diesel Mods: ’89-‘93 Cummins

$
0
0

Even though the P-pumped Cummins receives most of the glory in the Dodge performance realm, the 5.9L inline-six that started it all can be made to make power, too. Often referred to as first-gens, the inaugural Cummins B-series option offered in ’89-’93 Dodge ¾- and 1-ton trucks debuted with a rather docile, 160hp rating. However, with less than $1,000 invested, its power can effectively be doubled. With a little more than 100 bucks thrown at the rotary-style, mechanical Bosch VE injection pump, an extra 80 to 100rwhp can be unlocked and a broader power band achieved.

Beyond the initial “easy mods,” the first-gen trucks aren’t much different than any other modern-day diesel. That is to say that larger injectors will be in order, a turbo upgrade will be required to match the extra fuel and the transmission (or clutch) will eventually have to be addressed. Out of all the diesel enthusiasts we come across, first-gen owners are probably the most hands-on and budget-oriented of the bunch. While the aftermarket parts and prices shown below represent some of the most budget-friendly options available in the aftermarket, make no mistake that if a component can be machined, tweaked, built or installed in the driveway, a first-gen owner will tackle it.

Holding out for a P-pumped Cummins? Stay tuned. We’ve got one of the most comprehensive, budget-based horsepower lists ever compiled for the ’94-’98 Dodges coming your way next!

89-93 Cummins Truck

Things to Keep in Mind:

  1. These trucks are old. Most of them were produced more than 25 years ago, so don’t expect everything to be in perfect condition (injectors, injection pump, transmission, turbo).
  2. The ’89-’91 engines were non-intercooled and came with slightly different pistons, injectors, turbos and transmissions (TF727 vs. A518) than ’91.5-’93 versions.
  3. Considerable money can be saved or spent elsewhere once the clutch has been upgraded in trucks with manual transmissions.
  4. Each budget assumes you’re starting new, with a bone-stock and perfectly healthy truck.
  5. Most of the items listed in these budgets are stuff that you and a buddy or novice mechanic could install in a weekend. As such, the labor to have these parts installed has purposely been excluded.

$900 Budget (250-300rwhp)

Crank Up the Fuel Screw: Free!

001-1989-1993-Cummins-Bosch-VE-Injection-Pump

You gotta love mechanical injection, and this mod can net you as much as 70 additional ponies. Cranking up the maximum fuel screw is performed by locating and removing the tamper-proof cover positioned over the fuel screw at the lower, rear side (firewall side) of the VE injection pump, removing the fuel screw’s locking collar and then turning the fuel screw clockwise.

Helpful Tip: Pull the air filter before you perform this mod, because if you turn the fuel screw in too far the engine can run off (i.e. rev until the pump or engine seizes), and you’ll need to snuff out the turbocharger in order to kill the engine (a 2x4 or clipboard will suffice).

3,200 RPM Governor Spring: $20  

002-Cummins-Governor-Spring

Trust us, with the early 5.9L Cummins mills being governed around 2,500 rpm from the factory, you’ll be glad to have an extra 700 rpm at your disposal. For just 20 bucks, the 3,200 rpm governor spring from Pure Diesel Power is one of the most beneficial mods you can make to your first-gen Cummins—and the added rpm doesn’t warrant the need for stiffer valve springs.

High-Flow Air Filter: $27

003-Cummins-FleetGuard-Air-Filter

With the 3,200 rpm governor spring installed and higher rpm in the mix, more air flowing through the intake is needed. The FleetGuard AF4555M is the perfect replacement air filter for the job and is also a mainstay in first-gen performance (does not fit ’93 trucks).

Prince of Darkness Injectors: $480

004-Industrial-Injection-POD-Injectors

Made by Industrial Injection, the Prince of Darkness injectors (or POD’s as they’re often referred) have long been a budget-friendly, entry-level injector option for first-gen owners. They’re known to be a tad on the smoky side, but they provide a 50rwhp bump on the cheap.

Denny T Stage 1 Fuel Pin: $85

005-Cummins-Diesel-Fuel-Pin

Another well-documented power-adder for the ’89-’93 Dodges is the “Denny T” Stage 1 fuel pin (the fuel pin is also known as the fuel cone) from Denny T Performance. It allows the VE pump to be fueled harder as boost comes up and is typically good for a 30hp, 50 lb-ft of torque gain at the wheels.

Quick note: A lot of folks grind their factory pin to suit their needs, but there is definitely a point of no return once you break out the grinder.

Turbo-Back Exhaust System: $275

006-Cummins-Exhaust-System

Although many first-gen owners either build their own exhaust systems or have a local shop do it, Diamond Eye Performance offers fairly affordable 4-inch, turbo-back systems such as this. It’s aluminized, so keep in mind that it won’t last as long as the stainless steel versions, but those of you living in the rust belt can still expect to get a solid 5-6 years of use out of it.

$2,200 Budget (300-350rwhp)

Auto Meter EGT and Boost Gauges with Pillar Pod: $300

007-1992-Dodge-Cummins-Gauges

While adding easy power to a Cummins is fun, don’t burn down the barn! Get yourself a pyrometer to measure exhaust gas temperature (EGT) and a boost gauge to keep tabs on the turbo. As a general rule of thumb, don’t spend a lot of time above 1,400 degrees on the pyro or allow the turbo to see 35 psi of boost for extended periods of time.

Killer Dowel Pin (KDP) Repair Kit: $65

008-Cummins-Killer-Dowel-Pin-Kit

If you’re willing to pour a couple grand into one of these trucks (or any ’89-’02 model, for that matter), it pays to address the killer dowel pin issue before it’s too late. During assembly at the factory, a dowel pin was pressed into the Cummins’ block in order to locate the timing gear housing. Over time, this pin can work its way loose and cause catastrophic internal damage. At just $65, TST Products offers one of the most affordable killer dowel pin repair kits on the market.

60mm Compressor Upgrade: $285

009-First-Gen-Cummins-Turbo-Upgrade

With plenty of extra fuel in the mix at this point, it’s wise to help the 5.9L breathe a little deeper. Gillett Diesel’s compressor upgrade replaces the factory Holset turbocharger’s compressor wheel with a 60mm inducer version, along with the corresponding high-flow compressor housing (note that ’89-’91 engines were equipped with a 50mm turbo while ’91.5-’93 engines had a 54mm version). Gains of 30rwhp can be seen with this 30-minute turbo upgrade, along with a 100 to 200 degree drop in EGT.

Heavy-Duty Torque Converter: $650

010-First-Gen-Cummins-Goerend-Converter

For bigger budgets, it’s worth throwing a solid torque converter at the TorqueFlite 727 (’89-‘91) or A518 automatic (’91.5-‘93) behind the Cummins. This heavy-duty, single disc, non-lockup converter from Goerend Transmission features stock stall speed for lighting smaller turbos. If you’re working with a five-speed Getrag-equipped first-gen, we would install a clutch with a 425hp, 900 lb-ft rating from South Bend at this point.

  • Crank Up the Fuel Screw (Mentioned Above): Free!
  • 3,200 RPM Governor Spring (Mentioned Above): $20
  • High-Flow Air Filter (Mentioned Above): $27
  • Prince of Darkness Injectors (Mentioned Above): $480
  • Denny T Stage 1 Fuel Pin (Mentioned Above): $85
  • Turbo-Back Exhaust System (Mentioned Above): $275

$4,400 Budget (350-400rwhp)

DDP Stage 3 injectors: $745

011-DDP-Stage-3-Cummins-Injectors

Along with the addition of a higher flowing turbocharger, these injectors can push your first-gen into the 400rwhp zone. Available from Dynomite Diesel Products, one of the most trusted names in Cummins injector performance, they flow 55 liters per minute (LPM).

Turbo Upgrade: $1,575

012-Cummins-High-Tech-Turbo

To further improve airflow both in and out of the first-gen 5.9L Cummins, it’s hard to beat the performance a BorgWarner S300 turbocharger provides. For affordability and substantially improved top-end flow, the Super Stock 62/71/14 from High Tech Turbo is a sound, bang-for-your-buck option. The “62” refers to its use of a 62mm inducer compressor wheel, the “71” means it employs a 71mm exducer turbine wheel and the “14” indicates that a 14cm2 turbine housing is used.

AirDog Fuel Supply System: $599

013-Air-Dog-Fuel-System

Getting the most out of larger injectors boils down to a strong lift pump. An all-inclusive, compact, 100 gph AirDog fuel system will ensure the VE injection pump sees adequate supply pressure under all driving conditions.

  • Auto Meter EGT and Boost Gauges w/Pillar Pod (Mentioned Above): $300
  • Killer Dowel Pin (KDP) Repair Kit (Mentioned Above): $65
  • Heavy-Duty Torque Converter (Mentioned Above): $650
  • Crank Up the Fuel Screw (Mentioned Above): Free!
  • 3,200 RPM Governor Spring (Mentioned Above): $20
  • High-Flow Air Filter (Mentioned Above): $27
  • Denny T Stage 1 Fuel Pin (Mentioned Above): $85
  • Turbo-Back Exhaust System (Mentioned Above): $275

Like the article? Subscribe to our newsletter to get more sent to your inbox!

Naturally Aspirated King: The 2019 911 GT3 RS

$
0
0

These days Porsche offers a wide variety of 911 models suited to different types of buyers and budgets, and you really can't go wrong with any of them. But for hardcore enthusiasts there are always a few variants to get extra excited about—namely anything with an “RS” attached to the name. And whenever a new one comes out, it's a pretty big deal.

Porsche 911 GT3 RS Front

Next month in Geneva, Porsche will debut the latest iteration of the iconic 911 GT3 RS, and not surprisingly it looks to take everything that's great about the current model and make it that much better.

Porsche 911 GT3 RS Rear

True to the GT3 name, the 2019 model is still powered by a naturally aspirated flat six, but in RS this particular 4.0L is honed to make an incredible 520hp and will spin all the way up to 9,000 rpm. This makes it the most powerful naturally aspirated production 911 ever. With a seven-speed PDK gearbox, Porsche says the new car will hit 60 miles per hour in three seconds flat.

Porsche 911 GT3 RS Interior

As with previous GT3 RS models, the chassis and suspension was honed by experience through Porsche's Motorsport Division and features four-wheel steering, weight savings throughout, a rigid rear wing and additional aero enhancements.

Porsche 911 GT3 RS Wing

Additionally, both the front and rear decklids are made from carbon fiber while the roof is magnesium. Inside, the rear seat has been removed and the front seats are well-bolstered carbon fiber full buckets to keep the driver planted during track driving.

Porsche 911 GT3 RS Finish Line

After being shown in full at Geneva in a couple weeks, the 2019 911 GT3 RS will hit American showrooms this fall with a base price of $187,500 before options. Sure, go ahead and put us on the list.

Like the article? Subscribe to our newsletter to have articles sent straight to your inbox.


7 Things to Know Before Selling Everything and Moving Into an RV

$
0
0

Millennials have a bad reputation. They desire meaningful and purposeful lives, but at what expense? Living on the road and ditching the boorish checklist of adulting has become a phenomenon. Check Instagram or YouTube and you’ll find a barrage of DIY’ers building campers and young, good looking couples living in VW vans. They all seem to earn a living merely by telling you how to earn a living out of a van.

I’m 31 and considered an “Oregon Trail Millennial.” I am wholeheartedly pursuing the notion that life has more to offer, and perhaps it’s on the road. I’m taking my wife and one-year-old son, living nomadically through the United States. It’s a romantic concept from afar, but I decided to take the plunge, head first. We’ve sold most of our possessions and purchased a large camper. I’m attempting to live happily on the road, adventuring through the country, seeing cool things and experiencing my family, my life and the world around us. Here are a few of the lessons we quickly learned in our first month on the road.

7 Things RV Dog

1. The Set Up

Finding the perfect combination of budgeting, while meeting your needs and desires, makes traveling worthwhile—the truly fun part is the planning. Luxury camping is a huge industry, so there are plenty of options ranging from cheap to expensive and turn-key to DIY.

I already had a 100,000-mile 2006 Ford Econoline E-350, my own grocery-getter and motorcycle hauler, and it luckily has a 3.5-ton towing capacity, allotting for plentiful options of tow-behind trailers. Of course, I couldn’t use gooseneck/fifth wheel trailers, but those are too expensive anyway.

7 Things RV Econoline Front

We quickly jumped on a used 2016 Eclipse Milan, a 26-foot tow-behind camper with a fiberglass shell, at a local dealership. It had an entry-level price, mid-level amenities and being only slightly used meant it felt new. The bank even treated it as a new purchase, resulting in an easy loan. When I picked up my camper after the purchase, the dealers laughed at my van, but all my research confirmed it was within the weight limit classified by Ford.

7 Things RV Milan Campsite

I have around $5,000 invested the van, including the required towing additions. I ordered a complete towing package through Summit Racing for about $700, which included a trailer-brake controller, hitch, bolt-in-hitch receiver, 7-way plug and a weight distribution kit. I also made a trip to the junkyard to attempt to use factory Ford trailer wiring. The weight distribution kit required concentration and some fine-tuning. It transfers the weight from the tow vehicle onto the trailer, meaning the van handled tremendously better when adjusted properly.

Many RVs are based on the Econoline chassis, which uses a frame-mounted accessory battery box; I purchased one from a friend at Vantage Optics. This second battery provides an extra jump if we need it and helps to charge the camper batteries while on the road. I installed a heavy-duty relay so the battery is only in parallel when the ignition is hot. I also used a secondary fuse box from Amazon and wired up additional interior lights and plugs throughout the rear of the van, including a cheap, cigarette-plug 110-volt inverter. I finished the upgrades with a storage rack, and now have a mobile work station.

2. Camper or RV

For me the choice was easy. We already owned the Econoline, so a tow-behind was the way to go. (A “tow-behind” trailer is a mid-level camper that is a step up from a pop-out and step below a fifth-wheel in terms of size.)

7 Things RV Towing

While a tow-behind camper made the most sense for us, there are quite a few tradeoffs between campers, RVs and RVs with a tow-behind vehicle. Depending on your priorities and budget, you may favor one over the other.

 CAMPERRVRV WITH TOW-BEHIND
PRICELeastMiddleMost
STRUDINESSLeastMostMost
TOWINGLeastMostMost
RV AREA PARKING SPOTLeastMiddleMost
MOBILITY ONCE PARKEDYes, with larger vehicleNoYes, with smaller vehicle

7 Things RV Child

3. Rest Areas Are Great

Just hearing the words “rest area” can leave you with a sketchy feeling; they’re dark, dingy and filled with the noise of idling trucks. But, in my short experience, most rest areas are quite comfortable places to stay a night.

7 Things RV Milan Woods

Yes, trucks idling is annoying, but inside the camper, especially if I have my own generator running, it’s bearable. They’re far from the busy streets of a town and usually well-kept with an occasional on-site employee, so vagrants and homeless don’t often visit rest areas. This means visitors tend to keep to themselves or simply keep moving. The rest areas we’ve encountered felt safe for our family, plus they’re free, which is always a win.  

4. Dry Camping and Backups

RV sites provide mobile-life necessities, but depending on the season and how tourist-heavy the area is, nightly rates stack up higher than your average Southern California rental property. In order for this trip to happen, we have to pay for it, which means making a conscious effort to keep costs low. Coined “dry camping” (no hookups such as electric, sewage, etc.), an occasional dry overnighter here and there greatly lowered our monthly average.

7 Things RV Flag

Dry camping creates certain needs, however, meaning we need special items like either a generator or a battery/inverter system for extended periods of time (more than a couple nights). Our batteries will power the basics, like lights and cooking, for about two nights of use—unless it’s around freezing or below.

I’ve scheduled backups for the most important elements of our trip, too. For instance, I have four roadside assistance memberships: AAA, GoodSam, Kawasaki Riders Group (got a deal through a friend) and Verizon Hum X. I have enough tools to fix most roadside emergencies too, but having several systems in case one isn’t effective is important. Luckily though, we did not encounter any emergency situations.

7 Things RV Child Hand

5. Living or Loving, Renting or Buying

This lesson is more for the normal RV or camper user, and not those living on the road. Our timeline started by purchasing the camper several months before we departed. This meant paying ridiculous Southern California storage fees.

7 Things RV Milan Child

It cost us around $250 a month for the payment and $250 in storage—it was expensive just to let the camper sit. If you use an RV once a season (three weeks in a given year), rent, don’t buy.

  • Rental Day: $50-$200
  • Rental Weekly: $800-$1,500
  • Yearly Cost (three weeks in a year): $2,400-$4,500
  • Owning Daily Cost: $16
  • One Month Owning/Storage: $500
  • Yearly Cost: $6,000

Bottom line, unless you're spending over $6,000 per year in rentals, keep renting.

6. Rich Man, Living Like a Poor Man

Many long-termers use solar panels, which charge batteries and invert power from 12 volts to 110 volts. They’re environmentally friendly, silent and can be used non-stop. However, solar panels—if you have enough of them to be useful—and inverter systems are expensive. 

We currently use two 12-volt marine batteries mounted on the camper’s frame, meaning our primary supply of power is 12 volts and propane. Our water pump (sink and shower) is 12 volts and our refrigerator, heater, and hot-water heater operate on propane. Our plan for the future is to use a generator for 110-volt power, but it’ll primarily power the A/C unit—an unnecessary accommodation in Oregon’s winter.

7 Things RV Milan Interior

A camper’s insulation is limited, so simple tricks like blankets over windows or using double-sided tape for lining are important. Luckily, propane is cheap in most places (avoid RV sites for propane, sometimes they gouge). It varies greatly, but generally filling two bottles cost $30-$70 and would last us at least three weeks using the heater often during the winter. 

7. It’s Always a Good Time

Our winter-time travel wasn’t all bad. Though cold temperatures were difficult in some areas, RV resorts were rarely sold out and tourist destinations mostly calm. If you like to avoid the bustle of crowds, winter is a great time to travel.

7 Things RV Tree Phone

Friends and family discouraged us when we decided on our departure date, but there is no wrong time to travel. If you have the desire and are able to find the means, do it. I’ve had the ability to happily dwindle part of my life savings and experience the country, and my family, in a way I couldn’t have dreamt possible.

7 Things RV Family

Quick Tips

  • Mom and Pop RV spots are legit. Use Yelp to its fullest potential.
  • Try to purchase only one night at a time, then experience the site before upgrading to a longer stay.
  • Purchase quality sewage hoses.
  • Plan, but be flexible.
  • Be patient when traveling. Double your expected arrival time.

Like the article? Subscribe to our newsletter to get more sent straight to your inbox!

Storm on the Horizon: Tracing Today's Super-SUV Origins

$
0
0

America loves trucks. It’s an undeniable fact, with pickups leading the sales charts for decades and “crossover” vehicles pushing the old-school station wagon and minivan completely out of the picture. Instead of utilitarian appliances for getting people and stuff from here to there, they’ve become the family car, a status symbol and most improbably, they’ve even cut into sports car territory.

The 2018 Jeep Grand Cherokee Trackhawk has a supercharged V8 engine that delivers 707hp and despite tipping the scales at 5,258 lbs, it will run 0-60 in 3.5 seconds. The Trackhawk will also lighten your wallet by a minimum of $86,995.

Trackhawk

A rung down the ladder in raw performance and horsepower, but a big step up in prestige and price tag, you’ll find the Porsche Cayenne Turbo S. In exchange for nearly double the Trackhawk’s MSRP at $160,650, you get a twin-turbo V8 with 570hp, translating to 3.8 second 0-60 times. Handling isn’t ignored either, with the Turbo S running sub-eight-minute Nürburgring laps.

Cayenne Turbo S

BMW also offers a similar twin turbo V8 über-SUV, the $101,695, 567hp X5 M with essentially identical performance to their long-time rival’s top “truck”. Add in Lamborghini’s recently announced Urus and Ferrari’s interest in creating their own SUV, and the “sport truck” market is far more crowded than when that name was coined more than two decades ago. Insane performance (and equally insane price tags) are the rule, but back at the dawn of the ‘90s, the idea of a powerful engine and full-time AWD stuffed into a truck or SUV chassis was merely insane.

Urus

Turbocharge All the Things!

The end of the 1980s was a golden age for crazy ideas at General Motors. Coming off the smog-choked and oil-embargoed ‘70s, GM began throwing turbochargers at their tried and true 4- and 6-cylinder engines, creating some noteworthy hits—the 3.8L V6 that powered the now-legendary turbo Buicks—and some forgettable misses—anybody recall the Pontiac Sunbird Turbo? Inevitably, General Motors’ truck-centric GMC division caught the fever as well and began plans for their own turbocharged “halo” vehicle.

Dating back to the original GTO that dropped a 325hp V8 into the (relatively) compact 1964 Pontiac Tempest, the idea of marrying a high output engine with a small chassis wasn’t a new one, but the concept of a “sport truck” wasn’t something any manufacturer had taken seriously. As the ‘80s drew to a close, the only factory trucks with performance aspirations were oddballs like Dodge’s Lil' Red Express, available for just the ‘78-’79 model years and boasting mediocre high 15-second quarter mile performance and big-rig-inspired styling.

Chevrolet took a stab at the concept in 1990 with the 454SS—a full-size pickup with a 230hp big block under the hood—but the true ancestor of every modern sport truck and SUV was still to come. The year before, the LD5 V6 had migrated from Buick’s discontinued Regal turbos to the Pontiac Trans Am 20th Anniversary production model, and at least one prototype Chevy S-10 had been constructed with a Grand National-spec engine under the hood.

Chevy 454SS

While this “GN pickup” garnered interest, several things would change between concept and production; the truck would gain full time all-wheel drive, the 3.8L Buick V6 would be replaced with a turbocharged version of the 4.3L LB4 V6 already found in the S-series trucks and it would be branded as a GMC to provide market differentiation from Chevy’s 454SS.

First of a New Breed: The GMC Syclone

The result was the 1991 GMC Syclone (spelled that way to avoid legal issues with Ford, who still owned the “Cyclone” trademark). Its all-iron 4.3L V6 was basically three quarters of a small-block Chevy V8, sharing bore spacing, cylinder dimensions and certain components with its larger siblings, but unlike run of the mill 4.3L engines, it sported nodular iron main caps, special head gaskets and bespoke pistons to lower the compression ratio to 8.35:1.

GMC Syclone Front

Oh, and there was that turbo, too—a Mitsubishi TD06-17C regulated to 14.7 psi that fed air through a Garrett air-to-water intercooler and past a Corvette-spec throttle body. The engine was conservatively rated at 280hp at 4,400 rpm and 350 lb-ft of torque at 3,600, besting the 1991 Corvette’s 250hp naturally-aspirated L98 V8.

GMC Syclone Typhoon Sonoma

Backing the turbo V6 was a 700R4 four-speed overdrive automatic transmission, mated to a Borg-Warner transfer case to provide full time AWD through a viscous coupling. This dead-simple center differential normally directed the engine’s torque to the rear wheels, but if wheelspin caused a difference in speed between front and rear, the fluid in the coupling would progressively direct more torque to the front, up to a 35/65 split.

GMC Syclone Engine

Other performance hardware included a lowered suspension, unique 16x8 “turbine” wheels shod in 245/50R16 Firestone all season performance tires and the first four-wheel anti-lock braking system installed on a production truck. According to contemporary magazine testing, the Syclone was capable of 4.6 second 0-60 times and 13.4 seconds at 98 mph in the quarter mile, putting it on par with the very quickest factory vehicles available in 1991.

Cosmetically, the Syclone took a page from the Buick GNX, available in any color you wanted as long as that color was black. Unique body cladding and badges further identified the Syclone, and occupants were enthroned in special black cloth seats with red piping and embroidered Syclone logos on the headrests. The instrument cluster with its integrated boost gauge came from the aforementioned Turbo Sunbird, while the shift knob was shared with the Corvette. Finally, a soft vinyl tonneau cover came standard to conceal any small cargo bouncing around in the bed.

GMC Syclone Ad

Production was handled by PAS Inc. in Troy, Michigan, the same company that had previously built the Turbo Trans Am. Outsourcing specialty model assembly to PAS freed up capacity for the popular compact truck line at GM’s Shreveport Operations plant where the bare chassis were built.

With a base MSRP of $25,970 (about $47,600 in today’s dollars), the Syclone was a performance bargain compared to a base Corvette at $32,455, but was breathtakingly expensive when stacked up against the $15,445 1991 Camaro Z/28. It also suffered an identity crisis as a truck, with placards warning against carrying more than 500 pounds in the bed. Despite these factors, out of a projected run of just 3,000 units, 2,995 were actually built for the 1991 model year. While only three “pilot” 1992 Syclones were made, the experiment was successful enough to spawn the 1992 Typhoon.

More to Love: The GMC Typhoon

It wasn’t much of an engineering challenge to transfer the Syclone’s powerplant and AWD driveline to the GMC Jimmy 3-door SUV, as both shared the same body-on-frame underpinnings, but the 1992 Typhoon added more creature comforts. In addition to the ability to terrify more than one passenger at a time, Typhoon buyers also received leather seats and a self-leveling rear air suspension. While still rated at 280hp, the published figures for torque rose to 360 peak lb-ft, and Car and Driver reported that 0-60 times had risen to 5.3 seconds with the quarter mile passing in 14.1 seconds at 95 mph, thanks to the increased 3,822 pound curb weight (more than 200 pounds more than the Syclone.)

GMC Typhoon Front

Though black on black would still be the most-produced color combination for 1992 Typhoons, buyers were offered a number of different combinations of body colors, including the quintessential ‘90s choice, bright teal over gray. All this could be yours in 1992 for the low, low price of just $29,530—or $52,745 today. A total of 2,497 were built for the 1992 model year, and 1993 brought another 2,200 built, with black on black again leading the color choices.

GMC Typhoon Side

The end of the road came in 1993. With the changeover to the second-generation Sonoma and Blazer pending for the 1994 and 1995 model years, Typhoon production ended, and with it, GM’s experiment in true high-performance trucks and SUVs.

The Blue Oval Strikes Back: The F150 Lightning

Though GM was content to offer weak-sauce “performance” trucks in the following years, like the naturally-aspirated Chevy S-10 SS (which was mostly an appearance package combined with a 180-200hp 4.3L V6), Ford had taken notice. The 1993 SVT Lightning, originally intended as a competitor for the 454SS, took the full-size F-150 and added a 240hp 5.8L engine along with a suspension, wheel and tire package, but could only struggle to a 7.2 second 0-60 time. In its favor was the sub-$22,000 base price, and the fact that it was better suited to doing “truck things” than the Syclone, resulting in more than 12,000 being sold between 1993 and 1995, almost three times what the Syclone and Typhoon sold over their three-year run.

Ford Lightning

Ford took a second bite at the apple with a revised Lightning based on the tenth-generation F-150 in 1999. With a starting price of $29,995 ($45,032 today) and powered by a 5.4L Modular V8 topped by an Eaton supercharger pushing 8 psi that delivered 360 peak horsepower and a thumping 440 lb-ft of torque, the second-gen Lightning was finally creeping into SyTy performance territory with a 5.8 second 0-60 and a 14.3 second quarter mile. Detail changes added another 20hp and 10 lb-ft for the 2001 model year (and pushed the base price to $32,460, or $45,727 today), and times dropped to 5.2 seconds in the 0-60 sprint and 13.8 for the quarter mile.

Ford SVT F-150 Lightning

Over the course of the 1999-2003 model years, Ford produced more than 28,000 SVT Lightnings, proving a market existed for performance trucks, but with the advent of the redesigned 11th generation F-150 for 2004, the model was dropped.

Not Quite the Same: The Chevy SSR and Dodge Ram SRT-10

While the Lightning was in its heyday, GM began development of the Chevrolet SSR (Super Sports Roadster), based on a concept unveiled at the 2000 Detroit Auto Show to rave reviews. The 2003 production SSR featured “retro” styling and a retractable hard top. Power for 2003 and 2004 models came from a 5.3L Vortec V8, rated at 300hp and 331 lb-ft, and when asked to drag around the SSR’s hefty 4,764 pound curb weight, the results were “meh” at best. Zero to sixty took seven seconds flat, and 15.4 at 89 mph in the quarter mile put the SSR’s performance on par with the Honda Accord V6. 

Chevy SSR Red

For 2005, the SSR got LS2 power and output improved to 390hp and 405 lb-ft. Also new was an optional six-speed manual transmission. With the new engine and transmission, the SSR was now capable of a 5.5 second 0-60 time and ran the quarter in 14.1 seconds at 100 mph. Base pricing rose just shy of $1,200 from the SSR’s introduction, making it less expensive with inflation factored in, but it was still a lot of money for something that occupied the same territory in terms of performance and practicality as the Plymouth Prowler. The SSR didn’t truck well, didn’t have the performance enthusiasts hoped for and suffered from love-it-or-hate-it styling, all of which conspired to cause its cancellation after the 2006 model year with just over 24,000 units sold.

Chevy SSR Blue

In 2004, Chrysler jumped into the game with what still stands as the high point of “sport truck” displacement with the Dodge Ram SRT-10. They got the engine part right, using the 8.3L, 500hp/525 lb-ft V10 engine from the Viper, but wrapped it in over 5,000 pounds of full-size pickup. Even so, 60 mph came in a mere 4.9 seconds and the quarter mile was dispatched in 13.6 seconds at 106 mph. Two-door pricing started at $45,850 ($61,068 today) and added another $5,000 for the quad cab version. Like the first and second gen Lightnings, the SRT-10 also did “truck things” reasonably well, but after three years and 9,527 units built, it too rode into the sunset in 2006.

Dodge Ram SRT 10

The “Performance SUV” Hits Its Stride: The Grand Cherokee SRT8 and TrailBlazer SS

On the heels of the SRT-10’s demise, Chrysler followed up with the Jeep Grand Cherokee SRT8, debuting in 2006 with 420hp. Car and Driver compared it against Chevy’s 395hp 2006 TrailBlazer SS and found that the Chevy was nearly a second slower at the dragstrip, clocking a 14.1 to the Jeep’s 13.2, but still matching the straight-line performance of the original Typhoon. While the Grand Cherokee SRT8 remained in production through the generation change in 2011 (and gained more than 55hp), the SS ended its run after the 2009 model year with just over 26,000 sold in four years, or about 1.7 percent of total TrailBlazer production. 

Chevy Trailblazer

The 2011 SRT Grand Cherokee upgraded the V8 HEMI to a rated 475hp and 470 lb-ft but lost ground both in terms of performance and affordability. In a July 2012 Car and Driver comparison test against the BMW X5 M, Mercedes ML63 and Porsche Cayenne Turbo, the Jeep ranked last overall, but was praised for being the “bargain” of the group with an MSRP more than $34,000 lower than the winning BMW.

Jeep Grand Cherokee

While Chrysler would be hard-pressed to match the snob appeal of BMW, Mercedes, or Porsche, they had a ready answer for power in the 707hp supercharged Hellcat HEMI and leapfrogged the competition with the Trackhawk.

Imitated but Never Duplicated

That brings us back to where we started, with today’s very fast, very heavy and very expensive “sport trucks” capable of performance that would shame anything you could buy at the dawn of the ‘90s. So why are the Syclone and Typhoon still so desirable? Maybe it has to do with defining the meaning of the sport truck and SUV segment, and the fact that everything that followed, from Lightning to Urus, owes a little bit to those folks at GM who took an insane idea and ran with it.

GMC Typhoon Black

But maybe it’s that same magic that made the original GTO so special—maximum engine, minimum gingerbread. That’s something today’s super-SUVs haven’t captured, as their engine output and price tags have soared into the stratosphere. Give us a GMC Canyon standard-cab short bed or a body-on-frame three-door Chevy Blazer based on the same chassis with full time AWD and the 455hp LT1 V8 from the Camaro and Corvette. Price it to split the difference between the Camaro SS’s $38,000 base price and the Corvette’s $57,000 MSRP—call it $47,600 to match what a 1991 Syclone would cost in today’s dollars. Keep it simple and don’t overload it with a lot of options that add weight and cost.  

But most of all, paint it black on black. 

Special thanks to the GM Media Archive for providing original high-resolution images.

The Ranger Raptor is the latest performance truck to be announced, but it might not be coming to the U.S.

Reaching New Heights: The Chevy Prerunner Inspired by an 80s TV Show

$
0
0

Perhaps one of the most iconic high-flying vehicles on your TV during the 1980s, the 1982 GMC K-2500 featured in the popular adventure show The Fall Guy wowed audiences of all ages with its death defying stunts. The show featured a Hollywood stunt man (played by Lee Majors) who had a side-gig using his skills and trusty GMC truck to find and capture fugitives of the law. Over the years, this truck has inspired many replicas built by fans of the show, but putting a new twist on this classic is something we hadn’t seen before.

That is, until we met Wyatt Pemberton. A Texas native, and no stranger to off-road racing, Wyatt decided it was finally time to build his 2013 Silverado 1500. He knew he wanted to build something that performed well in the desert, handled daily driving on the pavement with comfort and looked unique from the hordes of other Chevy prerunners out there. The end result became a build that can pick up the kids from school and handle extended abuse in the dirt.

Wyatt's Silverado on the sand dunes

Of course, when Wyatt started the build, the first thing to go was the stock suspension. Wyatt called up the GM suspension pros over at Mazzulla Offroad for one of their CAD-designed long travel systems, which boasts 18 inches of travel using King coilovers and secondary bypass-shocks. The benefit of a long travel IFS system, with coilovers and bypass shocks, really lies within its tunability. Being able to easily adjust ride height and shock damping is crucial when building a truck with suspension performance in mind.

The Mazzulla Offroad front suspension system

Mazzulla’s kits have been race-proven for years and subjected to some of the harshest terrain in the West, which is why Wyatt also looked to them for a rear suspension system that performed well but kept the full use of the Chevy’s bed. Mazzulla’s rear cantilever suspension mounts the coilovers laterally, using pivots from the rear axle to gain as much wheel travel as possible, all the while staying tucked up under the bed and out of the way.

The Mazzulla rear cantilever suspension system

But Wyatt didn’t end his shopping spree with Mazzulla at the suspension. He went ahead and ordered their front and rear bumpers, finishing the overall prerunner look of this Chevy. In addition to improving the aesthetics on the truck, Mazzulla’s bumpers increase the approach and departure angles, and increase ground clearance.

Wyatt's Mazzulla rear bumper

No build is complete without a set of big tires, and the Fall Guy tribute prerunner is no exception. Where most half-ton Chevy prerunners roll on 35s or 37s, Wyatt took his build a few steps further. Wyatt outfitted his truck with a set of massive 40x13.50R17 Nitto Trail Grapplers, a task that took him over a month to accomplish. The Nitto Trail Grapplers provided the ultimate off-road performance Wyatt needed for this truck and at the same time expanded his half-ton prerunner into Ultra4 size tire territory. The amount of work it takes to tastefully clearance 40-inch tires on this truck is enormous, but Wyatt was determined. The end result, wrapped around Walker Evans 17-inch beadlocks, really set this truck apart from the rest.

Nitto 40x13.50x17 Trail Grapplers on Walker Evans beadlocks

Once the hard parts of the build were finished, Wyatt knew he wanted to wrap the truck. The two-tone “Fall Guy truck” theme wasn’t Wyatt’s idea at first, but with some convincing, he finally agreed to it and tasked Underground Graphics of Houston with the job. In addition to the vinyl wrap, Wyatt installed some KC HiLites LEDs and a Bak Industries RollBAK tonneau cover to tie the details together. The final product came out better than Wyatt could have imagined, and we think so too! Wyatt also has Dave Gutwillig from Brave Motorsports in Houston to thank for his dedication to completing this build.

Wyatt's Silverado on 40-inch Trail Grapplers

Although a modern departure from the original Fall Guy Truck, Wyatt’s Silverado remains one of those builds we couldn’t just walk past. The well-executed details, stout suspension performance and unique aesthetics make it a show-worthy build in its own right. And while you probably won’t see Wyatt’s truck jumping 50 yards over a school bus and into a swamp, you might see it flying across the open desert, soaking up every bit of the Wild West terrain.

Check out more unique rides, from trucks to supercars!

Budget Diesel Mods: ’94-’98 Cummins

$
0
0

While 400, 500 and even 600rwhp has become commonplace with today’s diesel pickups, this was the platform that helped bring diesel performance to the masses: the ’94-’98 Dodge Ram equipped with the P-pumped 5.9L Cummins. Thanks to the mechanical, Bosch P7100 injection pump, the engine was much more akin to something you’d find in a tractor on the farm than in a consumer vehicle—and as such, the good old boys were quick to break out the wrenches and turn up the wick on the P-pump. Some 25 years later, there are literally thousands of people that know how to get an extra 100-120rwhp out of the P-pumped Cummins using nothing more than a few simple hand tools.

Although we would be remiss if we didn’t recommend you start with all the free mods (full-forward AFC, turned star wheel, fuel plate delete, etc.), it’s important to know that with an extra 100-120rwhp on tap, the factory automatic or the stock clutch in five-speed manual probably won’t like it, or harness it very well. For this reason, and in keeping with our theme of ensuring your budget allows you to enjoy the power you add to your truck, you’ll have to fork over the cash for a built transmission rather quickly. If you drive an NV4500-graced ’94-’98 Ram, you can literally cut the second and third budgets listed below in half (this five-speed manual transmission is one stout S.O.B. and only requires a clutch upgrade and a larger input shaft to handle major power).

Own a ’98.5-‘02 model second-gen? Stay tuned. We’ll show you how to turn your sluggish, VP44-equipped Cummins into the ultimate play toy/workhorse in the next installment.

'94-'98 Cummins Truck

Things to Keep in Mind:

  1. These trucks are old. They were produced more than 20 years ago, so don’t expect everything to be in perfect condition (injectors, transmission, turbo).
  2. The ’96-’98 versions of the 5.9L (specifically trucks equipped with the NV4500 manual transmission) offer more performance potential than ’94-’95 engines, as the later engines benefitted from a 215hp P7100.
  3. Owners of manual transmission ’94-’98 Rams can save themselves a lot of money by not having to build the transmission, although a reputable dual disc clutch and possibly an input shaft upgrade should be installed at higher power levels.
  4. Each budget assumes you’re starting new, with a bone-stock truck.
  5. Most of the items listed in these budgets is stuff that you and a buddy or novice mechanic could install in a weekend. The labor to have these parts installed has purposely been excluded.

$1,600 Budget (230–300rwhp)

Full-Forward AFC: Free!

001-Cummins-P-Pump-Air-Fuel-Control

The air fuel control (AFC) assembly controls the P-pump’s fuel rate under low-boost conditions. To bring fuel into the equation at a much lower rpm (and lower boost), slide the AFC assembly completely forward.

Adjust the Pre-Boost Screw: Free!

002-Cummins-P-Pump-Smoke-Screw

By “adjust” we mean back out the pre-boost screw (i.e. “smoke screw”). Backing out the pre-boost screw changes the pump’s governor linkage and also adjusts the rack forward, thereby bringing considerably more fuel in at low engine speed and boost levels.

Turn the Star Wheel: Free!

003-Bosch-P7100-Star-Wheel-Cummins

Located inside the AFC housing, the star wheel can be turned toward the passenger side of the truck to open the fuel rack more. A bit of trial and error is required here in order to find the perfect balance between added power and streetability.

Remove the Fuel Plate: Free!

004-Bosch-P7100-Fuel-Plate

Another freebie, this one allows for full rack travel within the P7100. It calls for you to remove the AFC housing, a tamper-proof bolt and the two fuel plate mounting bolts in order to do it, but—like everything mentioned above—it can be done with a few simple hand tools. Removing the fuel plate usually adds 30-40hp.

Mack Rack Plug: $15

005-Mack-Rack-Plug-Bosch-P7100-Cummins

The Mack rack plug has been a go-to, cheap horsepower trick for P-pump owners for as long as we can remember. By increasing rack travel from 19mm to 21mm, it allows approximately 70ccs more fuel into the pump’s plungers and barrels. Depending on your specific setup (P7100 model, fuel plate arrangement, delivery valves and injectors), the rack plug can add anywhere from 10-35hp.

Boost Elbow: $25

006-1994-1998-Dodge-Cummins-Boost-Elbow

With the factory wastegate limiting the Holset HX35 turbo’s ability to make more than 20-22 psi of boost, an adjustable boost elbow (or outright disabling the wastegate) is a necessity. Available from various aftermarket companies, a boost elbow will allow the turbo to produce as much as 35 psi, will help lower your exhaust gas temps and will add 10-20hp to the equation.

3,000 RPM Governor Spring Kit: $115

007-Bosch-P7100-DDP-Governor-Spring-Kit

In stock form, the P7100 is governed at approximately 2,700 rpm—and the governor actually begins to de-fuel as early as 2,400 rpm. Installing 3,000 rpm governor springs will broaden the power curve of the engine. Note that most kits come with both 3,000 rpm springs and 4,000 rpm springs, but without stiffer valve springs we would stick with the 3,000 rpm units.

4-Inch Exhaust System: $240

008-Cummins-Exhaust-System

Aftermarket, 4-inch diameter exhaust systems are pretty affordable for second-gen Cummins trucks. The turbo-back system shown comes from Diamond Eye Performance, is aluminized and comes without a muffler or exhaust tip. Like all aluminized exhaust systems, it won’t last as long as its stainless steel counterparts, but second-gen owners living in the rust belt can still expect to get five to six years of use out of it.

Big Honkin’ Air Filter: $45                                       

009-Cummins-FleetGuard-Air-Filter

To provide the turbo more airflow on the cheap, many second-gen owners run the BHAF from Fleetguard (PN AH1141). This massive air filter’s biggest claim to fame is its ability to offer high flow at low cost.

Auto Meter EGT and Boost Gauges with Pillar Pod: $300

010-Auto-Meter-Pyrometer-Gauge

While adding power to a ’94-’98 Cummins is stupid-easy, don’t burn down the barn! Get yourself a pyrometer to measure exhaust gas temperature (EGT) and a boost gauge to keep tabs on the turbo. As a general rule of thumb, don’t spend a lot of time above 1,400 degrees on the pyro or allow the turbo to see 35 psi of boost for extended periods.

Killer Dowel Pin (KDP) Repair Kit: $65

011-Cummins-Killer-Dowel-Pin-Kit

Before you get too carried away in adding power to your P-pumped Cummins (or any ’89-’02 5.9L for that matter), it pays to address the killer dowel pin issue before it’s too late. During assembly at the factory, a dowel pin was pressed into the Cummins’ block in order to locate the timing gear housing. Over time, this pin can work its way loose and cause catastrophic internal damage. At just $65, TST Products offers one of the most affordable killer dowel pin repair kits on the market.

Upgraded Torque Converter or Clutch: $800

012-First-Gen-Cummins-Goerend-Converter

While some torque converters in the 47RH and 47RE automatic transmissions (and clutches in the NV4500 manual transmission) will hold up to these mods, many will not. For this reason, it’s wise to make sure you install a converter or clutch with enough holding power to be able to actually use your newfound power. Goerend Transmission offers a sound, single disc converter with a low-stall speed for $800, while South Bend builds several entry level clutches (rated for at least 400hp) in this same price range.

$7,600 Budget (425–450rwhp)

5x12 Injectors: $600

013-Cummins-Fuel-Injectors

There are literally dozens (if not hundreds) of ways you can go with 12-valve Cummins injectors. However, when it comes to getting the most bang for your buck, we’ve never forgotten what the 370 Marine-based, 5x12 injectors from Garmon’s Diesel Performance are capable of when used in conjunction with longer delivery valve springs and a bump in P-pump timing (430rwhp on a stock turbo). If you’re not up on your diesel injector lingo, 5x12 refers to the amount and size of holes in the injector’s nozzle. In this case, the injector nozzle has five holes, each measuring twelve-thousandths of an inch (or 0.012 inches) in diameter. The combination of making sure these injectors have had their pop-off pressures matched to one another and that the P-pump’s timing has been advanced 17 to 18 degrees is vital in getting the most out of them.

*Keep in mind that fine adjustments of the AFC, pre-boost screw and reintroduction of a fuel plate (stock or aftermarket) may be required in order to achieve the perfect balance of drivability and power.

Delivery Valve Springs: $90

014-1994-1998-Cummins-Delivery-Valve-Springs

Longer delivery valve springs offer more efficient fuel delivery, a crisper throttle, increased power and cleaner emissions. Note that in this instance we’re talking about longer delivery valve springs being matched to a set of the Garmon’s Diesel Performance-built 5x12 injectors mentioned above.

Ported Stock, 14cm2 or 16cm2 Turbine Housing: $150-$200

015-Cummins-Holset-HX35-Turbo-Housing

Opening up the exhaust flow of the factory turbo (especially the Holset HX35 on ’95-’98 models) can add significant power, along with reducing EGT. With a freer flowing turbine side, be it via a ported factory (12cm2) housing or a larger A/R housing (14cm2 or 16cm2), the HX35 can support more than 450rwhp.

Firepunk Diesel Street & Track Transmission: $5,250

016-Firepunk-Diesel-Dodge-Automatic-Transmission

While we know that 5K is no small chunk of change, the Chrysler automatics the folks at Firepunk Diesel put together are proven to last whether you commute, tow or race your truck on a regular basis. At this price point, you get a billet triple-disc torque converter from Diesel Performance Converters, a competition master rebuild kit with added direct drum and Overdrive clutches, one of Firepunk’s high-pressure valve bodies and a slushbox that’s rated for 550hp. Most importantly, it comes with a billet input shaft (the factory input is at risk of breaking around 400rwhp).

*IMPORTANT: If your truck is equipped with the NV4500 manual, all you’ll need is a clutch upgrade. That means instead of spending $7,600 to get to this point, you’re spending just $3,300.

Aftermarket Fuel Supply System: $599

017-Air-Dog-Fuel-System

It’s never worth taking a chance on starving the P7100, so we would advise installing an aftermarket fuel supply system as soon as possible. This compact system from AirDog comes with a pump that flows 100-gph and is preset to deliver 25 to 30 psi to the P-pump under all driving conditions.

  • Full-Forward AFC (Mentioned Above): Free!
  • Adjust the Pre-Boost Screw (Mentioned Above): Free!
  • Turn the Star Wheel (Mentioned Above): Free!
  • Remove the Fuel Plate (Mentioned Above): Free!
  • Mack Rack Plug (Mentioned Above): $15
  • Boost Elbow (Mentioned Above): $25
  • 3,000 RPM Governor Spring Kit (Mentioned Above): $115
  • 4-inch Exhaust System (Mentioned Above): $240
  • Big Honkin’ Air Filter (Mentioned Above): $45
  • Auto Meter EGT and Boost Gauges with Pillar Pod (Mentioned Above): $300
  • Killer Dowel Pin (KDP) Repair Kit (Mentioned Above): $65

$11,000 Budget (515–550rwhp)

ARP Head Studs: $450

018-ARP-Custom-Age-Head-Studs-Cummins

Although we’ve seen stock head bolts hold up to 100 psi of boost on a 5.9L Cummins, it’s best to play it safe when running 50+ psi of boost. Even threading one ARP head stud in at a time has been known to not cause any head gasket issues on high-mile engines.

5x18 Injectors: $900-$1,000

019-Cummins-5x18-Fuel-Injectors

Big power calls for big sticks and these injectors have been known to support north of 700rwhp with the right amount of air (turbos). Spec’d for the stock piston bowl, they feature SAC style nozzles with each hole measuring 0.018 inches.

024 Delivery Valves: $275  

020-P-Pump-Cummins-Delivery-Valves

To match the larger injectors, fuel flow to the injectors needs to be increased. These Bosch delivery valves can be sourced through Pure Diesel Power. Without changing anything else (and according to your specific P-pump’s setup) they can add as much as 25rwhp.

4,000 RPM Governor Spring Kit (Mentioned Above): $115

021-Bosch-P7100-DDP-Governor-Spring-Kit

At this point, it’s time to go with the 4,000 rpm governor springs over the 3,000 rpm units, along with stiffer valve springs in the head. More on that below.

180 LB Valve Springs: $450

022-Cummins-Valve-Springs

With added boost, drive pressure and rpm in the mix at this power level, valve float and creep will be inevitable with the factory valve springs. These 180 lb springs eliminate all of that and come with retainers and keepers.

64mm S300 Turbo: $1,900-$2,100

023-S300-Turbocharger-Cummins

There are a lot of options in the aftermarket for the S300-based BorgWarner turbos, so the 64mm (compressor inducer) is a general direction to go once you reach this power point. Don’t forget to take your elevation, driving style and what tasks you use the truck for into consideration when spec’ing out the perfect turbo for your needs. We would also choose a charger that utilizes either a 71mm or 74mm turbine wheel (exducer), as the common 65mm often doesn’t flow enough in bigger injector applications. Later on down the road, a 64mm S300 works great in compound arrangements—so it’s a solid investment in your truck’s performance future.

  • Delivery Valve Springs (Mentioned Above): $90
  • Firepunk Diesel Street & Track Transmission (Mentioned Above): $5,250
  • Aftermarket Fuel Supply System (Mentioned Above): $599
  • Full-Forward AFC (Mentioned Above): Free!
  • Adjust the Pre-Boost Screw (Mentioned Above): Free!
  • Turn the Star Wheel (Mentioned Above): Free!
  • Remove the Fuel Plate (Mentioned Above): Free!
  • Mack Rack Plug (Mentioned Above): $15
  • 4-Inch Exhaust System (Mentioned Above): $240
  • Big Honkin’ Air Filter (Mentioned Above): $45
  • Auto Meter EGT and Boost Gauges with Pillar Pod (Mentioned Above): $300
  • Killer Dowel Pin (KDP) Repair Kit (Mentioned Above): $65

Find out 11 reasons why the 12-valve Cummins is the ultimate diesel engine.

1320 for Life: Import Face-Off Meets West Coast Style [Gallery]

$
0
0

When thinking about the import drag racing scene in the America, your mind might wander back to the late 1990s to early 2000s and the era before drifting and time attack went mainstream on these shores.

Import Face-Off White Honda

During those years, import drag racing was at the forefront of America’s sport compact and tuner car scene from coast to coast. It’s amazing to think that youngest of today’s enthusiasts might not even have been born during its heyday.

Import Face-Off Drag Racing

Whether or not you were around for the peak of the sport, you’d be forgiven if you thought it had all but faded away. But you’d be wrong. Import drag racing is actually alive and well. We experienced that first hand over the weekend at Auto Club Famoso Raceway outside of Bakersfield.

Import Face-Off Start

It was there where hundreds of sport compact and tuner cars, and even larger number of spectators, gathered for Import Face-Off, a series of events held at drag strips across the country.

From pro front-drive drag cars to wickedly fast street cars, the staging lanes were packed all day with drivers competing both for money and fun.

Import Face-Off Blue

If you or your ear drums wanted a break from the drag racing action, you could walk through the huge car show area featuring entries from all over the west coast.

Import Face-Off White

We’ve prepared an extended gallery featuring scenes from both the track and the show area, and we’ll be back shortly with a closer look at some of the event’s coolest and most unique cars.

Import Face-Off Blue Front

In the meantime, enjoy the photos, and rest assured that import drag racing is very much alive and well, just as anyone who was at Famoso could tell you.

Like the article? Subscribe to have more sent straight to your inbox!

#VanLife-ing It At Delicas Northwest Meet [GALLERY]

$
0
0

Mitsubishi Delicas bring the heat to #vanlife. These 4-wheel drive, turbo-diesel, cab forward vans look like space-age moon rovers and are possibly the coolest thing to ever be called minivans. Turns out, they make great adventure rigs too. Who doesn’t want 4-wheel drive when the gravel road you’ve been cruising down for 20 miles gets rough or your camp spot turns to mud overnight?

Mitsubishi Delica Van

Delicas have attracted a cult following for their utility, styling and potential for customization. “Delica” is a portmanteau of “delivery” and “car,” as many of these models were intended and used as compact work trucks all over the world. The more popular vintage models for import now are the third-generation Delicas from the late '80s and early '90s, called the L300 or Starwagon.

Mitsubishi Delica Van

Delicas Northwest is a club for owners of Mitsubishi Delicas in the Pacific Northwest to meet up and share tips and stories. Last weekend, nearly twenty Delicas (including one Toyota Hiace and one Subaru micro van) gathered at the IBU Public House in Beaverton, Oregon, on a typically rainy afternoon. All of the Delicas present were turbo diesels imported from Japan, often via Canada due to lighter import restrictions, sporting right hand drive. Many of the rigs were set up for life on the road, with small kitchen setups, mattresses that fold into couches and other camping comforts. Though they look nearly identical at first blush, each van had unique customizations both from the current owners and from the original options when ordered from the factory two or three decades ago.

Mitsubishi Delica Van - Delicas Northwest Meet

Do you have van envy yet? See more in the gallery above.

If you're interested in #vanlife yourself, check out our recent article on importing a micro van or visit Vanlife Northwest to see their current imports and refurbs.

Old Favorites & Unique Racers: The Coolest Builds from Import Face-Off

$
0
0

Now that we've set the scene that was the Import Face-Off 2018 at Auto Club Famoso Raceway, it’s time for a breakdown of our favorite cars from both the drag racing portion of the event and the show and shine. While the staging lanes were dominated by Honda Civics in various states of modification, there was much more to the event than that. Here are our favorites.

240SXs for the 1320

Drifting may be the first thing that comes to mind when you think of the Nissan 240SX, but Import Face-Off featured a couple different S-chassis that were built specifically for quarter mile action.

Import Face-Off 240SX Racing

One of them was this S14 on slicks and skinnies, which was packing not SR20 or LS power under the hood, but a built Toyota 2JZ. Given that the 2JZ-powered Supra has long been a popular drag platform, it’s only natural that you’d get great results with the same motor in the lighter, more affordable Nissan.

Import Face-Off  240SX Engine

Over in the car show area we found another 2JZ-swapped 240SX that was getting a lot of attention—this one a red S13 hatchback wearing JDM 180SX Type X aero parts.

Import Face-Off 240SX Front

The car had an especially cool look with its factory styling. The clean presentation blended beautifully with a unique combo of Desmond Regamasters up front and Weld drag racing wheels out back.

Import Face-Off 240SX Rear

Whether it’s drifting, time attack or drag racing, these cars are just a couple more reasons why the 240SX is one of the world’s most popular and versatile tuning platforms—even if the powerplant happens to be from Toyota.

Import Face-Off 240SX Engine 2

DSM Power

If you followed the sport compact scene in the late ‘90s and early 2000s, you might remember just how popular the Mitsubishi Eclipse and Eagle Talon were among those looking to go fast for cheap.

Import Face-Off Eclipse Rear

Today you don’t hear as many people talking about the DSM cars, but it was nice to see a few examples hitting the track at Import Face-Off, including this first gen Eclipse GSX.

Import Face-Off Eclipse Racing

With Mitsubishi’s legendary 4G63 under the hood, available AWD and a relatively light curb weight, a used first gen DSM is one of the best performance bargains around, and we wouldn’t hesitate to put it into the “future classic” category.

Import Face-Off Mitsubishi Engine

Others might be partial to the looks of the second generation cars, which have an equally high chance of, as they get older, becoming more sought after and harder to find in clean condition.

Import Face-Off Orange Front

For now though, it’s nice to see the DSM platform still getting love from racers, and the ETs they're capable of today are every bit as impressive as they were back in the day.

Import Face-Off Orange Engine

"A Taste of Japan" Nissan Laurel

Over in the car show area, we found one car that couldn't be more different from the sea of drag machines—a C33 chassis Nissan Laurel straight from Japan with some healthy RB power under the hood.

Import Face-Off Nissan Laurel Side

Now that the import flood gates have been opened, it's not nearly as rare to see JDM vehicles at events and meets, but this four-door Nissan still managed to stand out in a big way. 

Import Face-Off Nissan Laurel Engine

We just can't help but love the factory style two-tone paint, Work Equip wheels and most of all the unique four-door hardtop bodylines.

Import Face-Off Nissan Laurel Rear

With the sound of cars ripping down the quarter mile just yards away, we couldn't help but wonder what kind of ETs a car like this would be capable of putting down.

Import Face-Off Nissan Laurel Wheel

Or maybe it would just manji the whole way down the track?

Import Face-Off Nissan Laurel Interior

Not Your Typical Honda Drag Racer

Without a doubt the most popular race car at Import Face-Off was the Honda Civic, but Civics weren't the only Honda models taking to the track.

Import Face-Off Accord Side

This fourth gen CB-chassis Accord Coupe may have been the most unusual Honda running.

Import Face-Off Accord Racing

While this generation of Accord was only offered with SOHC four cylinder engines in the US, this one has had its original engine swapped out for a Honda J-series V6 mated to a manual transmission. Check out the way the engine pops out of the hood in old school street machine fashion.

Import Face-Off Accord Engine

Honda's V6 engines might be some of the most under-appreciated engines out there. When swapped into an older, lightweight chassis like this one, the performance can be downright impressive.

Import Face-Off Accord Racing Rear

How did it do on the track? On the run we saw, it went through the traps to the tune of 12.2 seconds at nearly 117 mph. Not bad for an old Accord, eh?

Import Face-Off Orange Racing

Crazy Corollas

Last but not least, we have a pair of cars that were big crowd favorites all day long—two TE72 Toyota Corollas from Del Monte Performance in San Bernardino.

Import Face-Off Corolla Rear

While vintage Toyotas drag cars are quite big in the East Coast drag scene, you don’t see nearly as many here in California. That’s one reason why they were getting so much attention at Famoso.

Import Face-Off Corolla Front

The other reason? They were wickedly quick, both powered by fully built and turbocharged 2RZ four cylinder engines mated to drag-spec automatic transmissions. This was all good for ETs that were into the high eight second range.

Import Face-Off Corolla Engine

Not only did this make the Corollas some of the fastest cars at the event, but they were also some of the most entertaining to watch with their short wheelbases and wheels-up launches.

Import Face-Off Corolla Interior

Watching the former economy cars go through the traps at over 150 mph was easily one of highlights of an interesting day spent at the drag strip. 

Like the article? Subscribe to our newsletter to get more sent straight to your inbox!


Show and Go: A '67/'95 Mustang Built for Speed

$
0
0

There are a lot of beautiful vehicles out there, especially when it comes to the classic muscle car scene, but it's not always about being classically beautiful. Instead, the cars that grab our attention are the ones that do something we'd never expect. When it comes to choosing between unique and wild or beautiful but samey, we'll choose unique every time—and the unique ones often happen to be beautiful as well.

This ethos has sent us on a journey of sorts, and eventually led us to this gorgeous '67/'95 pro-touring Mustang.

Built and owned by Adam Meadors of Lakewood, Colorado, this awesome Mustang is much more than an attention-grabbing show car on Nitto tires. In fact, it's much more interested in going fast on the track than being admired in the parking lot. You guessed it—this Mustang was built for the autocross course, but not in the way you might think.

Many the Years

Like many vehicles in the autocross scene these days, this Mustang was built, not bought. While that alone doesn't make the car special, the fact that it took six years to build does. Between tight budgets and a lack of time, we all know how projects can take longer than we'd like. Fortunately for Meadors, not only is his build finally complete, but it ended up being a great autocross car, too. It was well worth the wait.

Put the '95 in the '67

While the car has a classic body, it's actually more of a 1995 Mustang than a 1967. In fact, the only classic muscle car elements of the build are the body and mirrors (and rear bumpers from a '67 Camaro—a little jab at Chevy purists). To save money, Meaders used the drivetrain and chassis from a wrecked 1995 Mustang he bought for $1500. The changes were so wholesale, he actually cut the '95 body off the wrecked car and replaced it with the one from the '67 Mustang.

Easy Upgrades

Because it's mostly a '95 Mustang, getting adequate power and handling is much easier to do on a budget. It has a 5.0L engine, which is good for decent power right out of the gate, but Meaders took it to the next level by adding a supercharger this past winter. Similarly, it's a lot easier to bulk up the more modern chassis and suspension system without spending too much money.

Carbon Fiber all Around

Along with the wholesale changes came making a body out of carbon fiber, front to rear—well, sort of. Instead of painting it once it was finished, Meadors opted to have the car wrapped in a 3M Carbon Fiber wrap so that down the road, if he wanted to change the color scheme, he could do so with little trouble. Meadors then painted the 2015 Jeep Wrangler lime green graphics (his favorite color) over the wrap. Oddly enough, everywhere Meadors takes the car, people debate if the body is truly carbon fiber or if it's a wrap—it's that well done!

Soon, this '67 won't be the only autocross Mustang in Meadors' stable. Building highly capable classic Mustangs for the autocross course is Meadors' thing, and the next build he's working on is a 1966 wide-body pro-touring Mustang. We can't wait to see it!

Like the article? Subscribe to our newsletter to have more sent straight to your inbox!

AE86 Corolla Meets Honda Persuasion

$
0
0

You’re one of two people. Either you're the person who jumped on the AE86 Corolla bandwagon and then realized that the car only makes about 90whp, or you're the one who’s been a fan of the GT-S since before Drift King Keiichi Tsuchiya said it was cool and who always knew they only make about 90whp. Turns out that neither of you can go on defending Toyota’s 4A-GE much longer, an engine that makes half as much power as your niece’s Beetle and isn’t a whole lot more capable.

Despite how good people say the mid-1980s Toyota 16- and 20-valve four-cylinders are, a few decades’ worth of technology says they can be better. By better we mean unloading them for something that's almost 20 years newer, has more than twice the power and doesn’t have a lick of Toyota heritage to its name. We’re talking about retrofitting any one of Honda’s twin-cam F-series or 2.4L K-series engines into place.

It Starts With the Right Corolla

To do all of this you can’t just start with any old Corolla. We’re talking about Toyota’s ’84-’87 GT-S—often referred to as the AE86—offered in coupe and hatchback variations and with that 4A-GE twin-cam engine you want to get rid of. The GT-S and its 4A-GE engine have both proved their historical relevance, having been beaten on in everything from Group A racing in Japan to the British Touring Car Championship, but you care more about horsepower than history, which is why your’e considering throwing out that old box of pistons and rods for something newer.

AE86 Corolla Meets Honda Persuasion White

Choosing the Right Engine and Transmission

Getting in touch with Vista, California’s JSP Fabrication is a smart first move. JSP is prepared to get any S2000-based F-series engine—or just about any of the taller-deck, 2.4L K-series engines, for that matter—to fit within the confines of that 30-year-old Toyota engine bay of yours, but that doesn’t mean picking the right one will be easy. There are as many 1990s Accord F-series engines going for $150 on Craigslist that you think will work but won’t as there are hacked-up Hachi-Rokus that you shouldn’t touch. Success starts with you picking the right engine.

AE86 Corolla Meets Honda Persuasion Engine Good

AE86 Corolla Meets Honda Persuasion Engine Bad

The F-Series

Go with the F-series and you’ve just made the swap a whole lot easier; its intake and exhaust manifolds can be retained since they already point the right way. Even its transmission can be used.

AE86 Corolla Meets Honda Persuasion F-Series Engine

The S2000’s F20C1 and later F22C1 aren’t Honda’s first F-series engines, but they’re the only ones you ought to care about. Look to the 1999-2005 Japanese-spec S2000 for the smaller-displacement F20C and late-2005-2009 models for the bigger F22C. In North America, the F20C1 was available from 2000-2003 until it was replaced with the F22C1 for model years 2004-2009. Special JDM-only Type V and U.S.-only CR models were sold with the exact same 2.0L and 2.2L engines, depending on the year, so don’t get hung up on their fancy-pants nomenclature. If whatever F-series engine you’re looking at is missing a camshaft or has anything at all to do with an Accord, you’re on the wrong track.

AE86 Corolla Meets Honda Persuasion F-Series

Why you might want the S2000's engine isn’t a mystery. Both versions manage 240 hp—the 2.0L measuring in at 153 lb-ft of torque and the 2.2L topping off at 162 lb-ft of torque. For years the smaller-displacement F20C1 held the record for most horsepower per liter for any naturally aspirated engine this side of Ferrari or Porsche. Its 11.0:1 compression ratio and roller rocker valvetrain—both firsts for any North American-bound, four-cylinder Honda engine—along with its maniacally high 1.82:1 rod-to-stroke ratio meant no factory-warrantied 8,900 rpm redline ever felt this right.

The K-Series

Side with the K-series and you’ll need to ditch its intake manifold and transmission for the S2000's, along with exchanging the exhaust manifold for something custom. You’ll also need to figure out a way to get that S2000 gearbox to bolt up to whatever engine you’ve chosen. 

AE86 Corolla Meets Honda Persuasion K-Series Engine

Your obvious choice for the taller-deck K-series is the 2004-2008 TSX that’s fitted with the larger-displacement K24A2, with Japanese variants available by way of the 2004-2008 Accord 24S, 24T, 24TL and Type S chassis. Almost everything else doesn’t feature Honda’s performance-oriented version of i-VTEC or has one of those newfangled exhaust manifolds that are integrated into the cylinder head. You might be able to get one of them to work, but why bother?

AE86 Corolla Meets Honda Persuasion K-Series Engines

Like the smaller-displacement K20A2 that you can’t use, the K24A2 measures in at 200hp at 6,800 rpm but pumps out 166 lb-ft of torque at 4,500 rpm with a 10.5:1 compression ratio. Its 13mm stroke increase and 1mm bigger bore mean more displacement and, as a result, more torque. But all you care about is that, unlike the S2000, this K-series features i-VTEC, which means its intake cam can be constantly manipulated for optimal power by way of the ECU. If there’s any reason you’d choose the K-series over the F-series, this’d be it.

Engine Mounts and Chassis Prep

No matter which engine you choose, now’s the time you’ll pick up the phone and call JSP for one of its mount kits. But first you’ve got to prepare that chassis. It starts with modifying the front crossmember to clear whatever oil pan you’ve got and make room for the anti-sway bar.

AE86 Corolla Meets Honda Persuasion Chassis

Both the K engine’s and the F engine’s oil pans also have to be modified in order to clear. Here, a small section has to be removed and patched back into place.

AE86 Corolla Meets Honda Persuasion Oil Pan

F-series swaps that make the mistake of retaining power steering will need even more clearance. JSP’s brackets are designed to work with the AE86’s original rubber mounts as well as the S2000 transmission’s mounts.

AE86 Corolla Meets Honda Persuasion Mounts

The Drivetrain

The good news is that you won’t be spending a dime on a new rear end. The bad news is that you’ve got to do something to make all of that compatible with the S2000’s transmission that you’ve got to use.

AE86 Corolla Meets Honda Persuasion Axle

Now to deal with that S2000 transmission. If you’ve gone K-series, you’ll need some sort of adapter plate to make it all work with that engine block—of which that Google machine of yours can point you toward some sort of off-the-shelf solution—and a driveshaft made up of S2000 and Corolla bits to hook it all up.

AE86 Corolla Meets Honda Persuasion Transmission

The Intake and Exhaust

Go with that F-series engine and you’ll wind up with an intake manifold with its throttle body already facing the right way and an exhaust manifold that bolts right into place.

AE86 Corolla Meets Honda Persuasion Engine

You and your K-series engines won’t have as much luck with either of those things, which means an adapter from JSP that’ll interface with any S2000 intake manifold as well as some sort of custom exhaust manifold—also from JSP—will be in your immediate future. No matter which engine you choose you’ll need to make sure you’re using one of the F-series’ older, cable-driven throttle bodies.

AE86 Corolla Meets Honda Persuasion Intake

No matter which engine you choose, all of that exhaust piping that’ll ultimately meet up with that Corolla-specific muffler will have to be fabricated to fit.

AE86 Corolla Meets Honda Persuasion Transmission 2

Everything Else

Getting the engine and transmission hung in the right spot won’t be the end of that swap of yours. The brains behind that 4A-GE won’t know what in the world to do with any of that Honda business, which means you’ve got two choices: wire up and configure a Hondata-modified factory Honda ECU into place, like JSP does, or configure just about any MAP-based standalone engine management system to work, like something from AEM. JSP takes the whole swap one step further, adapting a fully functional S2000 instrument cluster to the Corolla’s dash.

AE86 Corolla Meets Honda Persuasion Dashboard

The only other things standing between you and engine swap bliss are hooking up whatever hoses and lines that deliver things like coolant, fuel and hydraulic fluid to all the right places.

AE86 Corolla Meets Honda Persuasion Hoses

To see more cars like this in action, check out our gallery of import drag racing at Import Face-Off!

Budget Diesel Mods: ’98.5-’02 Cummins

$
0
0

In terms of entry-level mods, the ’94-’98 P-pumped 5.9L Cummins is a hard act to follow. Thanks to its electronic VP44 injection pump, the 24-valve version of the 5.9L offered in ’98.5-’02 Dodge Rams can’t pick up a quick 100hp for zero dollars spent. However, for street-driven applications between 300 and 550rwhp, the 24-valve really isn’t any more expensive to make power with than a P-pumped 12-valve. Don’t believe us? Find out for yourself below.

Sure they had their fair share of problems and yes, they’re plagued by weak automatic transmissions and the VP44 is susceptible to premature failure (thanks to the factory lift pump), but once these items are addressed you’ve got a heckuva powertrain on your hands. And don’t forget that what the VP44 lacks in high rpm fueling it more than makes up for at lower engine speeds, where some pretty monstrous torque figures are produced.

Interested in finding out which aftermarket parts the ’98.5-’02 Cummins responds to best? Give the following list a glance. And (once again) stay tuned for more. Mod lists for the common-rail 5.9L and 6.7L mills are coming your way next.

'98.5-'02 Cummins Truck

Things to Keep in Mind:

  1. These trucks are getting older. The last one rolled off the assembly line more than 15 years ago, so don’t expect everything to be in perfect condition (injectors, injection pump, transmission, turbo, etc.).
  2. Between ’99-’01 model year versions of the 24-valve 5.9L, approximately 100,000 blocks were cast with thinner walls near the water jackets than what was found on most ’98.5 and ’02 crankcases. These blocks are known as “53 blocks” and they are liable to crack over time.
  3. Owners of manual transmission ’98.5-’02 Rams can save themselves a lot of money by not having to build up the 47RE automatic, but a reputable dual disc clutch and a larger diameter input shaft should be installed at higher power levels.
  4. Each budget assumes you’re starting new, with a bone-stock truck.
  5. Most of the items listed in these budgets are things that you and a buddy or novice mechanic could install in a weekend. The labor to have these parts installed has purposely been excluded.
  6. Despite all the rumors and horror stories you might’ve heard, a well-maintained VP44 will easily last between 150,000 to 200,000 miles.

$1,900 Budget (270–300rwhp)

Edge Products Hot Comp Module: $725

001-Edge-Products-Hot-Comp-Module

Also known as the Drag/Comp box, Edge Products’ Comp module has long been a favorite electronic power adder in the VP44 Cummins segment. On stock injector ’98.5-’02 trucks, the Hot version of Edge’s Comp box can add as much as 130hp at the wheels, along with 350 lb-ft of torque.

Boost Elbow: $25

002-Dodge-Cummins-Turbo-Boost-Elbow

With the factory wastegate limiting the turbo’s ability to make adequate boost, an adjustable boost elbow is a necessity. Available from various aftermarket vendors, a boost elbow will allow the turbo to produce as much as 35 psi, lower your exhaust gas temperature (EGT) and add horsepower to the bottom line.

Aftermarket Fuel Supply System: $599

003-Air-Dog-Fuel-System

Because the factory lift pump is known to die a slow death, it gradually feeds less and less fuel supply pressure to the VP44. This can lead to both the lift pump and injection pump checking out. Before you get too carried away with modifications, we would install a 100 gph lift pump system from AirDog for this very reason.

4-Inch Exhaust System: $240

004-Cummins-Exhaust-System

Aftermarket, 4-inch diameter exhaust systems are pretty affordable for second-gen Cummins trucks. The turbo-back system shown comes from Diamond Eye Performance, is aluminized and comes without a muffler or exhaust tip. Like all aluminized exhaust systems, it won’t last as long as its stainless steel counterparts, but second-gen owners living in the rust belt can still expect to get 5-6 years of use out of it.

Auto Meter EGT and Boost Gauges with Pillar Pod: $300

005-Auto-Meter-Pyrometer-Gauge

With added fueling and more than 30 psi of boost on tap thanks to the Edge Comp box and boost elbow, make sure you pick up a pyrometer to measure exhaust gas temperature and a boost gauge to keep tabs on the turbo. As a general rule of thumb, don’t spend a lot of time above 1,400 degrees on the pyro or allow the turbo to see 35 psi of boost for extended periods.

$3,400 Budget (380–410rwhp)

100HP Injectors: $684

006-Cummins-Scheid-Diesel-Injectors

Although the stock turbocharger will be nearing its limit, you can get away with throwing a 100hp set of injectors into a 24-valve and having it live. Just make sure you watch your EGT when towing or hot-rodding around. The 100hp injectors offered by Scheid Diesel provide proven power gains and are built using brand new Bosch nozzles.

Upgraded Torque Converter or Clutch: $800

007-Goerend-Transmission-Torque-Converter

While some torque converters in the 47RE automatic transmission (and the clutch in the NV4500 and NV5600 manual transmissions) will hold up to these mods, most won’t be able to hack it for very long. For this reason, it’s wise to make sure you install a converter or clutch with enough holding power to be able to actually use your newfound power. Goerend Transmission offers a sound, single disc converter with a low-stall speed for $800, while South Bend builds several entry-level clutches (rated for at least 400hp) in this same price range.

  • Edge Products Hot Comp Module (Mentioned Above): $725
  • Boost Elbow (Mentioned Above): $25
  • Aftermarket Fuel Supply System (Mentioned Above): $599
  • 4-Inch Exhaust System (Mentioned Above): $240                                              
  • Auto Meter EGT and Boost Gauges with Pillar Pod (Mentioned Above): $300

$5,300 Budget (425–450rwhp)

62mm Turbo: $1,575

008-High-Tech-Turbo-Cummins

Rated for up to 525rwhp, High Tech Turbo’s drop-in HTB2/62 Street Stock charger is a nice complement for 100hp injectors. EGT will be cooler and the added airflow will yield more power over the previous budget. This turbo utilizes a 62mm compressor wheel, 65mm turbine wheel and a 14cm2 turbine housing.

Cold Air Intake: $299

009-SB-Cummins-Cold-Air-Intake

At this point (and especially with a higher flowing turbo feeding the engine), we would throw a quality aftermarket cold air intake from S&B Filters on the truck. These systems ease serviceability, match or exceed the factory filtration standard and offer an oiled air filter option that’s reusable.

  • 100HP Injectors (Mentioned Above): $684
  • Upgraded Torque Converter or Clutch (Mentioned Above): $800
  • Edge Products Hot Comp Module (Mentioned Above): $725
  • Aftermarket Fuel Supply System (Mentioned Above): $599
  • 4-Inch Exhaust System (Mentioned Above): $240                                              
  • Auto Meter EGT and Boost Gauges with Pillar Pod (Mentioned Above): $300

$13,300 Budget (550–570rwhp)

150HP Injectors: $830

010-Cummins-Performance-Injectors

The best way to make power with a VP44 is to add a sizeable set of injectors. If your goal is to breach the 500rwhp mark, it’s going to take a set of quality 150hp units from a name such as Scheid Diesel (priced above), Industrial Injection, or Dynomite Diesel Products to get you there.

High Output VP44: $1,791 

011-Cummins-Bosch-VP44-Injection-Pump

While solid power figures can be made using the standard output (factory) VP44 pump, the aftermarket’s high output versions (also known as “hot rod” pumps) undoubtedly make more power. On bone-stock ’98.5-’02 Rams, Scheid Diesel’s High Output VP44 can add as much as 100 additional horsepower. In person, we’ve seen it add 75rwhp to a truck running 100hp injectors and a mild tuning module.

S300 Turbo Upgrade: $2,000

012-Industrial-Injection-Phat-Shaft-Turbo

Both BD Diesel’s Super B Special 63mm SXE and Industrial Injection’s Phat Shaft 64mm will support 550 to 570rwhp and both retail for roughly the same price—so you can’t go wrong with either one. Both chargers feature a forged milled wheel (FMW) compressor wheel, a 360-degree thrust bearing for ultimate reliability and a T3 turbine inlet flange.

Aftermarket Exhaust Manifold: $431

013-BD-Diesel-Exhaust-Manifold

All of the ’98.5-’02 trucks we’ve seen clearing 550rwhp on 150hp injectors have had an aftermarket exhaust manifold in the mix. With a reputation for building durable, high-flowing Cummins exhaust manifolds, a T3 Pulse manifold from BD Diesel would be the route we would take.

Heavy-Duty Valve Springs: $399

014-Hamilton-Cams-Cummins-Valve-Springs

Hamilton Cams’ heavy-duty, 103-pound valve springs rule out valve float and valve creep under high rpm and excessive boost conditions. While high rpm isn’t of much concern with the rpm-limited VP44, the 35 to 50 psi worth of boost you’ll see with this setup can lead to reversion with the factory (78-82-pound) valve springs left in the head.

ARP Head Studs: $415

015-ARP-Custom-Age-Head-Studs-Cummins

Although the 24-valve 5.9L Cummins’ stock head bolts hold up well to big boost and high drive pressure, it’s best to play it safe when running elevated pressures. Even threading one ARP head stud in at a time has been known to not cause any head gasket issues on high-mileage engines.

Firepunk Diesel Street & Track Transmission: $5,250

016-Firepunk-Diesel-Dodge-Automatic-Transmission

While we know that $5,000 is no small chunk of change, the Chrysler automatics the folks at Firepunk Diesel put together are proven to last whether you commute, tow or race your truck on a regular basis. At this price point, you get a billet triple-disc torque converter from Diesel Performance Converters, a competition master rebuild kit with added direct drum and Overdrive clutches and one of Firepunk’s high-pressure valve bodies. Most importantly, it comes with a billet input shaft (the factory input is at risk of breaking around 400rwhp).

*IMPORTANT: If your truck is equipped with the NV4500 (’98.5-‘02) or NV5600 manual (’01-’02 H.O.), we would recommend adding a 3250 dual disk clutch from South Bend at this point. That means you aren’t spending $13,300 to get to 550+rwhp, you’re spending less than $10,000.

  • Cold Air Intake (Mentioned Above): $299
  • Edge Products Hot Comp Module (Mentioned Above): $725
  • Aftermarket Fuel Supply System (Mentioned Above): $599
  • 4-inch Exhaust System (Mentioned Above): $240
  • Auto Meter EGT and Boost Gauges with Pillar Pod (Mentioned Above): $300

Upgrading a different engine? Check out all our other budget diesel mods articles!

Wanderlust or Insanity: 5 Surprises From Living on the Road

$
0
0

On my former daily commute, I’d pass a roadside RV dealership, daydreaming the rest of the way home. One day late last summer, I succumbed to the urge and stopped. After arriving home late, I anxiously explained the delay to my wife, to which she softly, but excitedly replied, “Ok, let’s do it!” Now, we’re living the millennial’s dream, nomadically traveling the country. We’re camping wherever our hearts desire, from beach-front parks to Walmart parking lots and everything in between.

Wanderlust Walmart

Departing from Southern California, we’re road tripping up the west coast and back to LA, then this rolling stone will eventually grow moss in North Carolina. Our long-term goals are to be closer to my family, settle down and eventually buy a home. The goals for this road trip are to explore different communities and see extraordinary sights, all while being paid to document our experience.

Currently, I’m working on the road as an editor-at-large and photographer. We sold most of our possessions and are now surviving with the bare essentials. It all sounds idyllic, but I’ve quickly learned difficult lessons. Here’s some of our experiences from the first month we’ve been on the road. 

1. Every Day Is an Adventure

Living on the road is a romantic notion—adventure awaits every turn. Gone are the repetitions of my normal evenings, slothing around in front of the TV and getting to-go orders from the same burrito joint every week. Now, I awaken in a new place every few days. It’s a liberating feeling with endless possibilities—at least I thought so.

Imagine living everyday on vacation. It sounds great, right? You have the ability to ignore the bills, postpone chores and set up an out-of-the-office-reply email. However, while attempting to work on the road, I’ve realized that there are consequences for ignoring daily responsibilities. After all, it’s not a sabbatical. You can’t afford to be absent, like a typical vacation. Abrupt realities hit us, as bills began to pile up and the influx of assignments did not match the debt we were incurring. We needed a system to operate smoothly.

Wanderlust Family

Developing a routine and planning out our weeks at least a few days beforehand has improved our adventures and eased my anxiety. I work a few days, then try to spend family time exploring the local scene or hiking to a new view. It’s hard to recreate this feeling through an afternoon trip to the park, and I’m making memories in places I never thought I would. 

For instance, one Saturday through the coastline of Oregon on U.S. Highway 1, we stopped at multiple vista points. I don’t remember them well. What I do remember is spending the afternoon playing on the playground of a local elementary school with my son and then my wife making dinner in the empty parking lot—a day I fondly cherish.

Wanderlust Panorama

This experience has turned my life upside down, but that’s a part of the fun. Every day, as we uncover the unfamiliar, we learn unexpected lessons and experience exciting changes.

2. RV Nerds Abound

“Oh, I see you have the OOMPA5000, yeah I’ve got the LOOMPA8000. It’s great. I used to have yours, but needed something bigger. Do you like it? We diesel with extra gizmos and a few ACME upgrades.” —Every New Camper I Encounter

Wanderlust Rust

I’ve quickly discovered I’m a RV nerd. Luckily, though, I’m in good company. When I discuss the trip, I quickly hone in on technical aspects: custom tow vehicle touches, camper size and various upgrades. But who cares? Apparently, everyone does. The first six people I’ve met at RV parks talked about their setups, what they learned and returned with genuine and enthusiastic curiosity about my own.

3. Tourist Spots Are the Best and Worst Sites

Generally, people use RVs and campers to occasionally camp, tailgate or party—not us. We’re living our day to day lives with no real separation from the weekend, which means bedtime for a toddler is at 8 p.m., and the loud partying is more than a nuisance.

Wanderlust Econoline

Bolsa Chica RV camp has no Wi-Fi, no sewage and no cable, but ample Saturday-night drunks. People go there to party on weekends, which turns me into the grumpy old neighbor standing on my front step in black socks, sandals, boxers and a scowl, yelling at everyone to quiet by 9 p.m.  

The tourist spots, such as a beachfront campsites or state parks, are limited in their amenities, but a lack in features doesn’t translate to a reduction in price.

Wanderlust Rust Family

But who can resist that exquisite view? As aforementioned, tourist resorts are the best and worst sites.

4. A Slim Wallet and Full Stomach

When listing all of the grand ideas to convince myself this trip is a good idea, I trusted that this new lifestyle had every potential to be healthier. Without a daily traffic-jammed commute or pointless corporate meetings, I’d now have time to work out and cook every meal.

Wanderlust Food 1

However, temptation is at every gas station. Did someone say they wanted Skittles? Yes, please. Sign me up. Also, my morning to-do list includes planning our next stop, hooking or unhooking the camper, making minor repairs, and editing photos or a story—so exercising doesn’t always make the top 10. 

We often find ourselves in populated areas impulsively purchasing something we probably don’t need. Transitioning into the camper has been a major learning experience. I constantly fight the urge to buy a gizmo to solve a newly learned dilemma, a knock-off Dirt Devil to help clean up after the kid after a messy meal or double-sided tape for the windows to lock in heat. I must keep my wallet and appetite in check.

Wanderlust Food 2

On the bright side, we stock up at local farmers markets for fresh produce. This aspect improves our diets, albeit expensively. When our campsite is close to town, I ride my bike to the nearest coffee shop, which has been a great source of exercise and saves gas money.

5. You Need to Mentally Prepare

Prepping for the day’s journey, while also creating an endless list of my responsibilities, has been difficult. I’ve transitioned from having a full-time job with regular hours and an office to now sharing personal space at Starbucks. My former outlets for stress, my garage and office, are gone. I used to have different outlets to decompress and calm my nerves. Those meditation practices are now channeled into tinkering with the camper or van.

I’m slowly adjusting to the new surroundings while overcoming certain psychological barriers. Time management is important. Everyday struggles include balancing my professional life, personal needs, important family time and physical maintenance on the van, all while trying to enjoy life on the road.

Wanderlust Rust Child

My father used to jolt me awake on the weekends, so I didn’t get used to sleeping in. Waking up early and consistently has helped my transition into self-employment and living on the road. 

The hours in the day become lost when I wake up late, walk the dog, pay the RV campsite spot, fix a problem on the camper and answer a few emails. It’s a never-ending cycle, but it’s best to be proactive. I will constantly be working on self-discipline. It’s easy to get sidetracked with the never-ending list of tangible responsibilities.  

Daydreamin’

My daydream has become our reality. Living on the road has been challenging, yet incredibly rewarding. With a little planning, some savings and a great support team, nearly anyone can indulge their musings. It’s really a matter of letting go of your current lifestyle and being flexible and excited about what this journey really has to offer. So, the next time you have your head in the clouds, buy a plane ticket, or an affordable RV, and seek adventure.

Wanderlust Family

Interested in living on the road? Here are 7 things you should know before selling everything and moving into an RV.

Red Dragon 2.0: Loren Healy’s Latest 4400 Masterpiece

$
0
0

In Ultra4 Racing, there’s no sure-fire recipe for success. Unlike stock-car racing where each vehicle must fit a specific spec template, the rules for the premier 4400 class leave plenty of room for diversity. It’s this rich mix of racers and build philosophies that keeps the sport so interesting. From the age-old motorsports debate of front vs. mid-engine design, to solid-axle vs. IFS, there’s been no one-size-fits-all 4400-car chassis to become the gold standard.

As the sport continues to evolve, we are now seeing many of the top racers revert from a single-seat chassis back to a two-seat car. This is largely due to many of the longer desert races where a navigator can be a critical addition. One racer that was eager to get back into a two-seat setup was Nitto Team driver Loren Healy. A few months ago, we gave you the sneak peek at Healy’s Jimmy’s 4x4-built Red Dragon 2.0. The all-new 4400 car was set for its big debut at the most coveted Ultra4 Race—King of the Hammers. However, after logging some test laps out in the desert, Healy soon realized that there was an issue with his freshly-built 454ci LS engine.

This would ultimately lead to him running his backup car at KOH—the race-proven Red Dragon. While Healy was hoping to make a hard charge with his new 780hp two-seater, the original Red Dragon still managed to pull off an impressive seventh place finish. The one plus side out of all of this (for us at least) is we were able to get a close up look at the Red Dragon 2.0 before it gets a hard workout this year. Healy and his team are currently busy getting all of the new-car blues taken care of, and we’ll have an in-depth video feature of the car very soon. Until then, you can learn more about the Red Dragon 2.0 in the feature breakdown below.

Loren Healy Jimmys 4x4 Red Dragon 2.0 Ultra 4 MBRP Nitto Tire Side

There are plenty of differences between the original Red Dragon and 2.0, but the most obvious is the fact that there are two Sparco suspension seats instead of one. With the engine now placed behind the driver’s compartment, a custom fuel cell was fabricated behind the seats. This allots room for a custom Pytrotect bladder and 60 gallons of go juice. Pumping this fuel are dual Aeromotive A1000 fuel pumps.

Loren Healy Jimmys 4x4 Red Dragon 2.0 Ultra 4 MBRP Nitto Tire Seat

Providing Healy with the rig's vitals is a Holley digital dash, while a 10-inch Lowrance GPS helps the co-driver navigate more effectively. To enable that both the driver and passenger can communicate without needing to yell over the MBRP exhaust, a set of Rugged Radios were installed. Directing the input from the removable Sparco steering wheel is a Howe 3.0 Trophy Truck steering rack.

Loren Healy Jimmys 4x4 Red Dragon 2.0 Ultra 4 MBRP Nitto Tire Dashboard

Channeling the power from the Dart Tall Deck 454ci engine is a Gearworks Turbo 400 transmission. This CBR-cooled custom transmission gets its marching orders from an Art Carr shifter. Behind it, you’ll find an Advance Adapters Atlas II transfer case with a 3:1 low range ratio.

Loren Healy Jimmys 4x4 Red Dragon 2.0 Ultra 4 MBRP Nitto Tire Shifter

Out back, you’ll find a Spidertrax Pro Series housing with 4-inch diameter, 0.250-wall 4130 chromoly axletubes. It’s holding a GearWorks third member that’s paired with 5.43 gears and a spool. Since the front of the engine is facing the back of the car, the low-pinion third member is flipped to allow for the tires to turn in the forward direction.

Loren Healy Jimmys 4x4 Red Dragon 2.0 Ultra 4 MBRP Nitto Tire Axle

Jimmy’s 4x4 has just about perfected long-travel four-wheel drive IFS Ultra4 cars and Healy’s rig is a shining example of that. Inside of the Spidertrax IFS differential housing you’ll find a flipped LP US Gear 10-inch differential and 40-spline ARB Air Locker. This setup feeds RCV Performance series 30 CVs, which sandwich the 300m Spidertrax axleshafts.

loren-healy-jimmys-4x4-red-dragon-20-ultra-4-mbrp-nitto-tire

Creating the ability to fully cycle 19 inches of vertical wheel travel is a King 2.5 series coilover shock running next to a 3.5 King bypass. The car nets 8 inches of down and 11 inches of up travel. For when Healy does max out the suspension, King 3.0 series bumpstops are there to ease the impact.

Loren Healy Jimmys 4x4 Red Dragon 2.0 Ultra 4 MBRP Nitto Tire Suspension

Tucking the King 2.5 coilovers and massive 4.0 bypass shocks out of harm’s way is a triangulated four-link using trailing arm uppers. This setup makes for an impressive 30 inches of travel, with 14 of that being up! Helping to keep the rig stable are 35-spline PAC Racing sway bars.

Loren Healy Jimmys 4x4 Red Dragon 2.0 Ultra 4 MBRP Nitto Tire Shocks

The main chassis is comprised of 2-inch, 0.120-wall chromoly tubing that’s stepped down to 1.75- and 1.5-inch sections. The wheelbase comes in at 122 inches, with a width of 92 inches and roof height of 72 inches. The car weighs in at approximately 5,500 pounds.

Loren Healy Jimmys 4x4 Red Dragon 2.0 Ultra 4 MBRP Nitto Tire Side 2

As one of the most dominant tires in all of Ultra4, the Nitto Trail Grappler has earned its spot under some of the fastest vehicles in the field. Healy’s running a 40x13.50R17 version, the same that’s found under his original Red Dragon.

Loren Healy Jimmys 4x4 Red Dragon 2.0 Ultra 4 MBRP Nitto Tire Tires

To ensure the tires stay in place while battling through the extreme terrain, a set of 17-inch Forged KMC Machete beadlocks are used. Peeking out of the wheel is the Spidertrax Ultimate Unit Bearing.

Loren Healy Jimmys 4x4 Red Dragon 2.0 Ultra 4 MBRP Nitto Tire Tires Vertical

Healy’s signature red Vision X LED lights keep the spirt of the original Red Dragon alive, while a Warn 9.5 competition series winch is there just in case. The bodywork on the car is a mix of aluminum and fiberglass panels, all custom crafted for the rig. We can definitely appreciate the Jeep-ish frontend on 2.0 as it lends a more familiar appearance to vehicle. It’s also a good tie-in to Healy’s new Jeep Wrangler JL that he’ll be showcasing at the upcoming Easter Jeep Safari in Moab, Utah.

Loren Healy Jimmys 4x4 Red Dragon 2.0 Ultra 4 MBRP Nitto Tire Close

Looking to put the rough start behind him, Healy is ready to give the car a proper testing. With Ultra4 and major races such as the Baja 1000 on his list this year, Healy will have plenty of opportunity to put the car through its paces. In the meantime, be sure to check out more detailed shots of the car in the gallery below.

Want to see the Ultra4 car with the most wins? Then you have to watch this video of the original Red Dragon.  

Viewing all 5096 articles
Browse latest View live


<script src="https://jsc.adskeeper.com/r/s/rssing.com.1596347.js" async> </script>